| On this page |
Overview 
The ![]() Copy to Points node copies one piece of geometry onto the points of another piece of geometry.
Copy to Points node copies one piece of geometry onto the points of another piece of geometry.
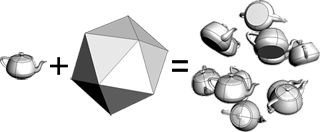
This is very useful for lots of effects, such as snow (copying flakes onto falling points), forests (scatter points on a ground surface and copy trees to them), cities (establish a grid of points and copy buildings to them), and so on.
Copying is similar to instancing, except copying creates real geometry you can manipulate further, allows more variations, and lets you create copies with unique attributes.
How to 
-
Click the
 Copy to Points tool on the Modify tab.
 -
Select the source geometry you want to copy and press Enter.
-
Select the target geometry on whose points to instantiate the source and press Enter.
Transforming the copies 
If the points you copy geometry onto have certain special attributes, Houdini will automatically apply the attributes to the copied geometry. For example, you can set the scale of each copy using pscale (uniform) or scale (non-uniform), or change their orientation using up. See copying and instancing point attributes for more information.
Varying geometry across the copies 
Note
In previous versions of Houdini, this workflow was done using a process called copy stamping. Newer versions of Houdini have a For-Each loop in the geometry network that makes this workflow more efficient, easier to set up, and easier to understand.
The basic workflow for varying the copies when copying geometry to points is to set attributes on the points you are copying onto, then use a For-Each loop to copy the geometry onto one point at a time, modifying the geometry within the loop.
See the tutorial for an example of varying copies.
(Remember that if all you want is to move, rotate, and/or scale each copy, Houdini will do that automatically if you use the right attributes, without needing a For-Each loop.)
Set up point attributes 
-
Create attributes on the target points containing the information you need to create the variations.
-
You can create attributes using an
 Attribute Create node. Or if you're comfortable with VEX snippets, you can use an
  Attribute Wrangle.
 -
For example, you might want to randomly switch between three different pieces of geometry on each point. In this case you could create a
piecenumpoint attribute on the target points with a random value of0,1, or2.To do this in an
Attribute Create, set the attribute’s Name to piecenum, the Class to “Point”, the Type to “Integer”, and the first Value field torand($PT) * 3.In an
Attribute Wrangle, you could use this snippet:i@piecenum = int(rand(@ptnum) * 3);
-
Each point has a unique number (though the point number can change if the geometry is modified). To copy the point number into an attribute so you can use it when copying, use an
 Enumerate node.
(When you copy the point number into an attribute, the convention is to call the attribute
id.) -
A quick trick if you want to generate random numbers on the points in the range 0 → (number of points - 1), is to scramble the point numbers using the
 Sort node's “Random” mode, and then use Enumerate to copy the scrambled point numbers into an attribute.
Tip
You can use the Geometry spreadsheet to see the values of attributes on all points in a node. Right-click a geometry node in the network editor and choose Spreadsheet.
Copy in a For-Each loop 
Create a For-Each loop to copy the source geometry onto one point at a time, using whatever nodes you want to modify the geometry based on attributes on the point you're copying onto.
-
In the geometry network, create a For-Each loop block.
-
Wire the target points with attributes into the For-Each begin node.
The For-Each loop will process each target point one at a time.
-
The default settings for the
foreach_endnode are for a certain workflow (looping over pieces, such as from a shatter) different from copying to points, so you need to change some parameters.-
Set Piece elements to “Points” to make the block loop over points.
-
Turn off Piece attribute so it loops over every individual point instead of trying to group pieces by an attribute.
-
-
Inside the loop, create a
Copy to Points node and wire the For-Each begin into the Copy to Points node’s second (“Target points to copy to”) input. -
Create the node(s) to generate the varying geometry and wire into the Copy to Points node’s first (“Primitives to copy”) input.
The key when generating varying geometry is to use the point expression function in these nodes to read attributes from the current point and use them to alter how you generate the geometry.
point takes the following arguments:
point(path_to_geometry_node, point_number, attribute_name, index)
-
The ‹path_to_geometry_node› is a path to the For-Each begin node, which inside the loop will contain the point we're copying onto.
-
The ‹point_number› is always 0, because inside the loop we're only ever working on one point at a time.
-
The ‹attribute_name› is the name of the point attribute you want to read.
-
If the attribute type is integer or float, you can leave ‹index› at
0. If the attribute type has components (for example, R, G, B in a color, or the three axes of a vector), you need to read each component separately using individual calls topointwith theindexchanged to0,1,2, and so on.
For example, if you want to copy one of a set of possible pieces onto each point based on the content of the point’s piecenum attribute, you could create a ![]() Switch node and switch between the different inputs using an expression like this:
Switch node and switch between the different inputs using an expression like this:
point("../foreach_begin2", 0, "piecenum", 0)…and then wire the Switch node into the Copy to Points node’s first input.
Compile the For-Each node 
The For-Each loop can be slow for large numbers of copies. To speed up copying, you can try wrapping the loop in a compile block.
Useful nodes 
Scatters points randomly and evenly across a surface or surfaces. This is very useful for creating points on the surface to copy source geometry onto. For example, you can scatter points across “rolling hills” geometry and instance trees onto the points.
Lets you delete points according to various criteria, such as every Nth point, or the last N points, and so on. By animating Deletion of points, you can add or remove copies.
Creates or modifies point attributes.
Lets you create or modify point attributes using VEX snippets.
| See also |