CREATING A DARK SCENE WITH FALLING BOOKS USING VELLUM AND SOLARIS
Books Project
The purpose of this project was to further explore possibilities for lighting artist when using USD pipeline in Solaris and Karma as a main render engine.
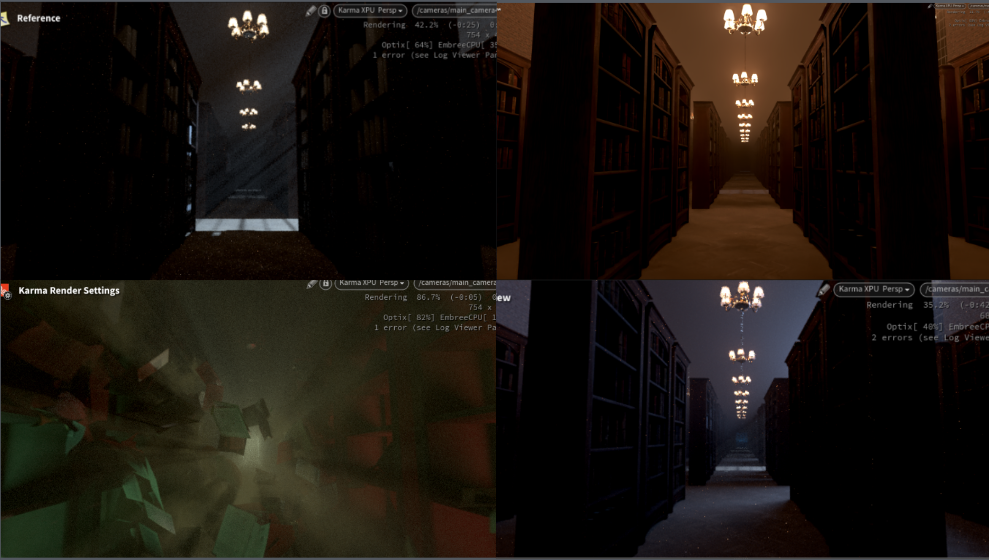
Books References
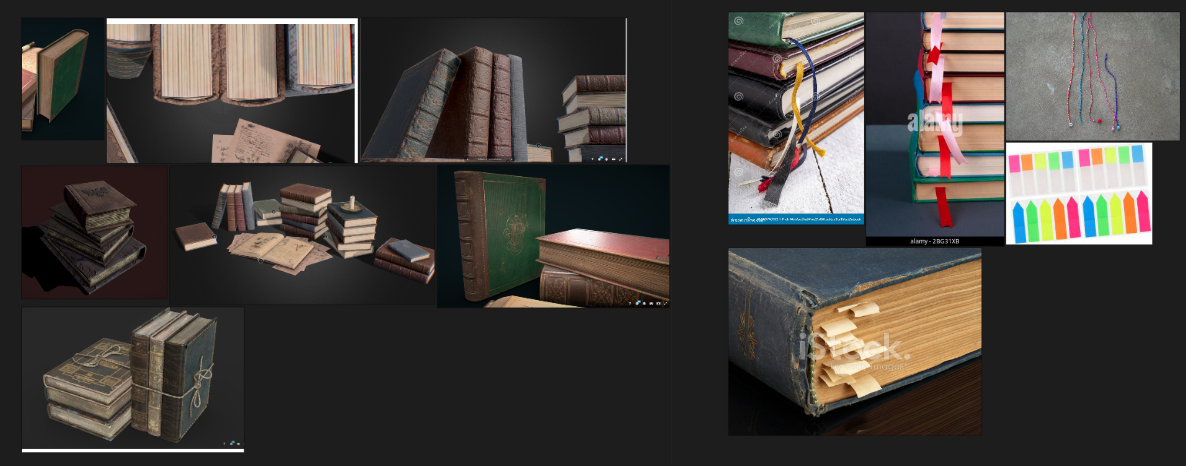
I started by gathering some general references of how my books should look and how I should build my environment. Here you can see that the majority of the colors are quite dark and cold. I wanted to have my scene lit by moonlight as you can see on reference here.
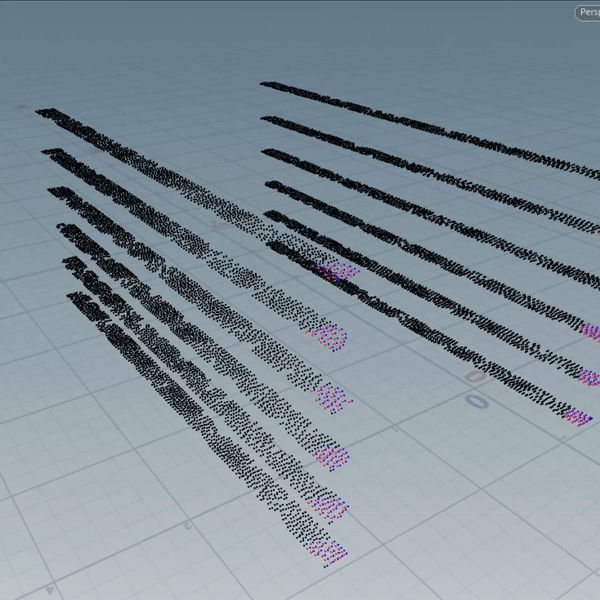
Books Test Sim
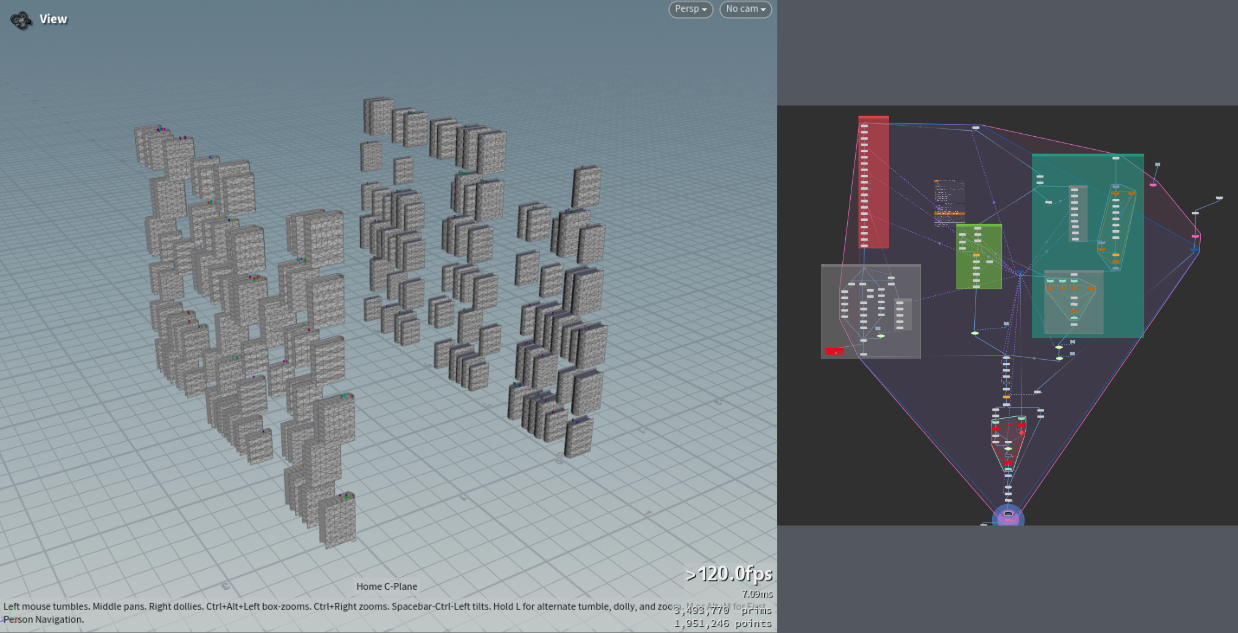
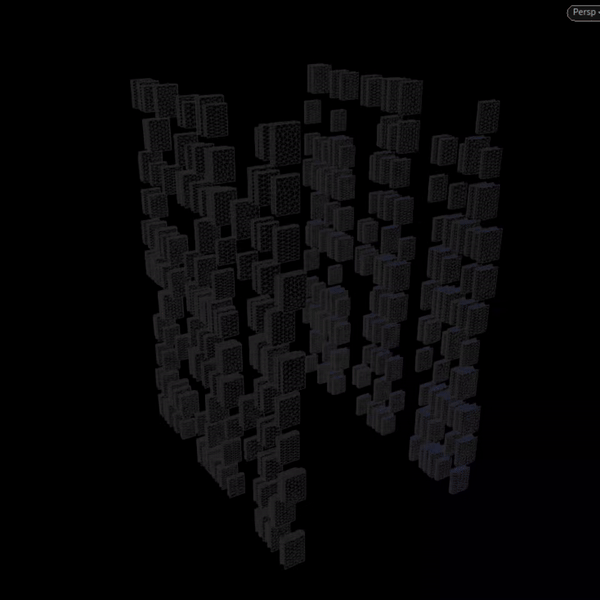
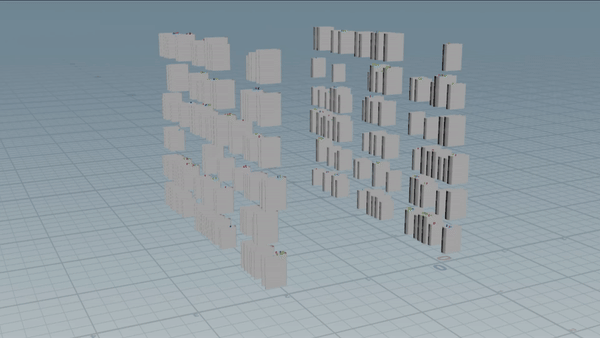
I wanted to have my books activated one by one so I started with a very simple and scaled down version of the simulation. I made a bunch of cubes as you can see here and by using an external solver network I made some changes into the mass attribute so they could activate and get into the action on my will.

Mesh Creation
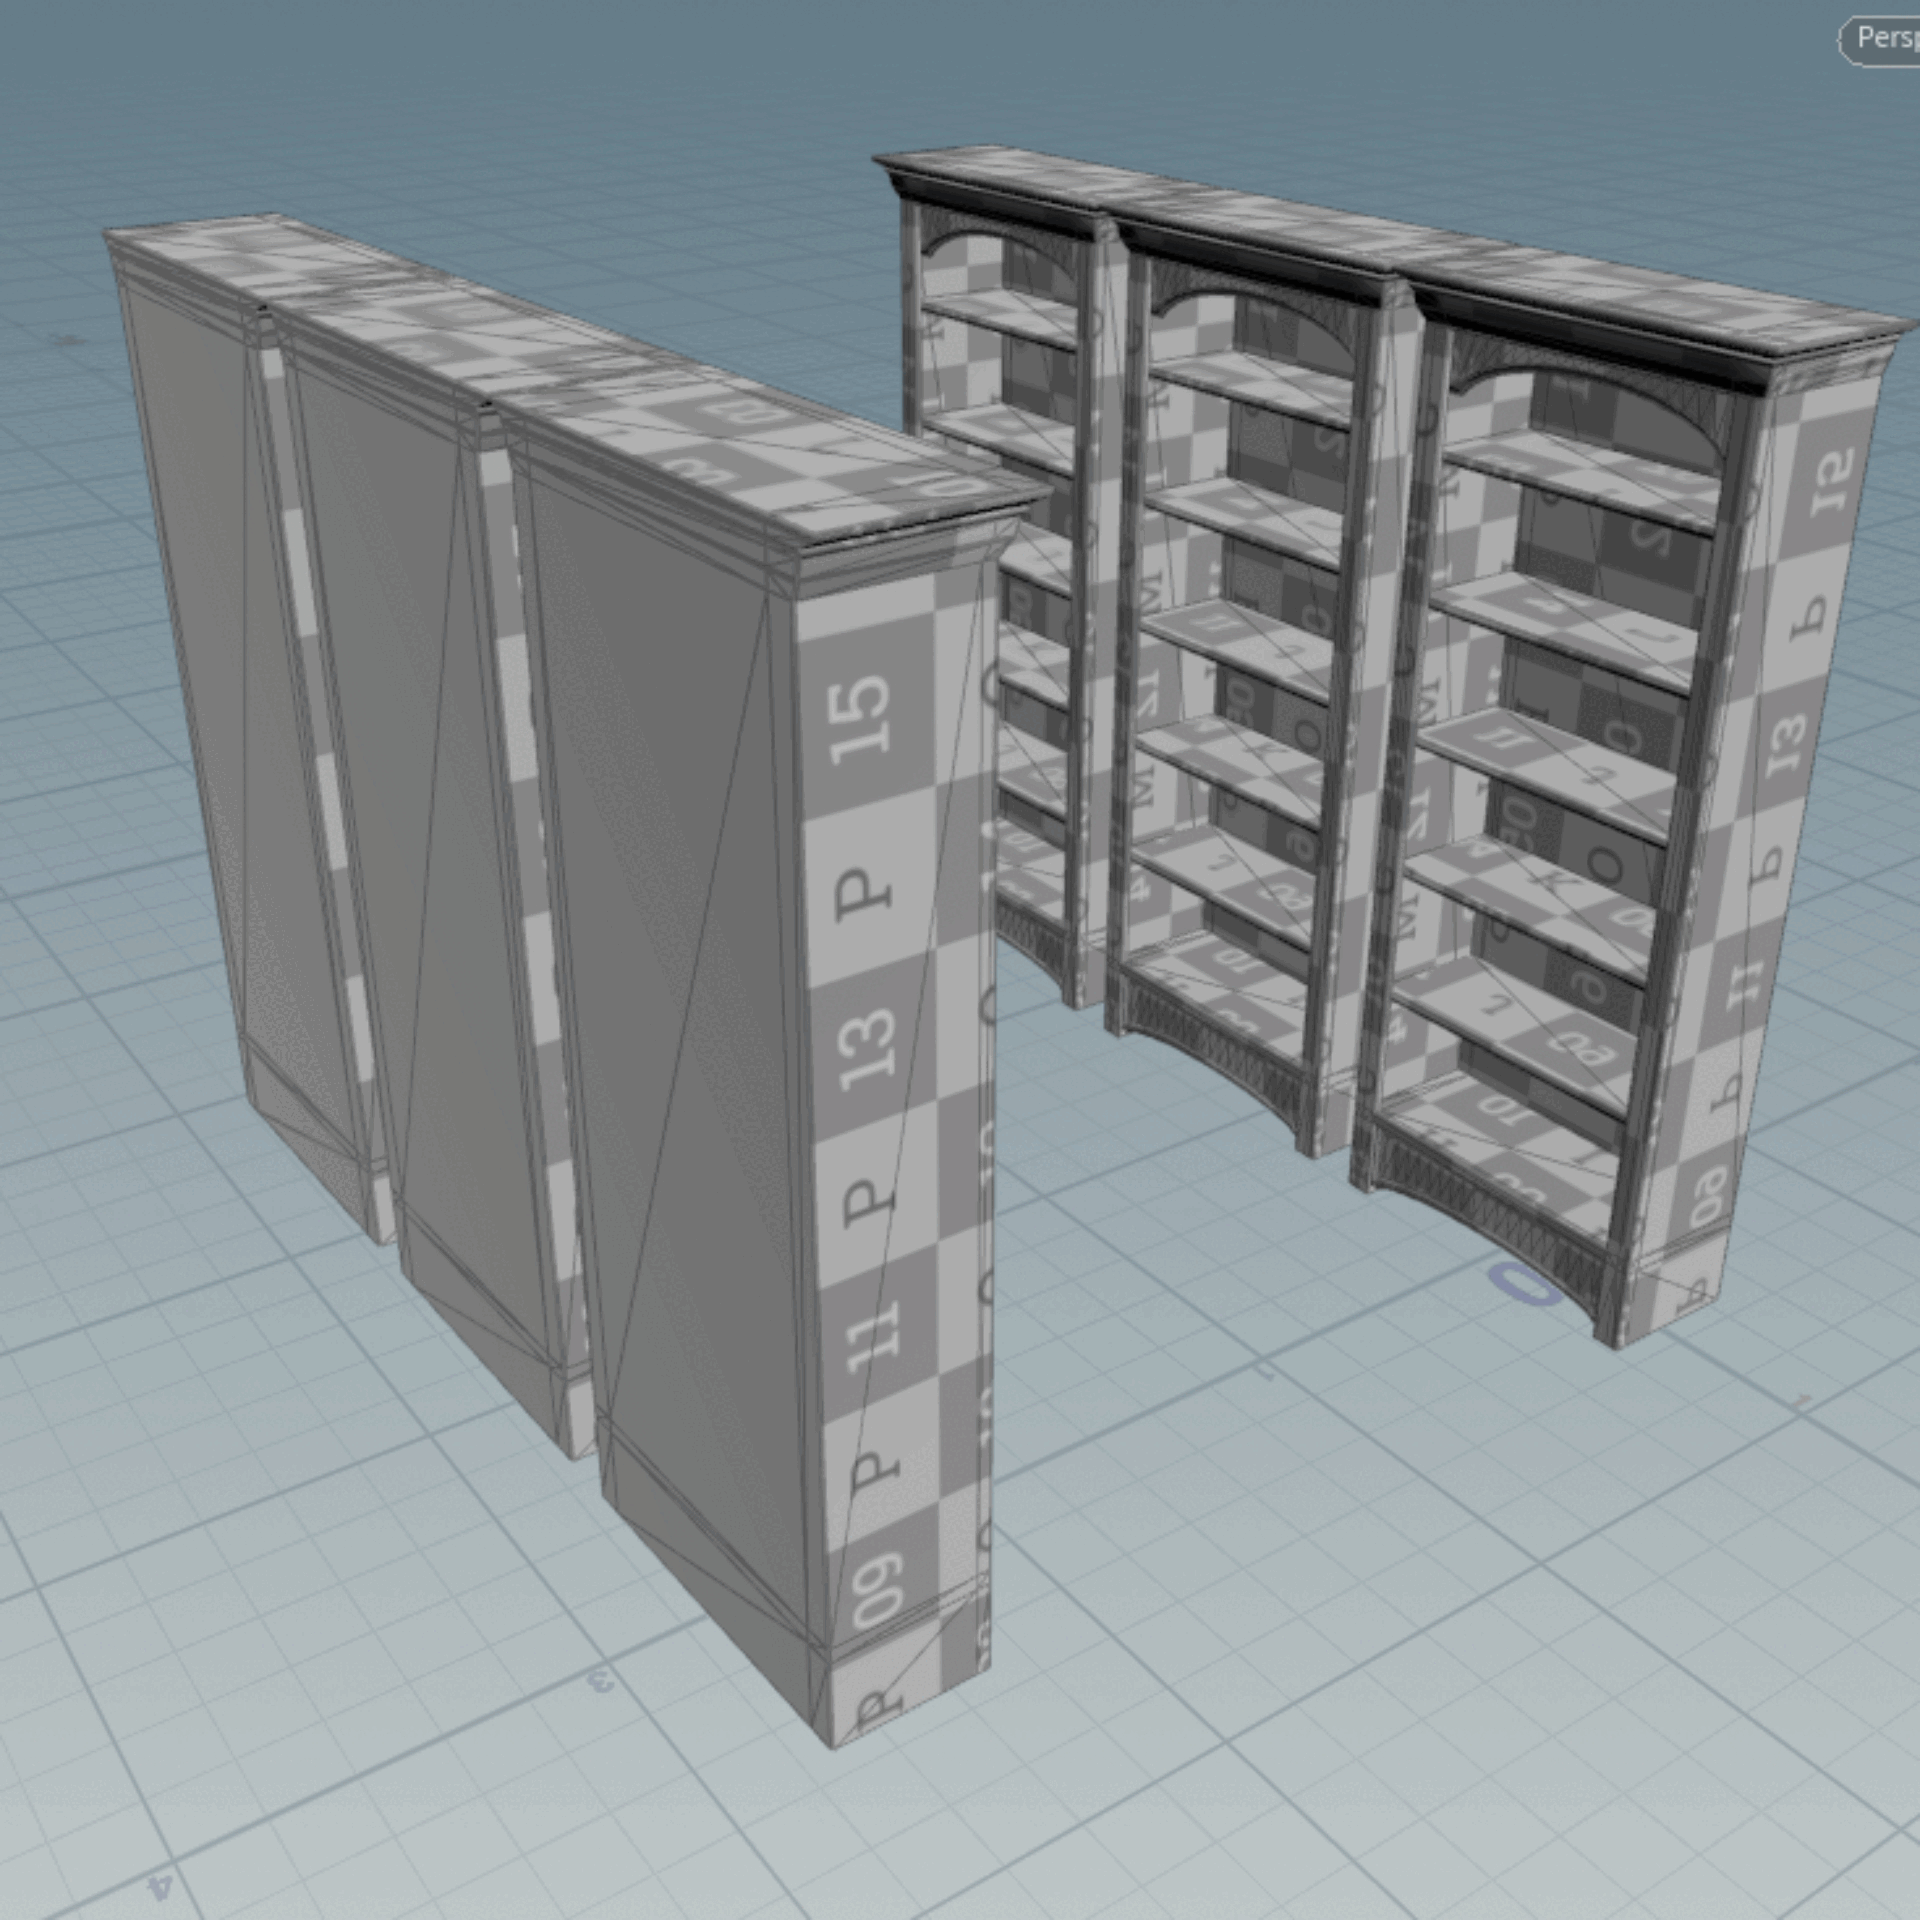
After some time I decided it was time to upgrade my simplified geometry to actual book one. It took some time to actually get to this network and this state but I will just cover the final design here. I have an external sop in which I'm bringing my bookshelves and I create some curves for each of the compartments.I use curves from edges SOP node which is very handy here.
Then here in the main sim sop I added a book procedurally generated for each of the points. I start with a simple line, after bending and extruding it I detahing parts that will be my covers and spine.
Then I'm taking that same line and resembling it a bit. For each point I attach page geometry which I created with a planar patch node.
Then I'm running another for loop for each of my pages and randomly assigning detached or basic page properties which I will be using later in the scene. I have a possibility to control the percentage of pages detached. I'm also coloring detached pages red so it's easy to see them on final geo for debugging purposes.
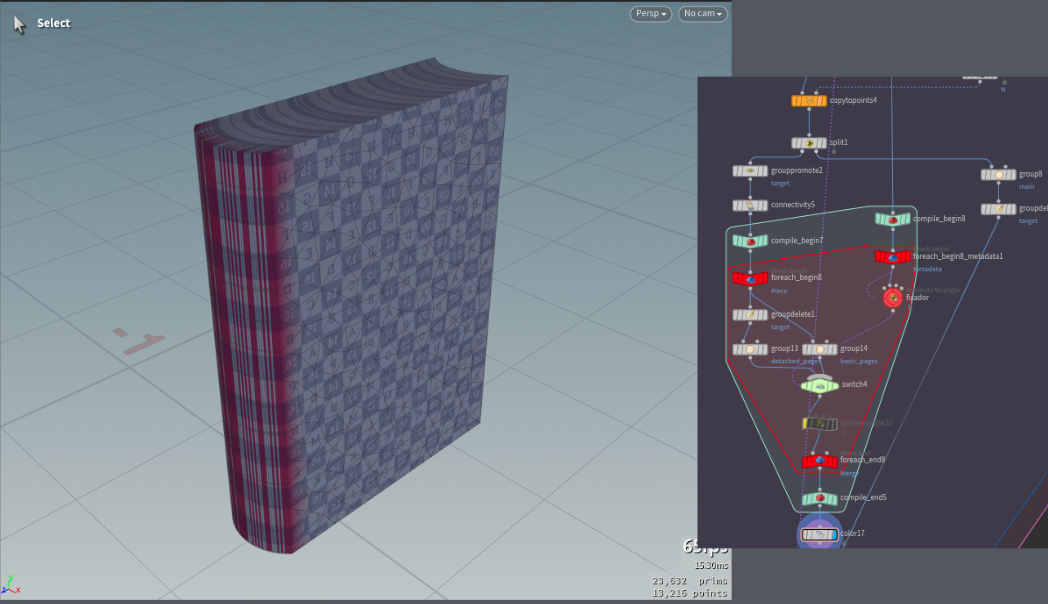
At this point the main book geometry is ready but I’m wrapping it up by adding some extra details like bookmarks. To create those I'm using the same initial line and I jitter some points alongside it and randomizing color to create a final geometry.
Optimization
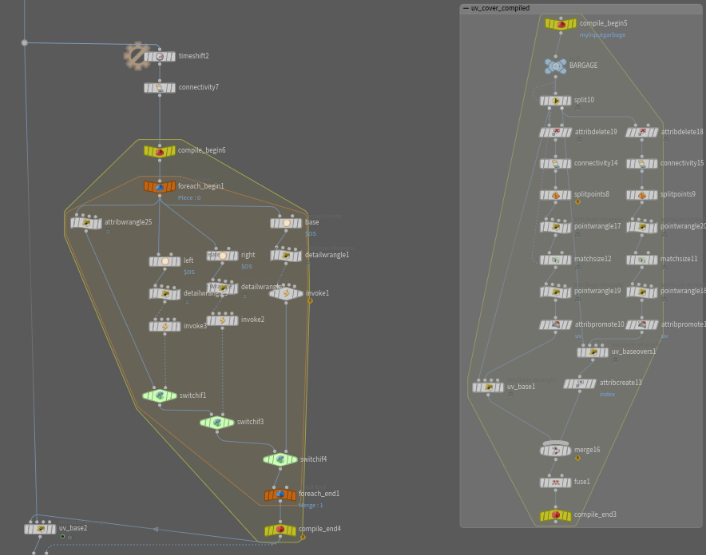
Unfortunately convectional for each loop runs on a single thread, therefore it's quite slow because the process is not paralyzed. So I asked Thomas Gaffelli, who’s one of the developers here at SideFX, to bring me into the world of compiling.
We got through my setup and added some compile blocks for each of the inputs of my for loop network. Now, as the compiled network is ready we could click the Multithreaded when Compiled option box in for each end block and now it runs in parallel. Meaning each of my CPU cores got in use to generate those books. The time improvements are quite drastic. Compiled network is cooked in about 8 seconds, while as standart one takes a bit over 45 seconds!
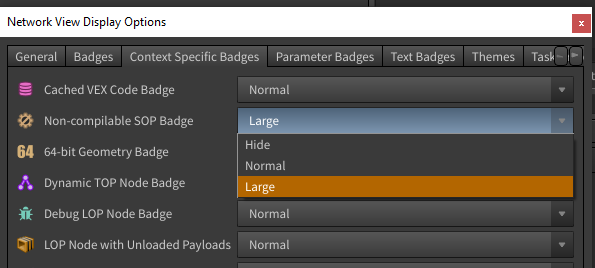
To know more about compiling its handy to know if node is compilable or not. For that, simply click D while hovering over network view and in the Context Specific Badges chose Non-compilable SOP Badge to be Large, so you could tell easily if it’s compilable or not.
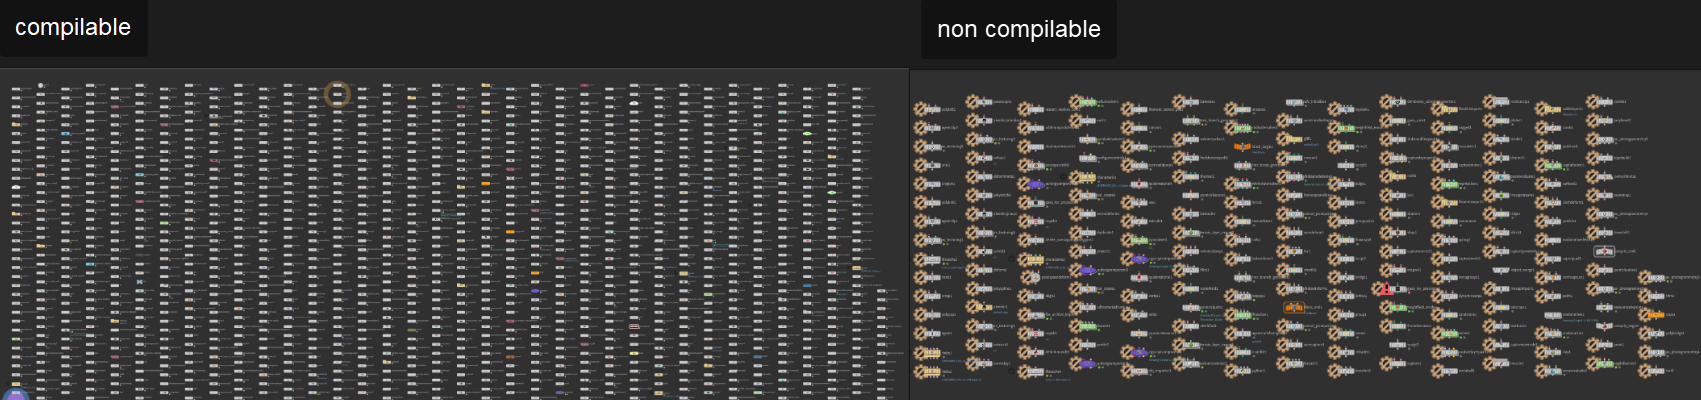
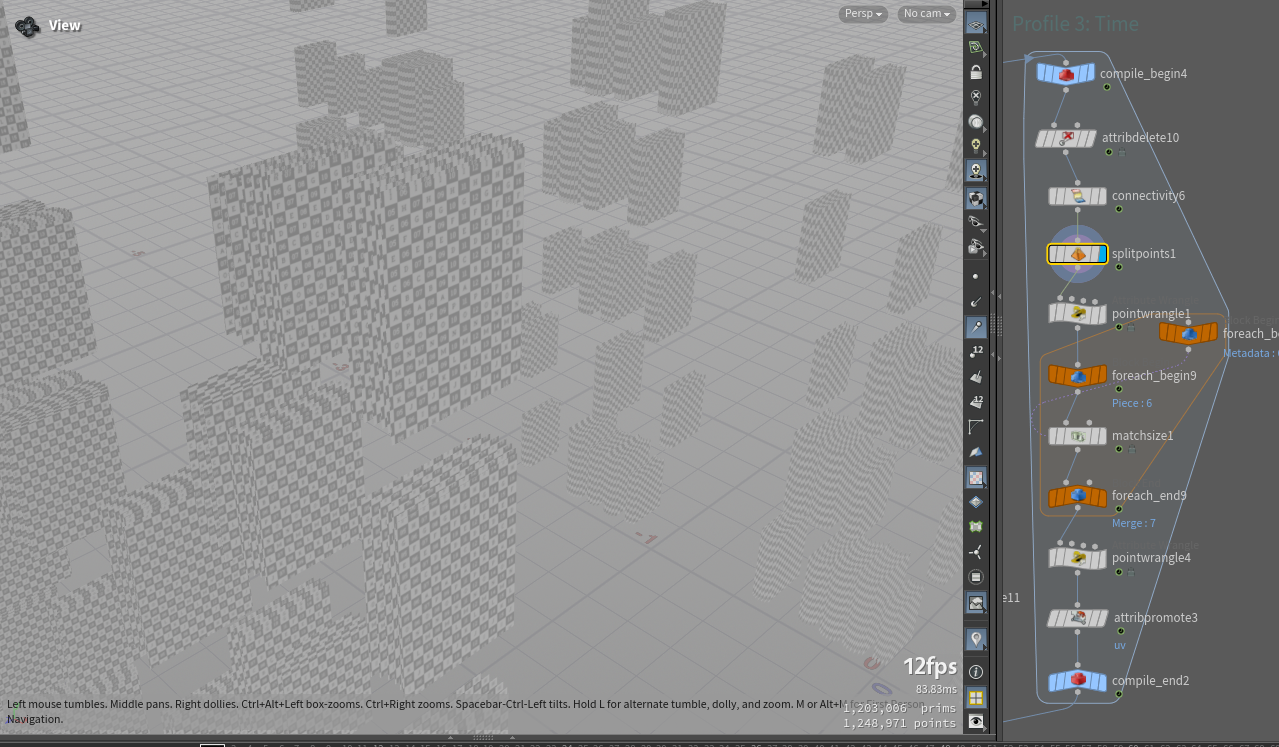
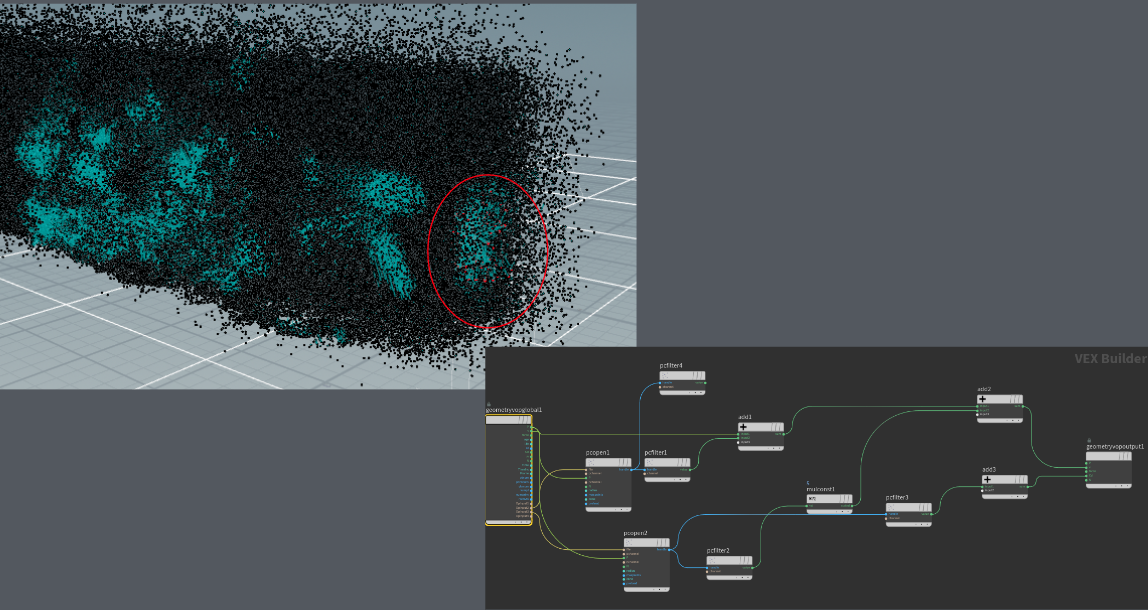
Here are the screenshots of all the nodes in SOP level. I separated compilable ones from non compilable. As you can see there are many more compilable nodes in SOP so go on and try complying!
Infection Solver
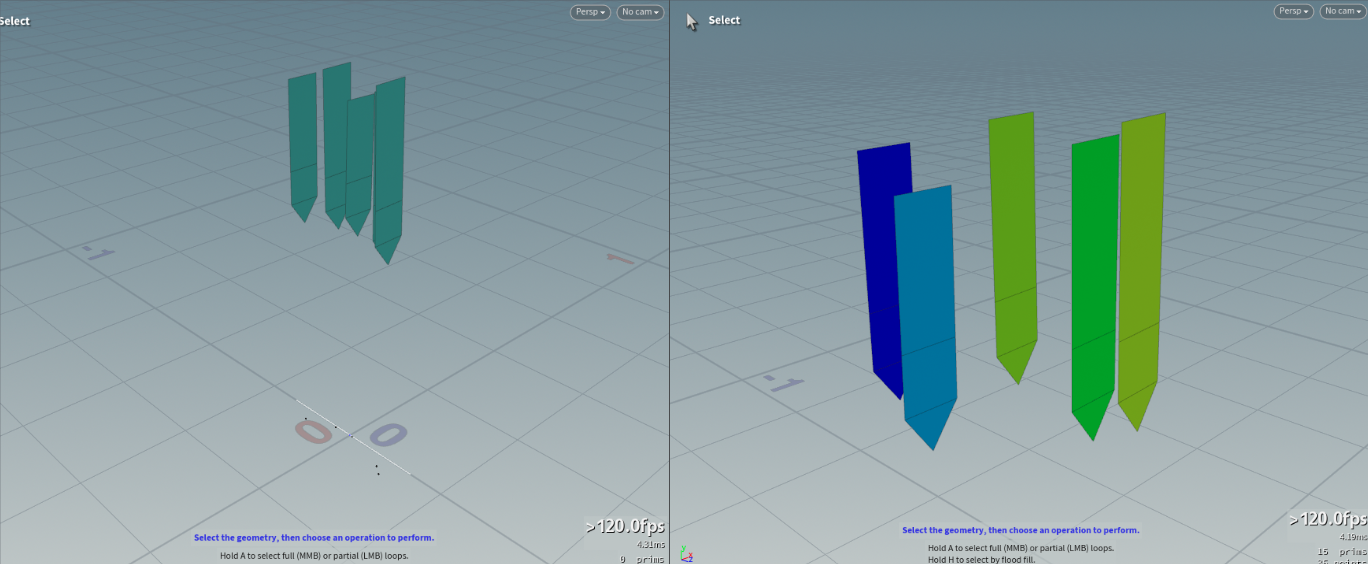
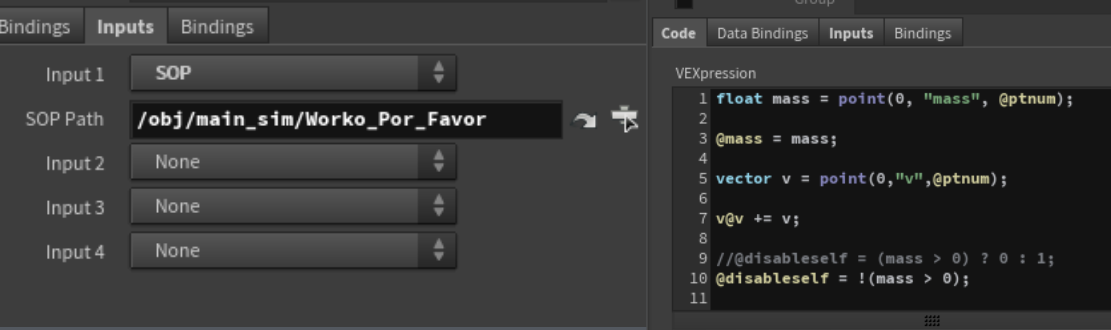
Now, I need to prepare that external solver cache to guide my final vellum sim. For that I started by creating an infection solver for the points that I got scattered along upper faces of bookshelves.
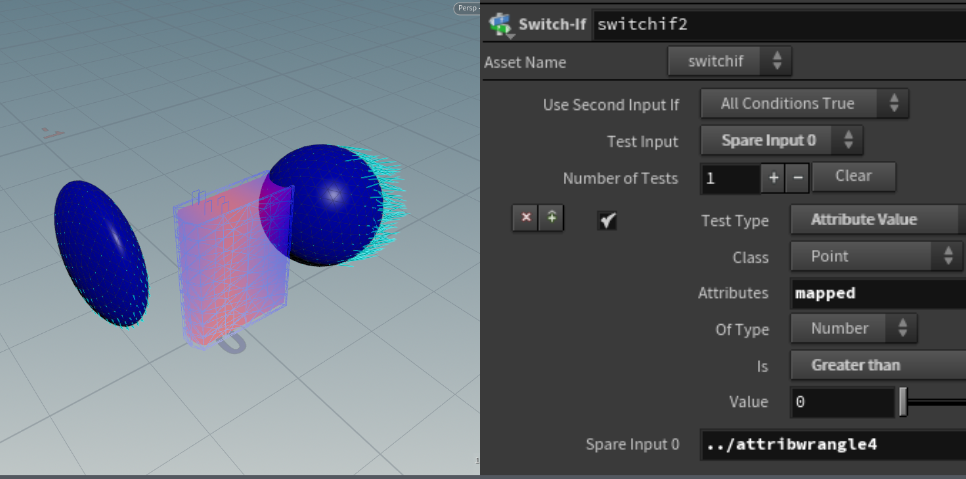
As I got it working I used a little bit of remapping to offset attribute population on those points. So the red points are responsible for kick starting my velocity assignment (they have attributes called mapped) and blue points are responsible for mass adjustments. I couldn't use the active attribute here for the vellum stuff so I went with mass 0 and then I'm changing it to the static mass.
Velocities
I wanted to have my velocities controlled but randomized. To do it I bring each of my books to another loop network. I gave some velocity attribute to some of the spheres which I'm placing around input book geometry. And, if a given book has an attribute mapped greater than 0 I'm using a switch node to switch from no velocity state to the one in which I use attribute transfer. Because my attribute mapped is not forever long, it will have effect on my books only for a couple of frames.
So basically what is happening here is that now I can control how fast my books are by directly changing my velocity attribute on those spheres as well as adjusting how wide that gap or red point with attribute is on my infection solver. Vellum will read velocity values from each frame, if I leave my velocity to be 1 for example, for each frame of the simulation it will get added up and my geometry will just fly forever.
Velocities Sequence
Here you can see my final sequence of velocities added to books, as well as mass. Now, as this part is ready let's dive into the main vellum solver setup.
Main Sim Setup
I need to assign different properties to my detached/basic pages as well as for the cover geo. My detached and normal pages sharing similar parameters and therefore are mostly identical. I set up mass to be uniformal as well as adjusted thickness. I'm then using another Vellum constraints to stitch my pages to the spine geometry of the cover, I'm using selected point group that I made before in the main for each loop. I played a lot with bending attribute to get the best looks of actual page.
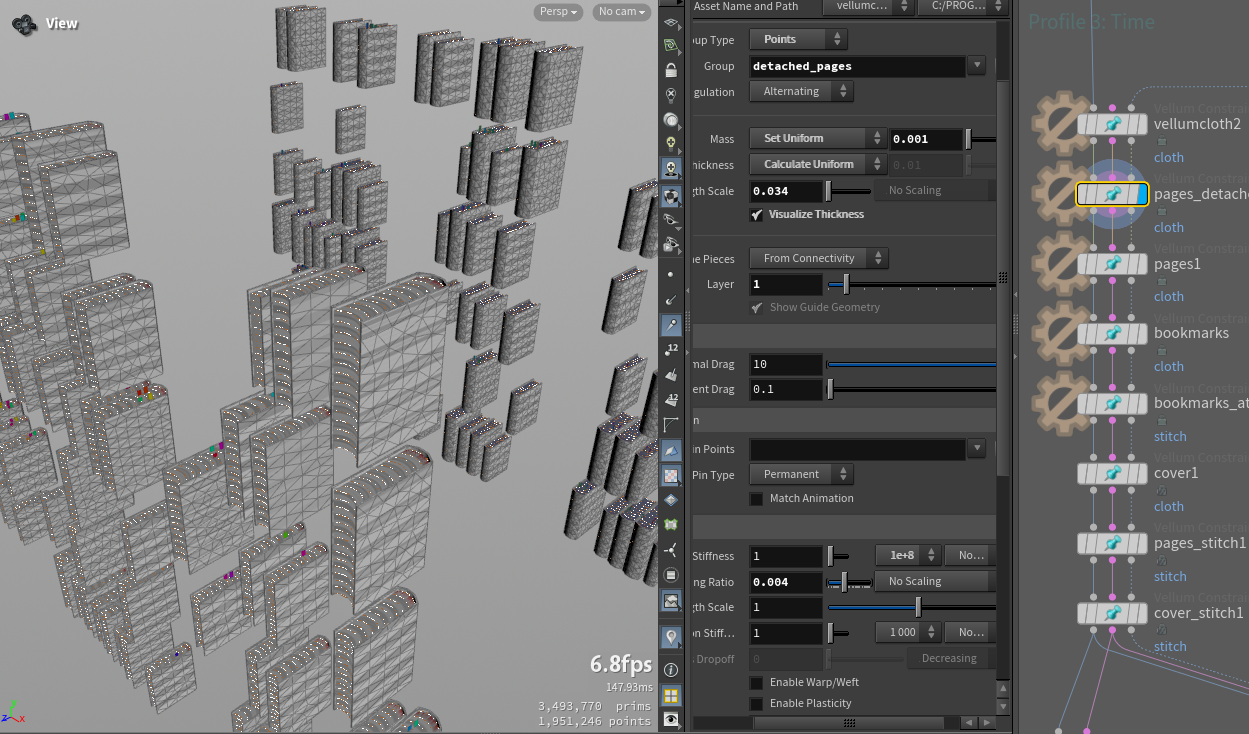
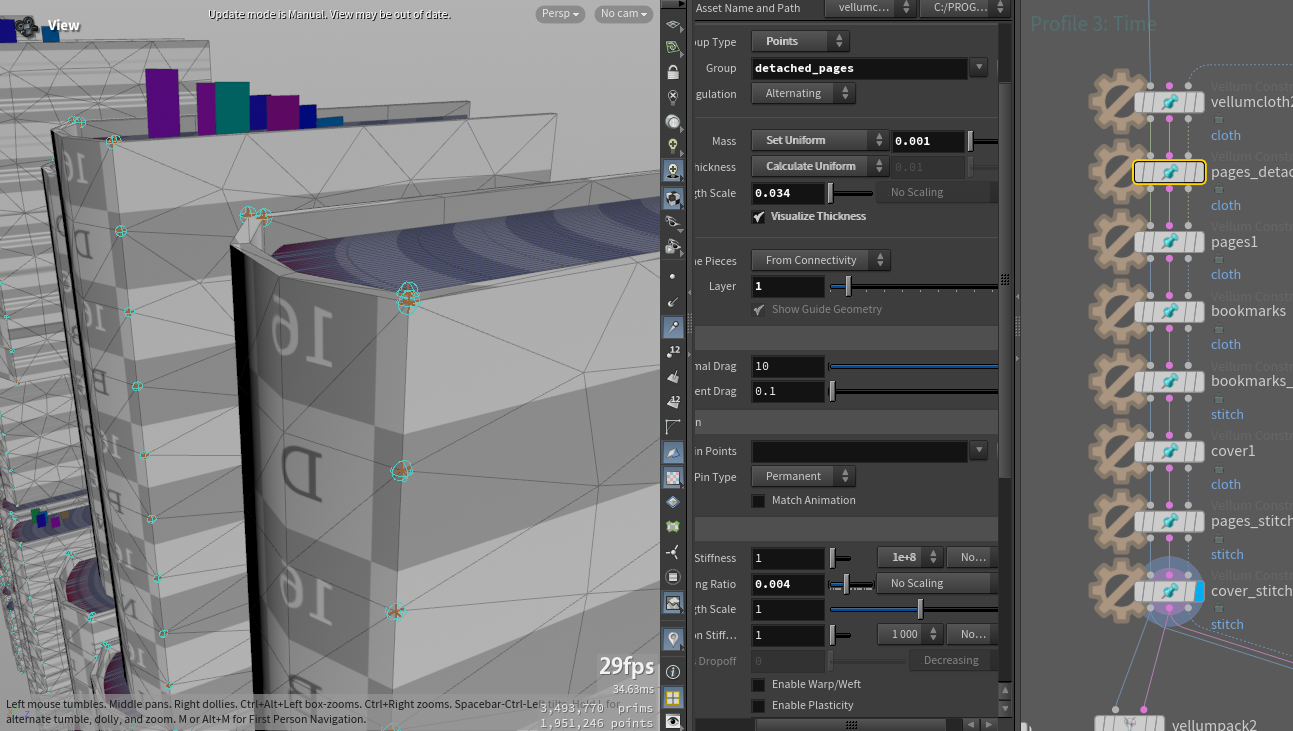
Its a similar approach for covers, their mass is a little bit bigger and the thickness value is also higher. But I also stitch them together using the same Vellum preset. Initially I wanted to have my cover as a single geometry but after running some tests I decided that it's too random and I will be having a better look if I got with 3 piece cover geo.
Similarly I do the same process for my bookmarks. I then used Stitch Points in the constraint type drop down window in the Vellum constraints node to glue my bookmarks to each of the page. I could easily adjust the threshold after which that glue will stop existing therefore I can have some of my bookmarks detached overtime.
Inside the Solver
Initially I planned to have a low res simulation and then do point deform afterwards to drive much more high res geometry but I quickly got away from it as it was too janky and I decided to just sim full res simulation.
I added pop wrangle inside the main vellum solver node., I'm referring to my guide books sequence cache here in the binding section. I'm taking my mass attribute from those points and adding it to the corresponding points of my simulation. And for velocities I'm just adding them up, I'm doing the add over equal because when my velocity on the guide = 0 it won't just stop moving on sim but continue on.
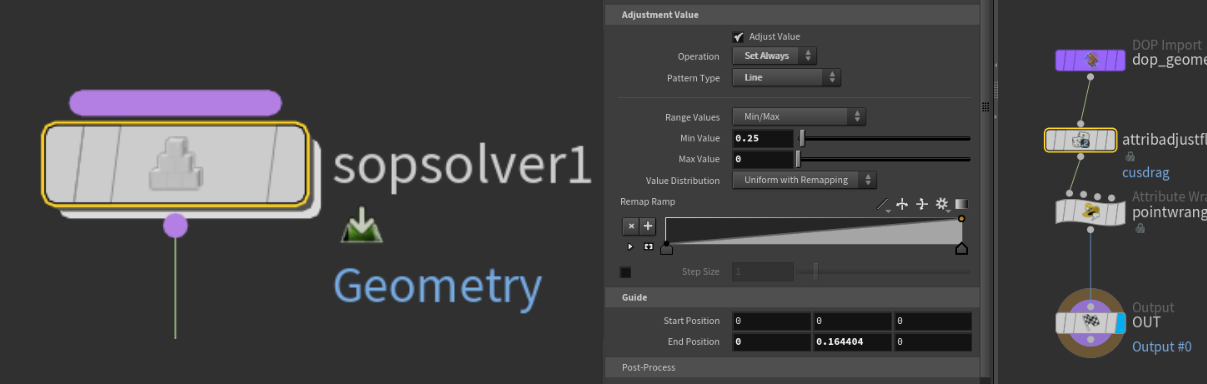
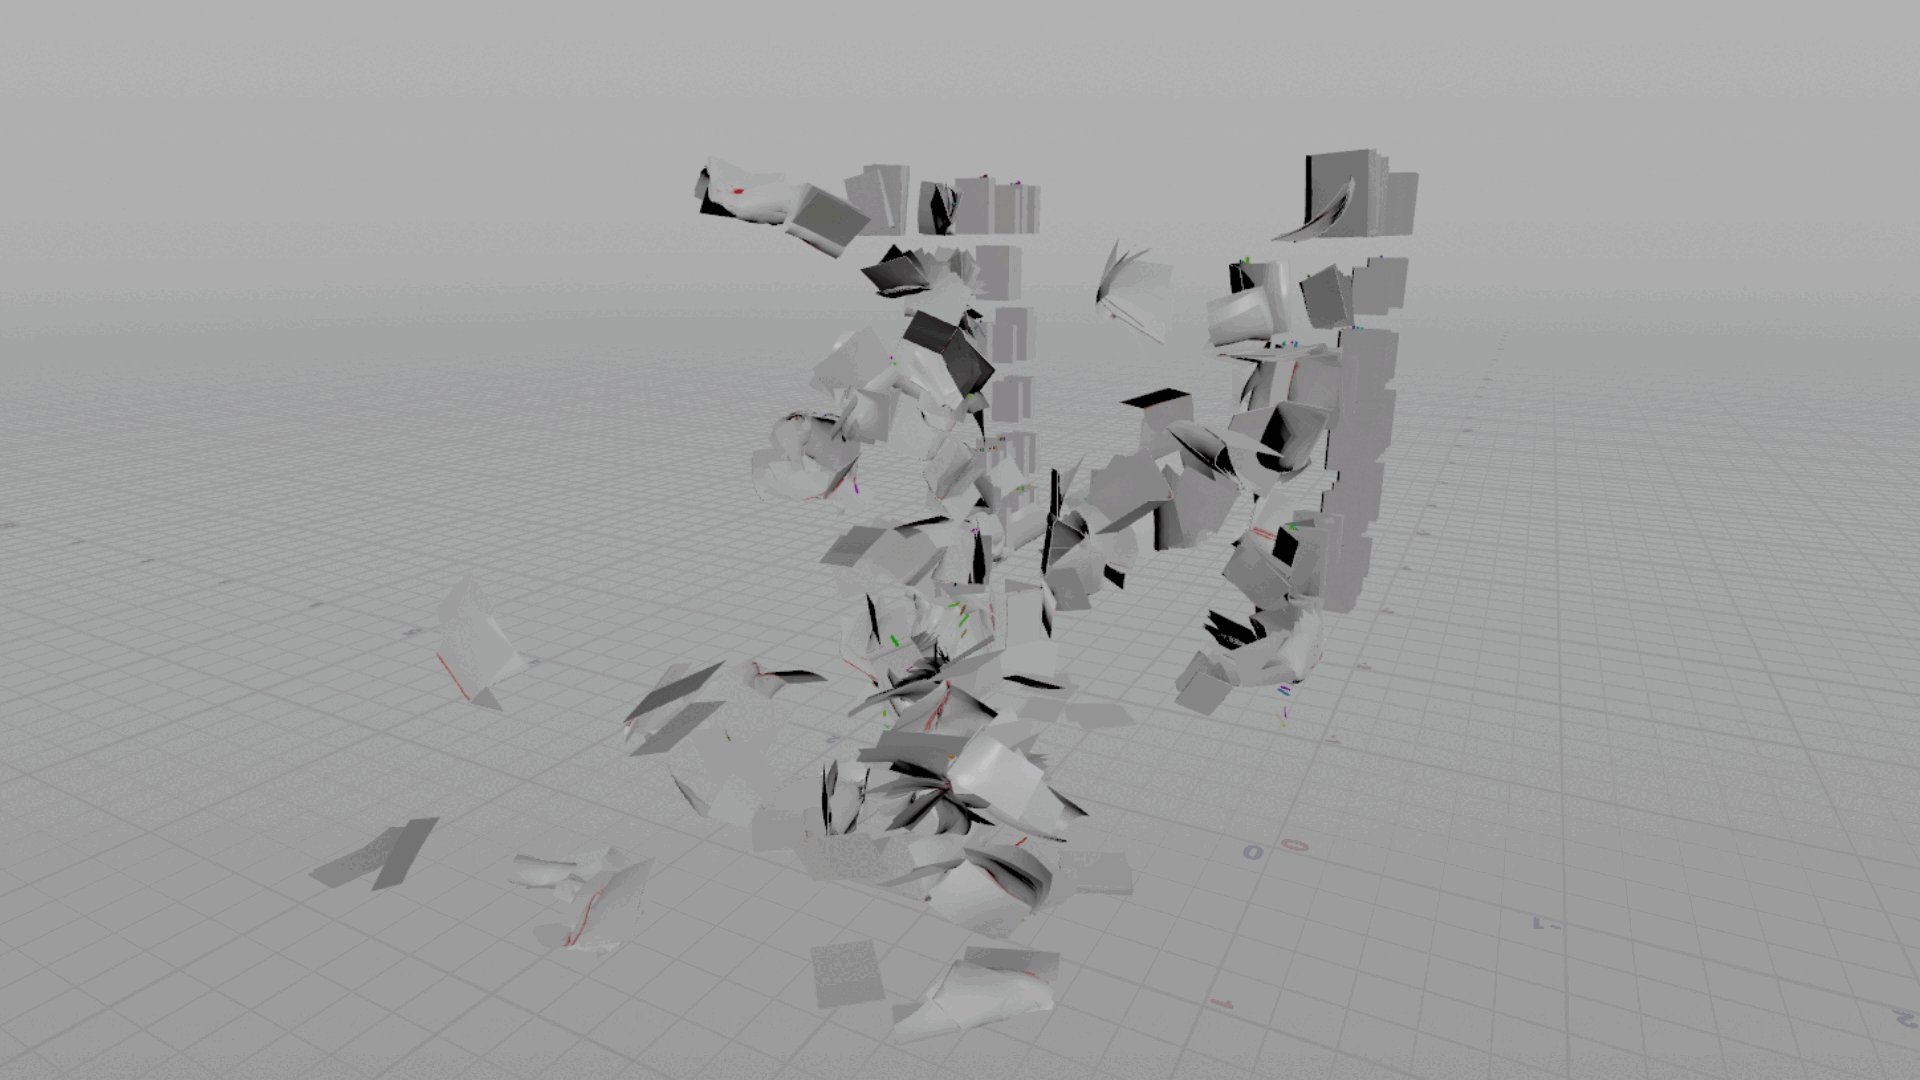
If we run sim in its current state you will notice that most of the books that touch the ground will strangely interest and detangling will error out and books will explode because of their inner velocities. To mitigate that I also have another sopsolver node here in which I created an attribute to adjust float node and in adjustment value I have Pattern type set to line. So if my book is coming to the ground at a certain threshold I will gradually multiply its velocity values until; ints fully stops. It doesn't make it look realistic but because my final render has a bunch of shakiness and the lover part of the scene close to the ground is basically in shadow it should be working just great.
Sim is Ready
As I got my simulation ready its time for some after adjustments. I started with unpacking my vellum solver cache and subdividing geometry.
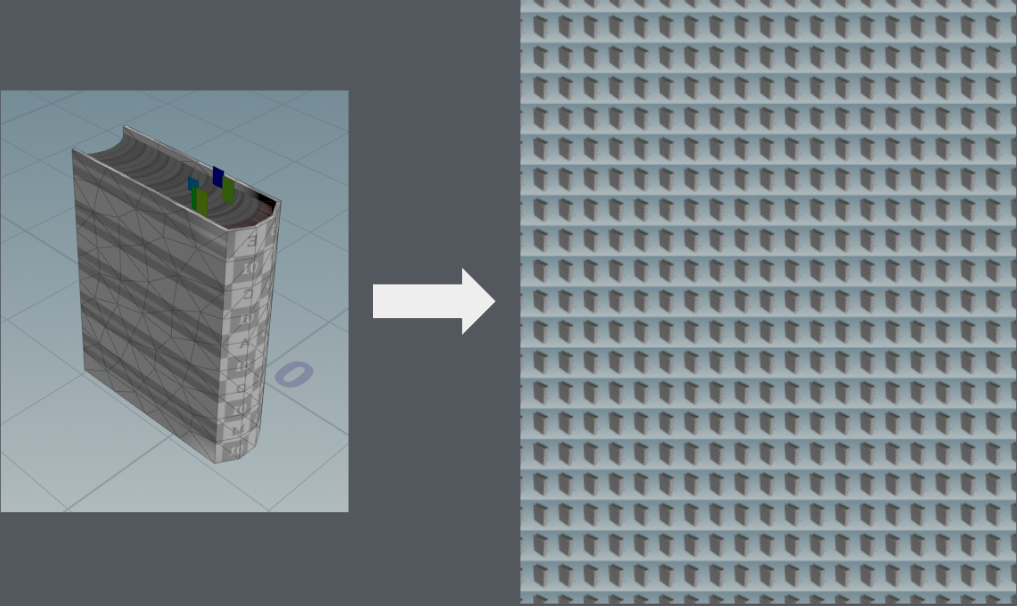
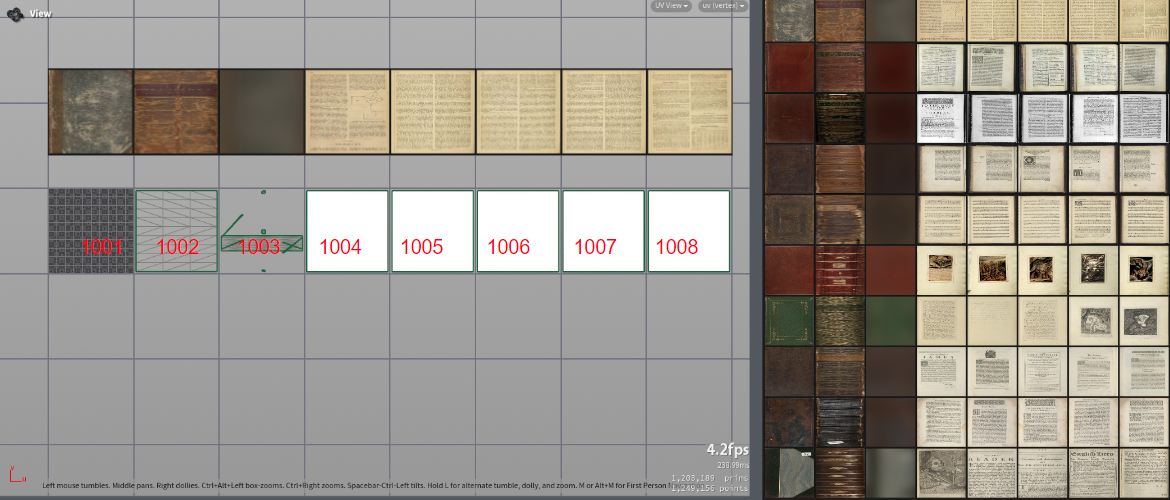
UDIM Magic for Pages
I'm doing the same for my pages here and then for each of the pages I match its size to fit a perfect 1 by 1 square and then I move it along to mimic different UV spaces.
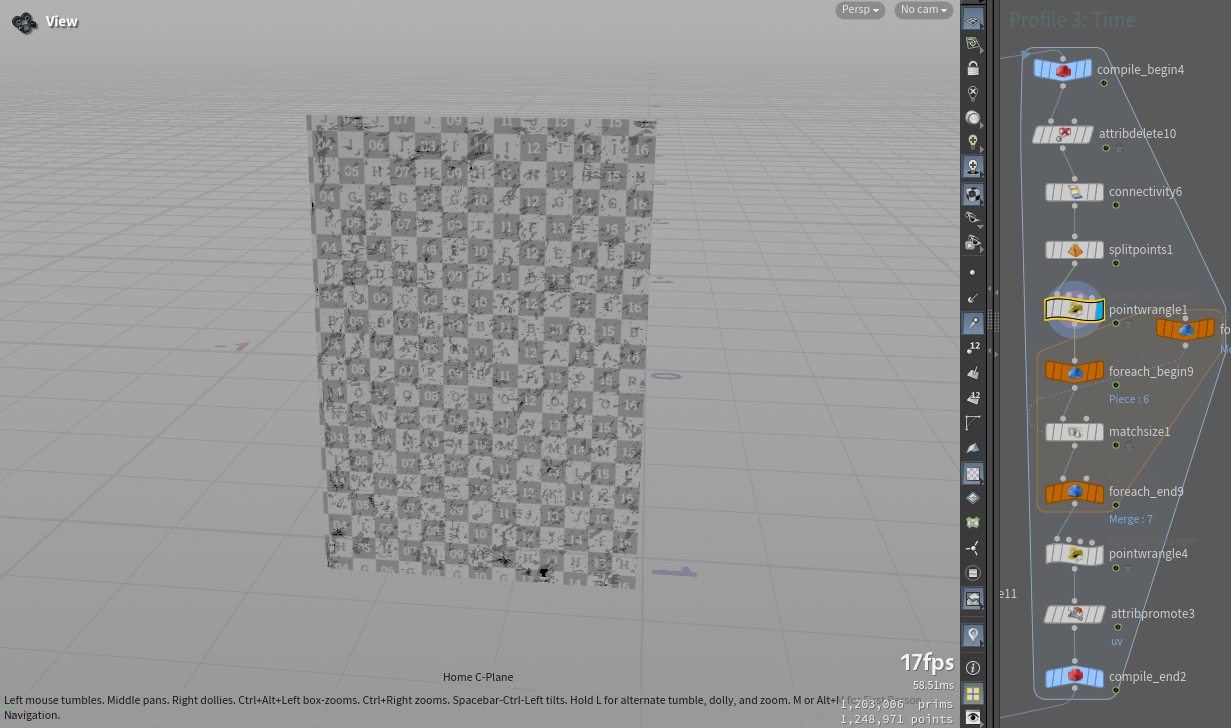
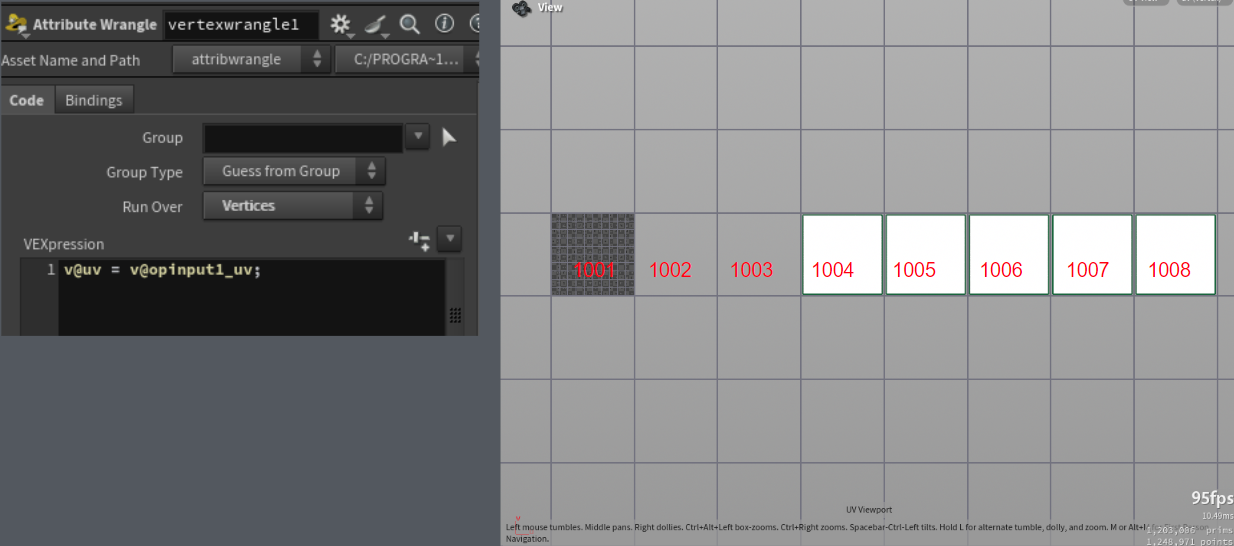
Here you can see my texture set, my first 3 UDIM spaces are reserved for cover textures therefore I'm taking UDIM space 1004 to 1007. After that loop I demote my UV attribute and copy it back to points . Now if we check our UV for the pages we’ll see they look exactly correct now.
UDIM Magic for Covers
For the cover I want to have my side cover textures to be on the first udim, my spine to be on the second, and all of the inner parts to be on the third. So i'm running a loop in which i'm detecting which part I'm getting in as the input (so left cover, right cover or spine) and I group faces that are looking outward by normal value.
And because those faces are basically rectangular I just stretch them to fit the entire UDIM space. And all the other chunks go to 3rd UDIM space. I'm not caring about them too much cuz that texture is just one uniformal color. I also added index attribute to all of my books to differentiate different textures sets up the in solaris
UDIM Magic Combined
After I combining everything together I'm getting something that looks like this. You can see here that first too UDIM spaces are taken by cover geometry that is facing outside, than there is all the inside parts that I don't care about much, and then there are pages U. Just like that my postprocessing of the books is ready and its time to finally bring it all to Solaris.
For each texture set I create a separate material that I then apply to a corresponding geometry. You can see here how all of the efforts that I put in before are paying back, there is no same books here in the scene.
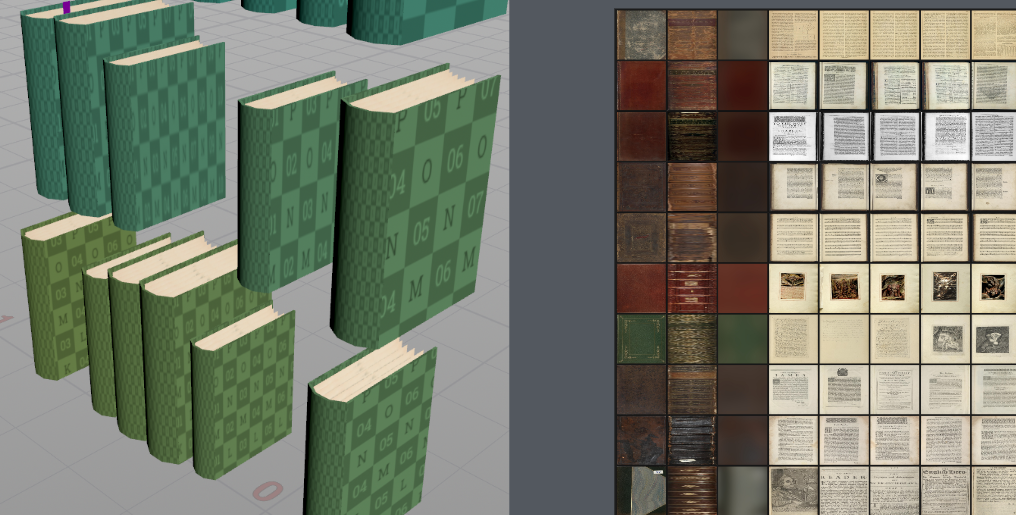
Every book has a random pages texture assigned by in the same time those textures are coherent with appropriate texture set. That was the hardest part to figure put for this project.
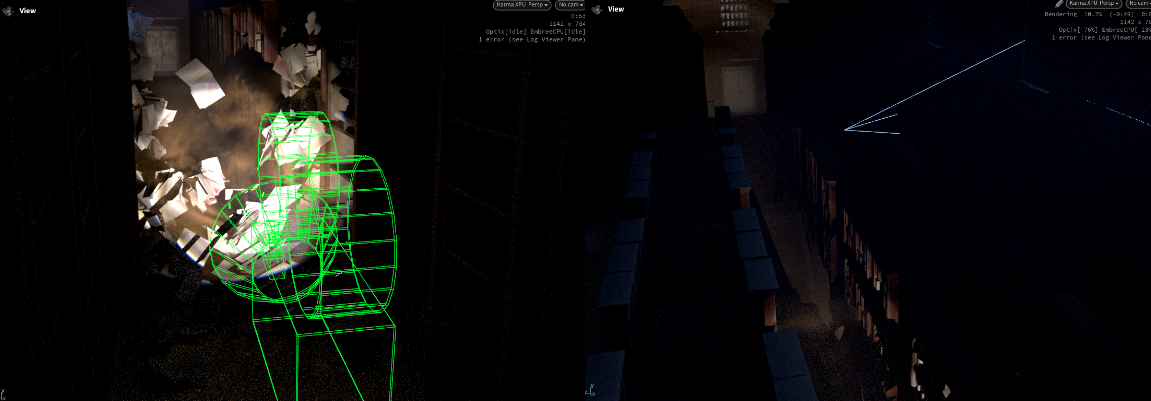
Dust
For the subtle smoke/dust sim I used same sim cache files but instead of going full res I created a subdivided proxy. I then casting some points from ever books as soon as its velocity becomes bigger than 0 and I use those points to drive my pyro simulation. Just like that a nice thin dusty smoke is ready, it will be a nice addition to the final render.
Floating Particles

For some floating particles I used pop sim once again. I imported my cache geo and used attribute transferring to get those point to react with falling books. But in the same time I increased my drag value quite drastically so those point will have a very short distance of travel.
As you can see here I’m also importing my camera here as a proxy geometry so the particles that are to close to the camera will float away from it. To achieve this effect, im taking normals of the bounding box of the camera and adding those vectors to point’s V attribute. I’m adding them only to the particles that are close to bounding box. I could adjust distance threshold and multiply my normals to have finer control over final V.
Camera
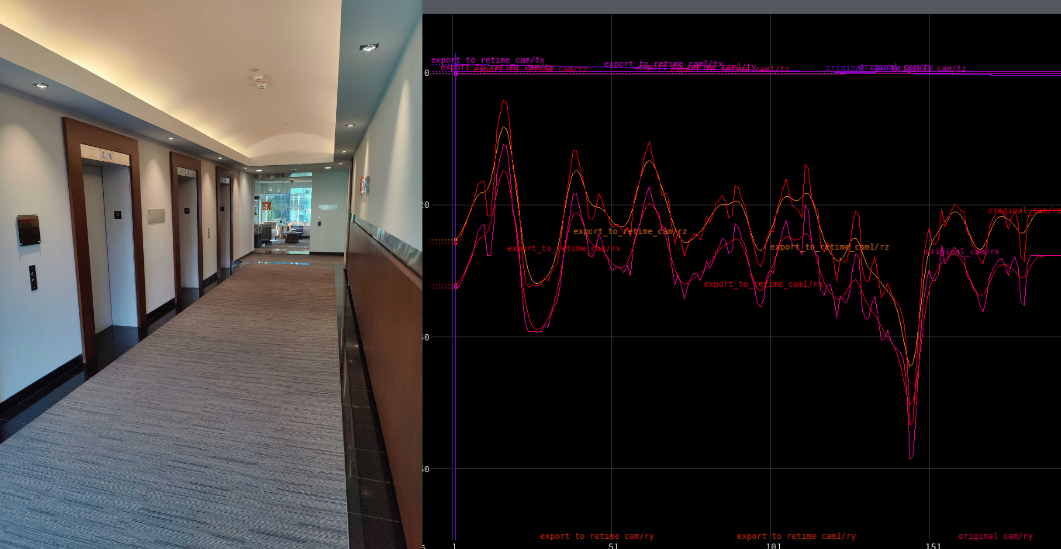
I filmed our hallway here in the office to have a realistic camera movement brought to the scene. I have to alter my camera movement a bit and for that I used chops. It was my first time using chops ever and it turns out its not as scary as I thought. I imported my camera there and softened transformation as well as rotation values. I end up using the same animation but even more smoother for my fleshlight geo.
Static Books and Shelves
I added some static books with much less geometry around as well as bookshelves geometries around the scene. I also used a nice modular asset from polyhaven here to create the wall and ceiling of my library.
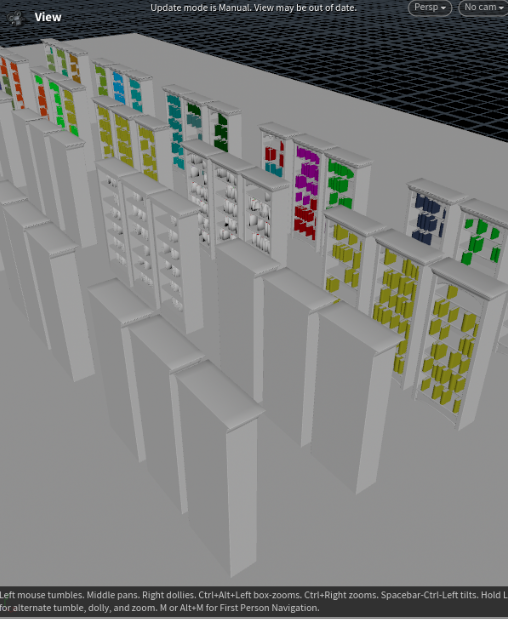
Here you can see a quick flipbook of my current scene with all the effects combined here in Solaris.
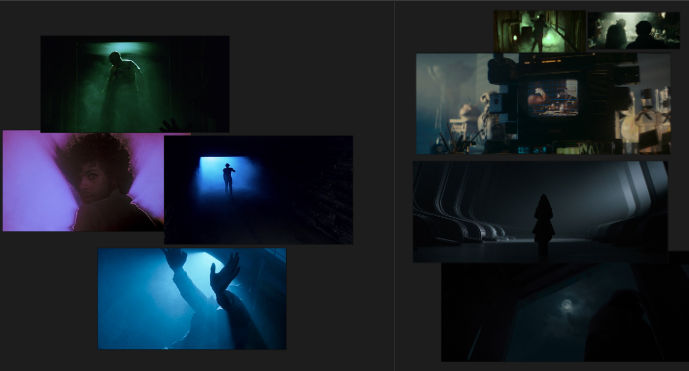
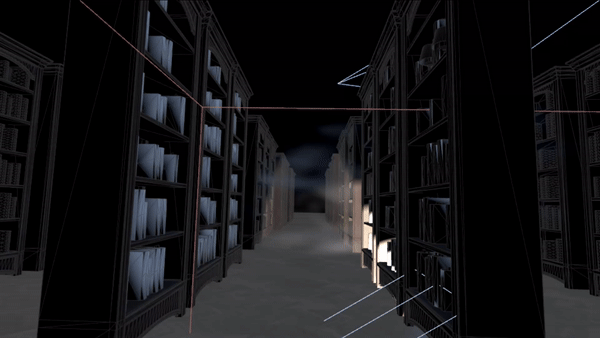
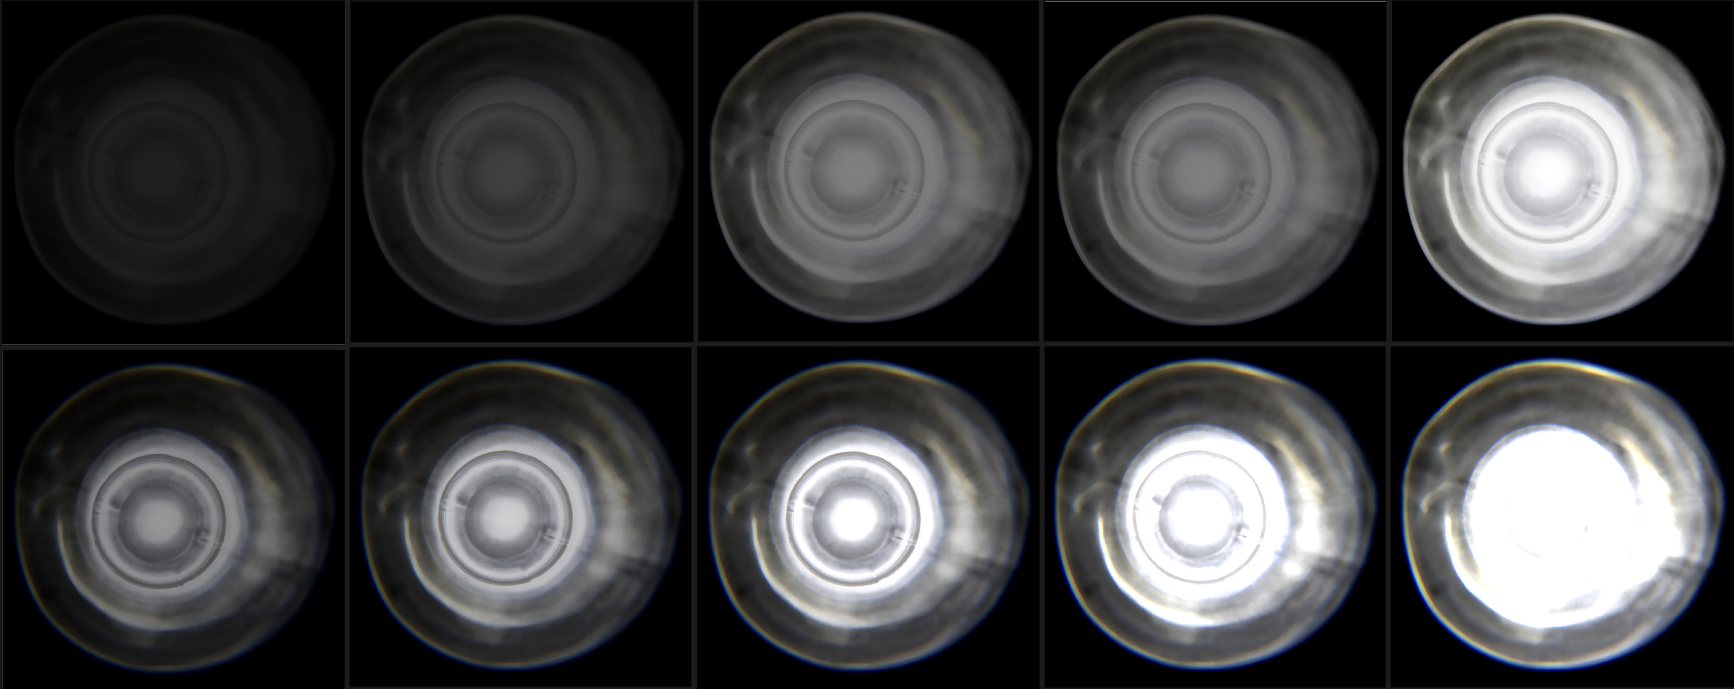
Light Gobo
Now its time for lighting. I did a bunch of setups for this scene but eventually decided to go with flashlight points from the camera view. To make it looks realistic I found a nice texture set of gobo filters at greyscalegorilla. Go and visit their website to find all the cool stuff! Initially it comes as png image with limited spectrum so I decided to alter them in cops to bring some realism to them. I basically remapped different parts of the picture so now it could fit the broader range of values. Then I use the same gobo filet material as for the toucan scene. I also added some nice blue moon light to bring some coldness to the scene as well as karma fog box to have atmosphere and dust happening in the scene.
To finish up my lighting I decided to add some blue moon fill light from the window side, as you can see here.
Finale
And just like that here you can see how my render end up looking:
CREATED BY

コメント
j.friggens 1 ヶ月, 1 週間 前 |
Fantastic breakdown! thank you for this :)
Please log in to leave a comment.