| On this page |
Houdini’s feather system provides several painting tools, but you can’t manipulate barbs directly. To do this, you have to go a detour via the Feather Ray SOP. The basic network for this method is explained in detail on the UV projection page.
In this example you’ll draw a mask to control the curvature of a feather’s barbs. Curvature, or better: bending, is controlled through a Guide Process SOP. There you can choose a Bend operation and define angles to shape the barbs. The special thing about the node’s operators is that you can use an attribute as overrides. And the attribute can also come from a mask.
Here you’ll control the amount of bending for a single feather, but you can also apply this method to a complete feather atlas.
Initial network 
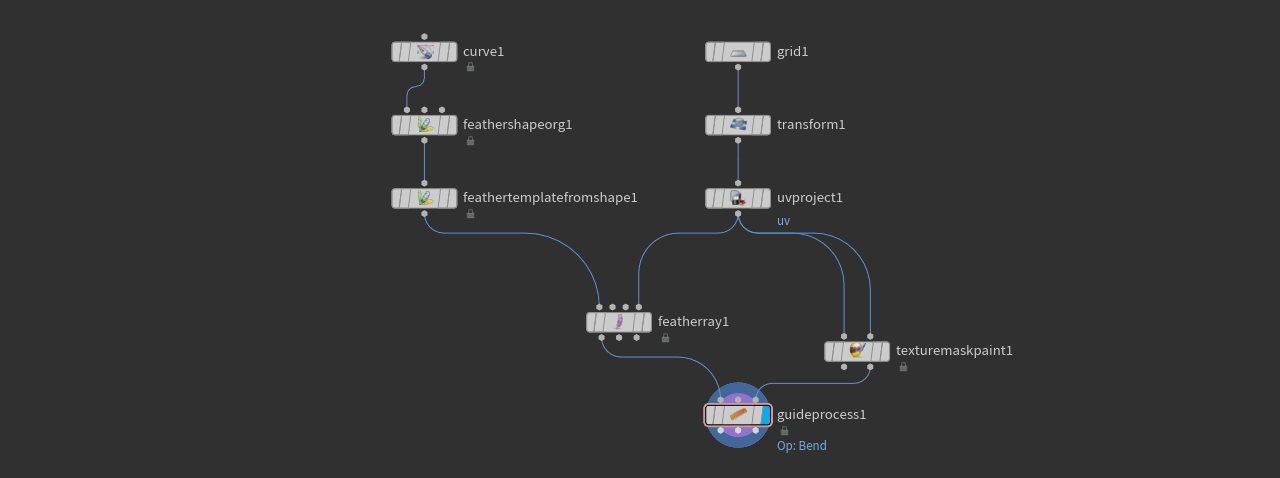
To create a bending mask you need a feather and a UV projection network, as mentioned in the introduction. For the feather you can use the Feather Template tool from the tab menu. This tool adds three nodes and draws a basic feather.
-
You don’t have to make any changes on this feather’s curve for this guide, but you might want to increase the
Feather Template from Shape SOP’s Barb Density, e.g. to
2000. To get thinner barbs, decrease Width Root and Width Tip. -
It’s also important that the template node’s Add Barb UV Attributes is turned on.
The UV projection network, however, consists of a Grid SOP, an
UV Project SOP to create the UVs, and a Feather Ray SOP. The latter node transfers the UVs from the grid to the feathers.
-
To adjust the grid to the feather’s size and position, use the grid’s Size and Center parameter.
Here’s a preview of the complete network.

Masking 
This part of the network lets you paint a mask to precisely define where the feather will be bent. The underlying grid acts like a canvas and the Feather Ray SOP transfers transfers the mask to the feather. Here you can see the grid UVs beneath the feather.

-
Add a Texture Mask Paint SOP. Connect both inputs to the UV Project SOP.
-
Set Mask Name to
bend. -
For more accurate results, change Resolution to 2048.
-
On the Brush section, make sure that Space is set to World. This is a common source of errors.
-
From the tab menu, choose the Guide Process (Bend) tool.
-
Connect its first input with the output of the Feather Ray SOP.
-
The third input is linked to the second output of the Texture Mask Paint SOP.
-
-
Go to the Operations tab. Next to the Operation parameter you can see two dropdown menus. From the second menu, choose Feather Barbs, because you're working with a condensed feather here.
-
From the Mode dropdown, choose Direction Constant.
-
Open the dropdown menu of the Angle parameter and choose Texture Primitive.
The Angel value will be considered when you draw the mask and it’s the maximum amount of bending. With a value of
-80, for example, the barbs will be bent in direction of the shaft. Positive value will bent the barbs towards the tip. -
On the new Angle Texture parameter, replace the default entry with
bend. This is the name of the mask from the Texture Mask Paint SOP. -
Next to Angle Texture you can find another dropdown. From there, choose Feather UV.
You have prepared the feather to receive masking information from your mouse strokes.
Painting 
You're ready to paint on the grid canvas.
-
Select the Guide Process SOP and turn on its blue Display/Render flag.
-
Now, select the Texture Mask Paint SOP.
-
Hove the mouse over viewport and press Enter to turn on the painting mode. When you move the mouse, the grid turn grey and you can see a circular brush.
If the brush isn’t visible, use the mouse_wheel and scroll down to make the brush smaller. Scroll until you can see the white circle. Alternatively, you can also enter a value on the texture paint node’s Brush ▸ Radius parameter.
You can control the amount of bending on the Brush section of the texture mask node. When you decrease Foreground Value, the bending effect will turn out weaker, while high Soft Edge values create smoother transitions. If you want to paint the mask from scratch, press Clear.
Due to Houdini’s procedural nature it’s possible to change the feather’s characteristics even after the painting of mask. On the Feather Template from Shape you can increase Barb Density and Barb Segments. You can also work on the Guide Process SOP’s Angle and Random Angle parameters at any time, or you restrict the mask to the Left barbs only.
Mask painting also works in conjunction with clumping and other guide process nodes. In the image below, a Feather Clump SOP was added between the Feather Template from Shape and Feather Ray SOPs to create the typical splits between the barbs.
-
On the left you see the original feather.
-
The mask in the middle ist just a vertical stroke along the shaft.
-
The right feather shows the bending effect.
