| On this page |
Overview 
In Houdini you can select objects or components and then choose a shelf item or command to apply to the selection, or you can choose a shelf item and the tool will prompt you for the type of selection it needs.
Select tool 
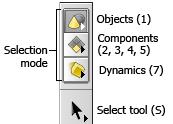
The selection mode buttons and the Select tool are at the top of the toolbox to the left of the 3D view.
|
1 |
Object mode |
Sets the viewer to object selection mode. Clicking this switches the view to the Scene (object) level. Right-click the icon for object mask options. |
|
Component mode |
Sets the viewer to component selection mode. Right click the icon for selection types (points, primitives, edges, vertices) and options. |
|
|
7 |
Dynamics mode |
Sets the viewer to dynamics selection mode. |
|
S |
Select |
Tapping the S key switches to the Select tool. Holding S temporarily switches to Select tool while you hold the key, allowing you to quickly reselect geometry while using another tool. The Select tool lets you select objects or geometry before applying shelf items or menu commands. In object mode, the selection arrow is black. In component mode, the arrow is white. This is simply to help you remember which mode you're in when you're working in the viewer. Right click this icon for a menu of selection options. |
See also using handles.
Selection buttons and keys 
Toolbar 
These options are only in the toolbar at the geometry level.
Select Points
Select Edges
Select Primitives
Select Vertices
Select Breakpoints
Box Selection
When you drag the Select tool, drag out a box and then select what’s inside the box.
Lasso Selection
When you drag the Select tool, drag out a freeform shape and then select what’s inside the shape.
Brush Selection
When you drag the Select tool, select any objects/components within the brush radius of the pointer.
Laser Selection
When you drag the Select tool, select any objects/components the mouse pointer specifically touches.
Select Visible Geometry Only
When this is on, drag selections only select visible objects/components (for example, they won’t select things behind other things, or components on the far side of a model).
Select Fully Contained Geometry Only
When this is on, box and lasso selections only select objects/components completely inside the box/shape. When this is off, they also select objects/components that touch intersect the selection box/shape.
These options are only in the toolbar at the geometry level.
Select Groups or Connected Geometry
Selecting a component selects all other components in the same group (if the component is in a group), or all connected components.
See also selecting groups.
Select Whole Geometry
Selecting a component selects all other components of the same geometry. This may be useful if you have several visible, un-merged geometries (using the selectable template flag).
Select by Normal
Selecting a component grows the selection to other components that are within the specified Spread Angle. This either selects from connected components or all components in the same geometry depending on whether Select All Matching Normals is enabled. If Use Static Reference Normal is selected, this will instead compare the normal of each component to a single reference normal, rather than to its adjacent components.
These options are only in the toolbar when selecting objects.
Select Material
When this is on, clicking an object in the viewer selects any material assigned to the object.
Select Constraints
When this is on, clicking an object in the viewer selects any CHOP nodes currently overriding the object’s parameters.
Select tool options 
Right-click the Select tool in the toolbox to the left of the viewer to get a menu of general selection options. Some of these options are duplicated in the operation toolbar when the Select tool is active.
Box Selection
When you drag the Select tool, drag out a box and then select what’s inside the box.
Lasso Selection
When you drag the Select tool, drag out a freeform shape and then select what’s inside the shape.
Brush Selection
When you drag the Select tool, select any objects/components within the brush radius of the pointer.
Laser Selection
When you drag the Select tool, select any objects/components the mouse pointer specifically touches.
Area Select Visible Geometry Only
When this is on, drag selections only select visible objects/components (for example, they won’t select things behind other things, or components on the far side of a model).
Area Select Fully Contained Geometry
When this is on, box and lasso selections only select objects/components completely inside the box/shape. When this is off, they also select objects/components that touch intersect the selection box/shape.
Add to Selection
In this mode, clicking an object/component adds it to the selection. Generally you will hold ⇧ Shift to enter to enter this mode temporarily, but you can set it as the default selection mode.
Toggle Selection
In this mode, clicking an object/component switches it between selected/unselected. Generally you will hold ⌃ Ctrl + ⇧ Shift to enter to enter this mode temporarily, but you can set it as the default selection mode.
Remove from Selection
In this mode, clicking an object/component removes it to the selection. Generally you will hold ⌃ Ctrl to enter to enter this mode temporarily, but you can set it as the default selection mode.
Replace Selection
The default selection mode: clicking an object/component makes it the only selected thing. This is the default behavior you can modify with ⇧ Shift (Add) and ⌃ Ctrl (Remove).
Intersect Selection
In this mode, clicking an object/component makes it the only selected thing, but only if it was already selected. This mode is largely useless.
Secure Selection
Prevents selecting geometry except in the Select tool.
See secure selection for more information.
Reselect
Lets you change the selected objects/components the current node operates on.
See reselect for more information.
Component selection options 
The selection mode controls what type of objects/components you are selecting:
|
1 |
Objects Right click this icon for a menu of selectable object types and other options. |
|
2 |
Points Right click this icon for a menu of component types, and other options. |
|
3 |
Edges |
|
4 |
Faces (and other primitives) |
|
5 |
Vertices |
|
Breakpoints |
Object selection options 
Right-click the button to get a menu of object selection options. The object type masks can be if, for example, if you're working with a control nulls for a character and want to prevent accidentally picking lights or cameras in the scene.
Select Geometry Objects
When this is on, the Select tool can select Geometry objects at the scene level.
Note that turning this off does not prevent selecting any geometry (for example, you can still select geometry created by asset nodes). It only prevents selecting actual Geometry nodes.
Select Camera Objects
When this is on, the Select tool can select cameras at the scene level.
Select Light Objects
When this is on, the Select tool can select lights at the scene level.
Select Bone Objects
When this is on, the Select tool can select bones at the scene level.
Select Null Objects
When this is on, the Select tool can select null objects at the scene level.
Select Blend Objects
When this is on, the Select tool can select blend objects at the scene level.
Select All Other Object Types
When this is on, the Select tool can select miscellaneous object types (objects that are not geometry objects, cameras, lights, bones, nulls, or blends).
Enable/Disable All Object Types
Toggles the selectable object types.
Select Entire Digital asset
When this is on, selecting an object contained in a digital asset will select the asset node instead of the object.
Select Material
When this is on, clicking an object in the viewer selects any material assigned to the object.
Select Constraints
When this is on, clicking an object in the viewer selects any CHOP nodes currently overriding the object’s parameters.
Select All Objects
Selects all objects (matching the current object type selection mask).
Show Name on Hover
Draws the name of the object under the mouse pointer in the viewer. This only works in the Select tool.
Secure selection 
When secure selection is on, when you're using a tool other than the selection tool (for example, the Handles tool to interact with the handles of the current node), you cannot change the current selection. You need to switch to the Select tool (hold S) to select components.
This can be useful to prevent accidentally changing the selection when you meant to click a handle. However, it can make it hard to work smoothly in interactive tools like Edit, and it can take time to train yourself to hold a key to select.
| To... | Do this |
|---|---|
|
Turn secure selection on or off |
Turn Secure Selection on To permanently set whether Secure Selection is on by default, choose Edit ▸ Preferences ▸ Objects and Geometry and turn on the corresponding checkbox. |
Selecting edge loops 
| To... | Do this |
|---|---|
|
Select an edge loop |
Double-click an edge to create a loop. |
|
Select multiple edges |
Hold ⇧ Shift and double-click edges to create loops. |
|
Remove edge loop |
Hold ⌃ Ctrl and double-click the loop to remove. |
Tip
Holding ⇧ Shift and ⌃ Ctrl will toggle adding or removing edge loops depending on the selection.
Selecting face loops 
To select face loops, hold A and click the first face and the adjacent face in the direction to create the loop.


Flood fill selection 
You can use the flood filling feature to select islands of unselected geometry, or deselect islands of selected geometry.
Hold h and click to flood fill from the component under the mouse. You can also hold ⇧ Shift and/or ⌃ Ctrl to add, remove, or toggle the selection.


Selecting groups 

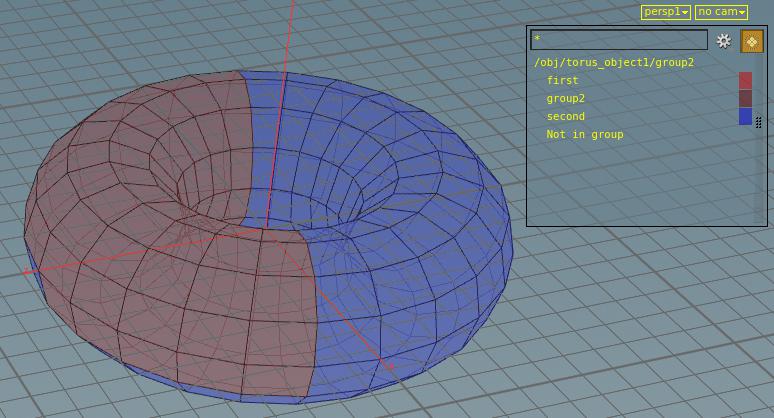
Groups are named collections of components (faces, edges, or points). When selecting in the viewport, you can use the group menu icon to select a group instead of/in addition to selecting individual components.
-
When selecting components, the operations toolbar across the top of the viewport should have selection-related buttons. Click the
Show Group List icon to show or hide the group list in the viewport.
Even when not selecting, you can click the
Show Group List icon in the view toolbar (on the right side of the viewport) to show the group list for visualizing groups.
-
You can resize the group list by dragging the sides or corner.
-
In the group list, click the
Show Group Colors to switch coloring components according to their groups on or off.
-
Click a name in the group list to select the components in the group. You can also shift-click the name to add to the current selection and control-click to remove from the current selection.
-
Use the items in the
gear menu to change or filter the display of group names.
-
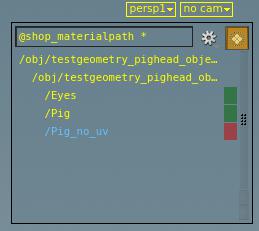
To select/visualize “islands” of disconnected geometry instead of groups, open the
gear menu and choose “3D Connectivity”. To select from disconnected UV pieces, choose “UV Connectivity”. To select from disconnected or unshared edge geometry, choose “Edge Cut Connectivity”. To go back to selecting groups instead of by connectivity, choose “All Groups”.

-
To select/visualize areas where a certain attribute has the same value, open the
gear menu and choose an attribute name from the Attribute sub-menu.
Path-like string attribute values are displayed as a hierarchy. Floating-point attributes are broken into 1-unit sized ranges.
-
Even when selecting on component type, you can use the
gear menu to choose a different component type instead of Match selection type. For example, if you are selecting faces, you can choose Points to work with point groups and point attributes. When you click a point group, Houdini will convert the point group to a face selection.
Pattern selection 
You can create a linear selection pattern and expand it in various directions to consistently repeat a selection over the geometry.
The base pattern can be defined from the currently selected components. When you press ⇧ Shift + P to set a pattern, the path along the oldest to the most recently selected component forms the base pattern. The last component is considered to be the start of the next iteration of the pattern.
You can expand all components in the selection pattern in 4 directions: forward, backward, left, and right. There are various options for expansion. You can:
-
expand each component to just the next component in a direction
-
expand each component as much as possible in a direction until you hit a boundary or reach a component that is already in the pattern
-
expand to the component currently under the mouse from the closest component in the pattern
There are four types of patterns that can be defined: primitive, point, edge loop, and edge ring.
| To... | Do this |
|---|---|
|
Starting a pattern |
Press ⇧ Shift + P to create a pattern. |
|
Expand the pattern forward |
Press ⇧ Shift + UpArrow to expand the pattern one unit forward. |
|
Expand the pattern forward to the end |
Press ⌃ Ctrl + ⇧ Shift + UpArrow to expand the pattern forward as much as possible. |
|
Expand the pattern up to the component under the mouse |
Hold k and click on the desired component. |


Reselect geometry 
When you use a tool on the shelf, it operates on the current selection (or prompts you to select something if nothing is selected). The node remembers which components were selected in its parameters. You can go back and change which components the node operators on.
| To... | Do this |
|---|---|
|
Re-do a node’s selection |
|
|
Re-select the contents of a Group parameter |
In the parameter editor, click the |
Tip
You can repeat the current node rather than modifying its selection by pressing Q.
Tips 

-
Right click the selection type icons (Object, Component, Particles, or Dynamics) to show a menu of subtypes which you can allow to be selected or prevent from being selected.
This lets you, for example, work with characters and props in your scene without worrying about accidentally selecting lights.
-
To make selecting overlapping geometry easier, you can choose Edit ▸ Preferences ▸ Objects and Geometry and turn on Popup menu selection.
When this option is on, if you click to select and the mouse is over multiple pieces of geometry, Houdini gives a list of choices of what to select.
-
If you want “secure selection”, “area select visible geometry only”, or “select entire digital asset” to always be on by default, choose Edit ▸ Preferences ▸ Objects and Geometry and turn on the corresponding checkbox.
-
You can turn off highlighting of geometry under the mouse pointer. In the main menus, choose Edit ▸ Preferences ▸ Objects and Geometry and turn off Highlight selected geometry in viewport.