| On this page |
Overview 
Houdini lets you save a set of parameter values, or a set of network items (nodes, dots, sticky notes, boxes), as a named recipe. You can then apply those parameter values, or recreate those nodes, whenever you want.
You can create three types of recipes: parameter presets, tools, and decorations.
Recipes are saved as assets, where the asset category is a special Data category, not a regular node type category like Sop or Lop.
Saving node presets 
You can save a set of parameter values and even spare parameters on a node as a recipe, and then apply those saved parameter values to other nodes. You can then apply the preset to an existing node when you want to set those values all at once.
You can also optionally save the contents of a node as part of the recipe. This might be useful, for example, to save the dive target contents of a Pyro Solver SOP so that applying the recipe sets certain parameters on a node and also fills in the DOP network.
Note
This type of recipe is for changing the parameter values and possibly the contents of an existing node. If you just want a way to put down a certain type of node with certain parameter values and contents, use a tool recipe instead (see below).
When you save spare parameters as part of a preset, applying the preset will create those spare parameters on the target node if they don’t already exist.
| To... | Do this |
|---|---|
|
Save parameter values as a preset |
Tip If you edit the parameters in the parameter editor pane, you can click |
|
Apply a parameter preset to a node |
|
|
Edit an existing parameter preset |
|
See how to edit a preset below.
Saving tool recipes 
A tool recipe saves a node or set of nodes, including their wiring and current parameter values, as a new tool on the tab menu. You can then choose the tool from the tab menu to recreate the saved node setup.
| To... | Do this |
|---|---|
|
Save a node or set of nodes as a tool |
|
|
Place the contents of a tool recipe |
Placing a tool recipe works the same as other tools that create a single node, except a recipe can create multiple nodes at once. See adding nodes for more information.
|
|
Wire the contents of a tool into or out of a node |
Starting a wire and choosing a tool recipe works the same as other tools that create a single node, except a recipe can create multiple nodes at once. See adding nodes for more information.
|
See how to edit a tool below.
Saving decoration recipes 
A decoration is similar to a tool recipe, but you designate one node in the recipe as the “central” node. The central node is like a placeholder for the node the user applies the decoration to. When you apply the decoration to a “target” node in the network, Houdini does the following:
-
Applies any parameters the recipe author saved on the central node.
-
Creates the other nodes in the recipe around the target nodes.
-
Rewires connections on the target node into the appropriate nodes in the new node setup, as set by the recipe author.
For example, if you usually append nodes to sharpen the volume after a Pyro solver, you could create a tool recipe that puts down a pre-made set up of a Pyro solver plus the sharpening nodes, or you could create a decoration recipe that adds the sharpening nodes to an existing Pyro solver. Or, you could even create both, to allow you to create new setups using the tool, and add to existing setups using the decoration.
| To... | Do this |
|---|---|
|
Save a node setup as a decoration |
|
|
Apply a decoration to a node |
In the network editor, right-click the node, open the Recipes submenu and click the decoration you want to apply. |
See how to edit a decoration below.
Controlling wiring 
You can control how existing connections are wired into the nodes created by tool and decoration recipes.
-
For tool recipes, you can choose which nodes in the recipe act as the “input” and “output” for the recipe. These are used when you start a wiring operation and then choose the tool from the tab menu, or when you drop the tool contents on an existing wire.
-
For decoration recipes, you can choose up to four input nodes, and one output nodes. When the decoration to the “target” node, Houdini rewires any incoming and/or outgoing connections on the target to those nodes.
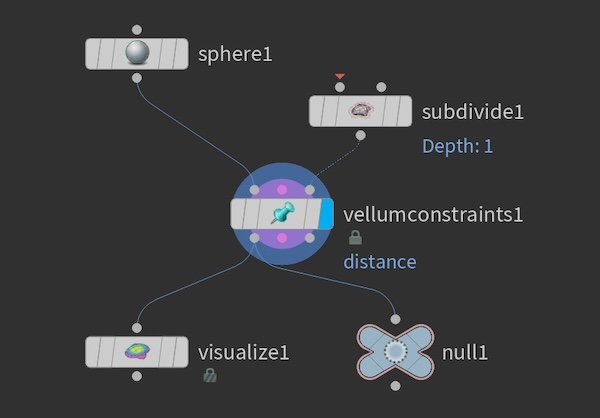
For example, you might want to create a tool recipe that takes an incoming connection, subdivides it, wires it into the “collision geometry” (third) input of a Vellum Constraints node, collides it with a sphere, splits the output to a visualize node a null, and uses the null as the outgoing connection:

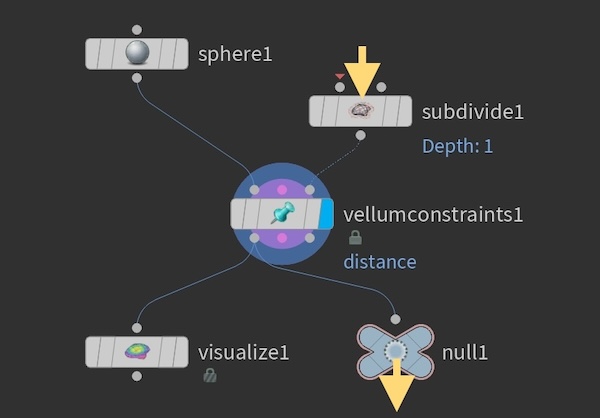
When you capture these nodes as a tool, you would set the Subdivide node as the recipe input, and the null as the recipe output:

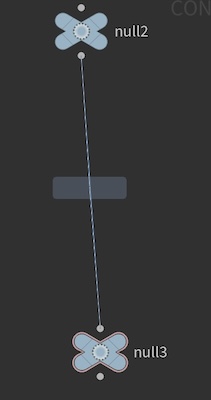
Then, if you drop the tool onto a wire:

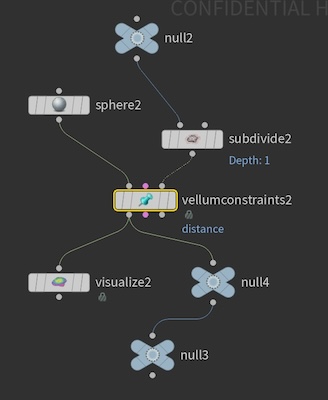
…Houdini will replace the wire with connections to the intput and output nodes of the recipe:

| To... | Do this |
|---|---|
|
Set a node as a recipe input or output |
In the recipe dialog, click the node in the schematic view, and choose Set as Input or Set as Output, or choose the node from the input or output pop-up menus. You can only set nodes “upstream” from the central node as an input, and you can only set nodes “downstream” from the central node as the output. |
Tip
Currently, Houdini only supports wiring the first input/output of a node. However, as a workaround you can wire a Null node into the input/output and then use the Null as the designated input/output for the recipe.
Target node patterns 
For presets and decorations, you can choose which node types the recipe appears for in the recipe menu.
-
The default is for it to appear for the same node types as the original node (for node presets) or the central node (for decorations).
-
When creating a recipe, you can use the Show for menu to choose to show the recipe for any node in the same category (for example, any SOP node), or for any node type whose name matches a certain custom pattern.
To have the recipe show up for a set of nodes, choose Show for ▸ Node Matching a Custom Pattern and set the custom pattern to match the nodes you want the recipe to show for.
-
The pattern uses standard Houdini pattern matching, as in the hou.text.patternMatch function. The
*wildcard matches any run of characters. -
The pattern can be a space-separated list of patterns. The recipe will show for a node type whose name matches any of the patterns in the list.
-
Houdini tries to match the pattern to a node’s internal name including category, for example
acme::Sop/foobar::2.0. -
For example, to match all nodes in the
acmenamespace, useacme::*. -
If you want to match multiple categories, such as any SOP or any DOP, you need to write a space-separated list of multiple patterns to match the possible cases, in this case SOP without namespace, SOP with namespace, DOP without namespace, and DOP with namespace:
Sop/* *:Sop/* Dop/* *:Dop/*. -
You don’t have to use wildcards in the pattern. If you want the recipe to only show for a specific set of node types, you can simply write the internal names of those nodes in a space-separated list.
Tip
You can edit the pattern after creating the recipe, if you find a case where the pattern doesn’t match properly.
You can also use hou.text.patternMatch and hou.Node.nameWithCategory to check whether a node would match the pattern:
>>> my_pattern = "acme::*"
>>> # Does this node match the pattern?
>>> hou.text.patternMatches(my_pattern, hou.node("/obj/geo1/my_node").type().nameWithCategory())
True
Choosing where to save (advanced) 
The Save to menu in recipe dialogs defaults to User Preferences. This saves all recipes into an asset library in your user preferences directory, which usually all you need. However, if you want to embed the recipe in an existing asset, or if you are working on a recipe to be shared (such as in a large studio), you can change where you save the recipe, and you can edit the recipe asset’s internal name.
For example, if you're making a tool for shared use in a studio, you may want to save it to a shared network drive, and give it an internal name using a studio-specific namespace and a version number, such as acme::vellum_cloth_tool::2.0
Save location 
| To... | Do this |
|---|---|
|
Choose where to save a recipe |
In the recipe dialog, click the Save to pop-up menu and choose one of the following: User Preferences Saves the recipe asset into Store In Same Library as ‹name› Saves the recipe into the same asset library as the source node type. This option is not available for “factory” node types installed with Houdini. $HIP/otls Directory Saves the asset into an $JOB/otls Directory Saves the asset into an Embed in Current HIP File Embeds the asset as part of the current scene file. This is sometimes useful for sharing a self-contained, working scene file. Note that this can bloat the size of the scene file. Custom File Path Choose this option, then enter the path to the asset library you want to save to in the field next to the pop-up menu, or click the file chooser icon to choose the file to save to from a file dialog. |
Internal name 
Each recipe asset has a default internal name designed to prevent naming conflicts. It uses the type of the node you created the asset from as the scope, your username (or the value of $HOUDINI_AUTHOR if it’s set) as the namespace, and an encoded version of the recipe title as the base name.
| To... | Do this |
|---|---|
|
Change the internal name when you create a recipe |
|
Editing recipes 
| To... | Do this |
|---|---|
|
Delete a recipe |
|
|
Rename a recipe |
|
|
Edit the contents of a recipe |
|
Tip
Since recipes are stored in digital assets, you can also manage them using the Asset Manager (Assets ▸ Asset Manager), the Type Properties Editor, and HOM functions for manipulating node types and asset definitions.
Advanced Options 
You will not usually need to change these settings. To show them, in the recipe dialog, click Show Advanced Options.
Recursively save node contents
If you turn this off, the tool or decoration will only have the top level nodes, it will not save the contents of subnetworks or unlocked assets.
Save Editable Dive Targets
Assets can specify subnetworks in their definitions as editable dive targets, where the user who created the asset instance can put their own nodes to affect how the asset works. Houdini normally saves the contents these subnetworks as part of the recipe. Turn off this option to ignore the contents of these subnetworks.
There are separate controls for saving editable contents of the central/anchor node, and saving them for all other nodes.
Save View Flags (at top level)
Normally, Houdini does not save view flags (output, display, render) as part of the recipe, because usually you don’t want applying a recipe to change them. Non-view flags (such as “frozen” or “bypass”) are always saved. You can turn on this option to save view flags as part of the recipe.
Only Save Nodes
Normally Houdini saves sticky notes, network boxes, and dots, as part of the recipe. If you turn on this option, the recipe will only save nodes, ignoring other types of network objects.
Scripting 
You can use the following HOM functions to save and apply recipes:
HOM also has various lower-level functions and methods to return JSON-like data from Houdini objects, and set up Houdini objects based on that JSON-like data: