-
Pixel-to-camera rays that hit some object in the scene.
-
Used to resolve noise/artifacts from:
-
Geometry and Curve Details
-
Displacement
-
Depth of Field
-
Motion Blur
-
| On this page |
Previous Rendering
Overview 
Sampling is the heart of modern render engines. Sampling refers to the simulated light rays Karma sends into the scene to determine the color of each pixel of the rendered image. This chapter goes into some detail about how Karma does sampling.
Tip
The terms sample, path, and ray are generally interchangeable when talking about path tracing.
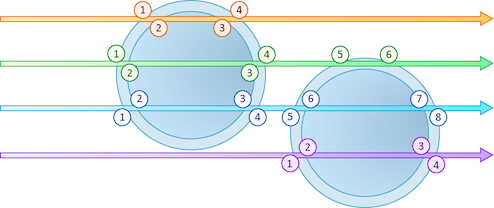
Karma begins by sending samples from the camera that then hit objects in the scene. These are the primary samples. When objects are hit, Karma uses the object properties (such as surface orientation and materials) to send out secondary samples. These additional rays hit other surfaces and lights, until the final color of the pixel is determined.
Primary
Secondary (Direct)
Secondary (Indirect)


Tip
The behavior of Primary Samples can also refer to Path Traced Samples.
Primary samples 
Secondary samples 
-
Rays cast from the hit position of primary samples, toward other directions in the scene.
-
Direct Samples are position-to-light rays:
-
Light Samples
-
-
Indirect Samples are position-to-position rays:
-
Diffuse
-
Reflection
-
Refraction
-
Sub-Surface Scattering
-
Volume
-
Oversampling (sending out more rays than you need for a given quality level) and under-sampling (sending out too few rays to achieve a given quality level) are sources of slow-downs and noise when rendering. Understanding the differences between primary and secondary samples will help you to use Karma more effectively.
Estimating ray counts 
Understanding how primary and secondary samples are related helps estimate the maximum number of rays Karma uses when rendering. User settings, per-object overrides, and algorithms make predicting the exact number impossible. Understanding how these parameters influence one another helps debug performance issues.
The number of rays Karma uses is determined by the total number of primary samples and secondary samples fired for each pixel. The selected convergence mode also affects this estimate, however pixel oracles only affect the number of primary samples.
Automatic Convergence
Path Traced Convergence
|
|
|
|
|
|
|
|
|
|
|
|
|
|
|
|
|
|
|
|
|
|
|
|
Oversampling (sending out more rays than you need for a given quality level) and under-sampling (sending out too few rays to achieve a given quality level) are sources of slow-downs when rendering. Understanding the differences between primary and secondary samples will help you to use Karma more effectively.
Primary samples 
The rays that Karma sends from the camera into the scene are called primary samples. Primary samples resolve anti-aliasing artifacts from small geometry detail (such as curves or displacement), depth of field, and motion blur. Sufficient pixel samples improves the overall sharpness and quality of the image.
Tip
Primary Samples are sometimes also called camera rays, AA samples, or pixel samples, especially by other renderers.
A single primary sample is usually too coarse for anything more than debugging. Increasing the pixel samples gives much smoother representation of the shapes in the scene. While this improves quality, even in secondary noise, it can be overkill because primary samples are a multiplier on the secondary samples. The pixel oracle can help Karma avoid over-sampling pixels.
Pixel oracle 
Karma supports adaptive primary samples, using pixel oracles. Pixel oracles represent the logic Karma should use when casting rays from each pixel. Currently, Karma ships with 2 pixel oracles: Variance and Uniform.
Note
Starting with Houdini 20.5, Karma XPU supports adaptive path traced samples via the pixel oracle.
By default, Karma uses the Variance oracle, which detects differences between neighboring pixels. This is to avoid sending too many primary samples by stopping when each additional sample will have very little effect on the final pixel color. Karma will send a small number of primary samples, then the Variance Oracle starts comparing pixels against the Oracle’s Variance Threshold. Once the variance between the previous samples of the current pixel and adjacent pixels fall below that threshold, Karma stops firing primary samples for that pixel.
The Uniform Oracle simply sends the same number of primary samples from every pixel in the scene. You may want to switch to the Uniform Oracle when extreme depth of field (DOF) or motion blur dominates the image. In those cases, Karma ends up fully sampling every pixel anyway, so measuring variance just adds overhead.
![]() Pixel Oracle Render Properties
Pixel Oracle Render Properties
Secondary samples 
Once a primary ray intersects an object, Karma will cast Secondary Samples from each primary ray’s hit location. For every hit position, Karma will send direct and indirect secondary samples. Direct samples are sent towards lights. Indirect samples are sent along directions determined by the geometry and shader, at the hit position. Secondary samples can be diffuse, reflection, refraction, subsurface, or volume rays.


Volumetric objects are handled a bit different from surfaces. Instead of sampling only a single hit position, Karma marches along the ray, sampling multiple points through the volume. At each positions along the ray, direct and indirect rays are sent out into the scene. Not every position within the volume is used; instead Karma intelligently chooses a subset of positions to sample.


![]() Min/Max Secondary Properties
Min/Max Secondary Properties
Min Secondary Samples
Minimum number of rays to cast in per-component variance anti-aliasing.
Max Secondary Samples
Maximum number of rays to cast in per-component variance anti-aliasing.
Secondary Noise Level
Noise threshold to determine the number of indirect rays cast for indirect bounce when the Convergence Mode is set to “Automatic”. Decreasing this threshold (for example, to 0.001) will theoretically send more indirect rays and decrease noise, however the “extra” rays will likely be cancelled out by the Max Ray Samples parameter. The correct way to decrease noise is to increase the number of samples per pixel, rather than change this threshold.
If you are using Variance Pixel Oracle, you should set the same value for both threshold parameters. Setting the oracle’s threshold lower may make the indirect component reach its threshold sooner and cast fewer indirect rays, but the oracle decides to cast more expensive camera rays because the amount of final noise in the beauty pass is higher than the oracle’s threshold.
Convergence modes 
The convergence mode is the strategy used by Karma to decide when to send secondary samples into the scene. Karma CPU supports two convergence modes: Automatic and Path Traced, while Karma XPU only supports Path Traced mode. While convergence mode specifically affects secondary rays, it can affect how many primary samples are needed, especially for Karma CPU.
The next chapters have more information on convergence modes for Karma CPU and Karma XPU specifically.
![]() Convergence Mode Properties
Convergence Mode Properties
Limits 


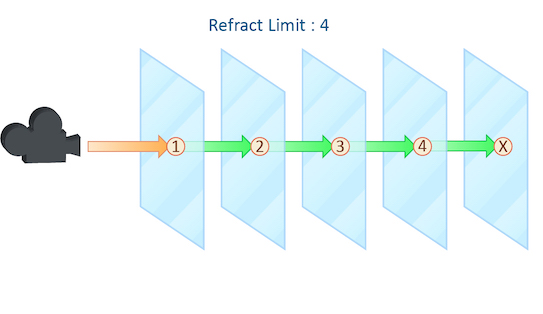
To avoid rays potentially traveling forever, Karma provides per-type “bounce” limits. You may need to increasing these limits to ensure Karma takes enough indirect samples to get the desired look. Refraction often needs a higher limit, to improve the quality of scenes with glass and liquid materials. Volumes may also benefit from increased limits, to capture the subtle effects of volumetric lighting.
Increasing the limits can increase render times substantially, and require higher numbers of rays to resolve noise. Be careful to only increase limits when needed to achieve a desired look.
![]() Limits Render Properties
Limits Render Properties
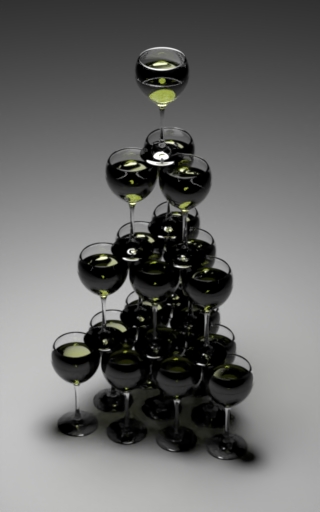
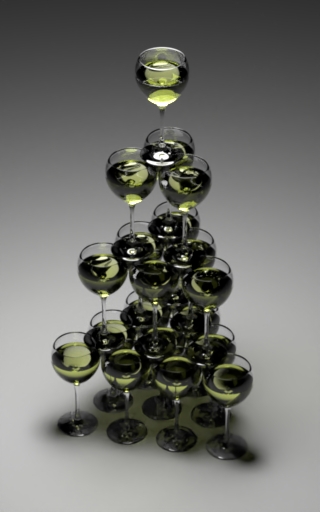
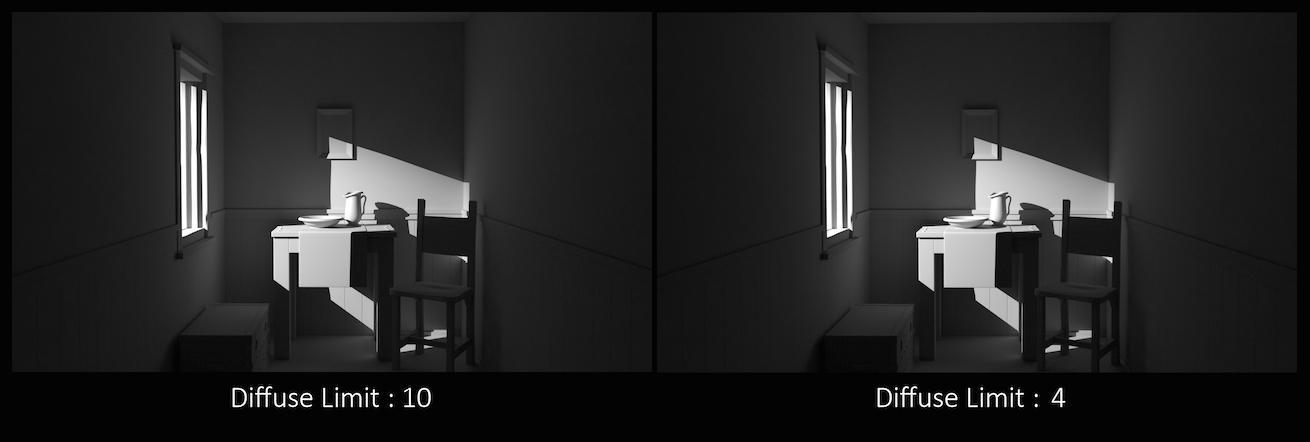
Diffuse Limit
The number of times diffuse rays can propagate through your scene.
Unlike the Reflect and Refract Limits, this parameter will increase the overall amount of light in your scene and contribute to the majority of global illumination. With this parameter set above zero diffuse surfaces will accumulate light from other objects in addition to direct light sources.

In this example, increasing the Diffuse Limit has a dramatic effect on the appearance of the final image. To replicate realistic lighting conditions, it is often necessary to increase the Diffuse Limit. However, since the amount of light contribution usually decreases with each diffuse bounce, increasing the Diffuse Limit beyond 4 does little to improve the visual fidelity of a scene. Additionally, increasing the Diffuse Limit can dramatically increase noise levels and render times.
This is a float because all limits are stochastically picked per-sample, so for example you can set the diffuse limit to 3.25 and have 25% of the rays with a diffuse limit of 4 and 75% of rays with a diffuse limit of 3.
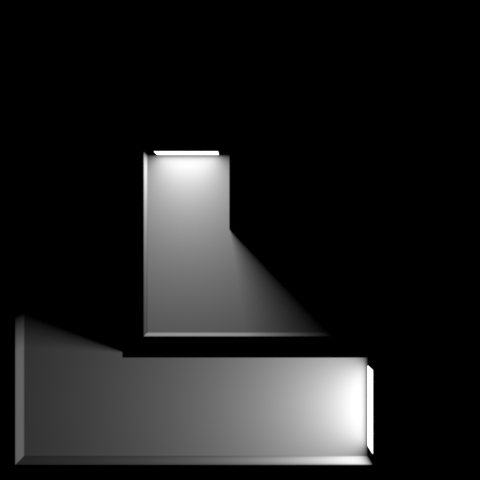
Reflection Limit
The number of times a ray can be reflected in your scene.
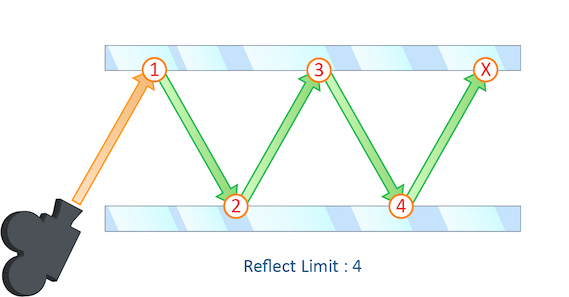

This example shows a classic “Hall of Mirrors” scenario with the subject placed between two mirrors.
This effectively creates an infinite series of reflections.
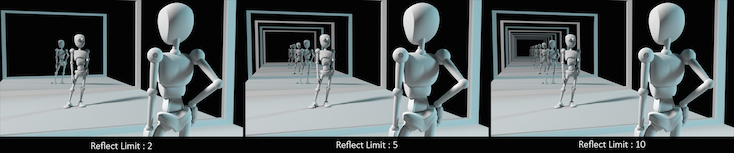
Remember that the first time a light source is reflected in an object, it is considered a direct reflection. Therefore, even with Reflect Limit set to 0, you will still see specular reflections of light sources.
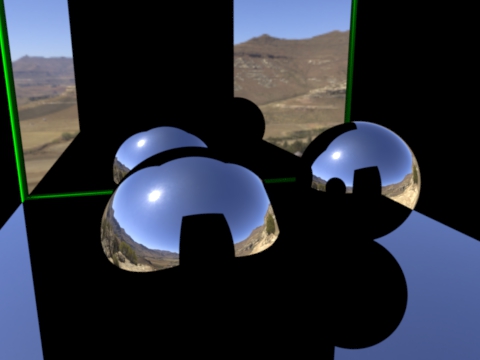
From this camera angle the reflection limits are very obvious and have a large impact on the accuracy of the final image. However, in most cases the reflection limit will be more subtle, allowing you to reduce the number of reflections in your scene and optimize the time it takes to render them.
This is a float because all limits are stochastically picked per-sample, so for example you can set the diffuse limit to 3.25 and have 25% of the rays with a diffuse limit of 4 and 75% of rays with a diffuse limit of 3.
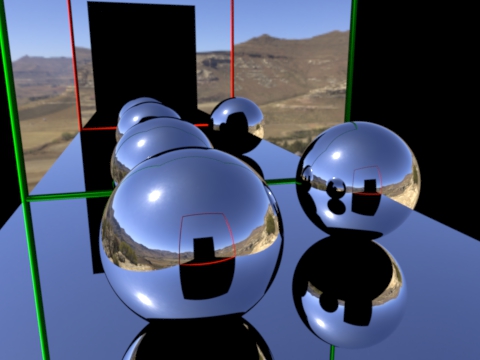
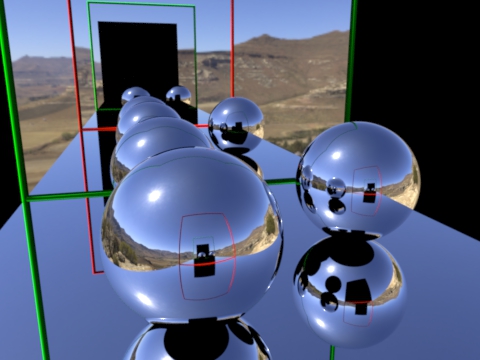
Refraction Limit
This parameter control the number of times a ray be refracted in your scene.
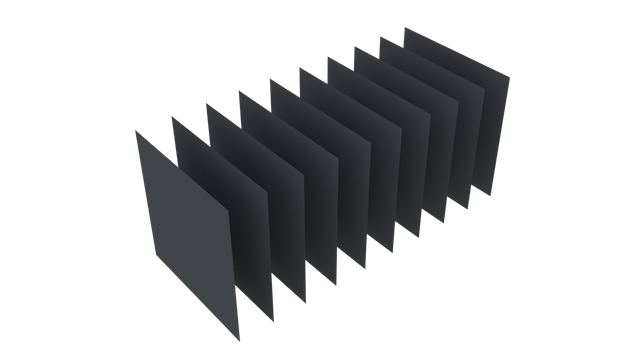
This example shows a simple scene with ten grids all in a row.
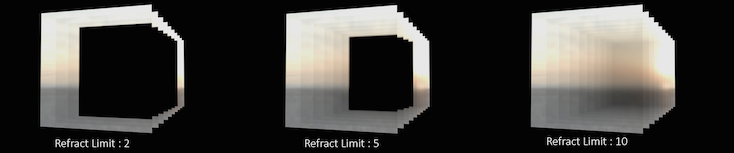
By applying a refractive shader, we will be able see through the grids to an image of a sunset in the background.
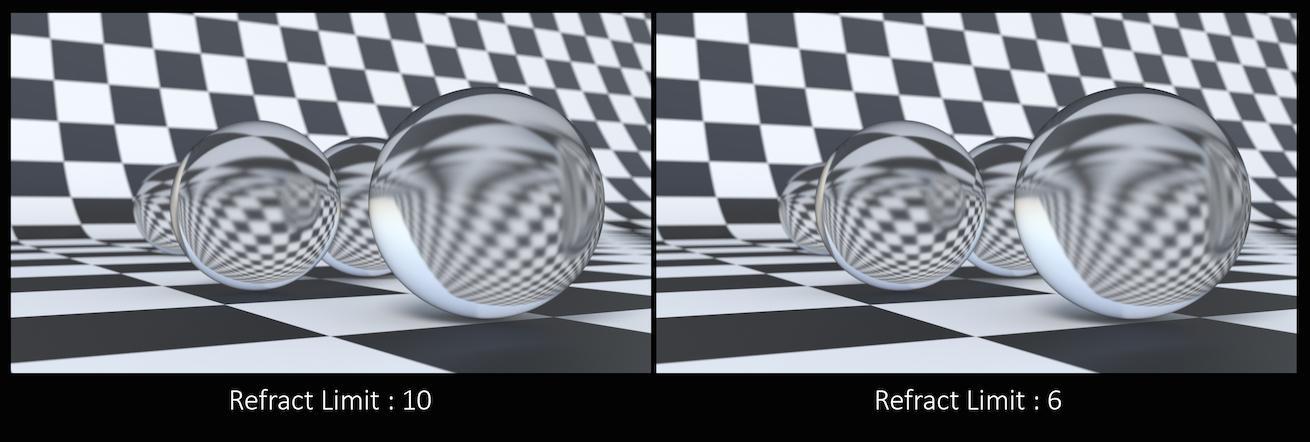
From this camera angle, in order for the image to be accurate, the refraction limit must match the number of grids that that are in the scene. However, most scenes will not have this number of refractive objects all in a row and so it is possible to reduce the refract limit without affecting the final image while also reducing the time it takes to render them.
Keep in mind that this Refract Limit refers to the number of surfaces that the ray must travel through, not the number of objects.
Remember that the first time a light source is refracted through a surface, it is considered a direct refraction. Therefore, even with Refract Limit set to 0, you will see refractions of Light Sources. However, since most objects in your scene will have at least two surfaces between it and the light source, direct refractions are often not evident in your final render.
This is a float because all limits are stochastically picked per-sample, so for example you can set the diffuse limit to 3.25 and have 25% of the rays with a diffuse limit of 4 and 75% of rays with a diffuse limit of 3.
Volume Limit
The number of times a volumetric ray can propagate through a scene. It functions in a similar fashion to the Diffuse Limit parameter.
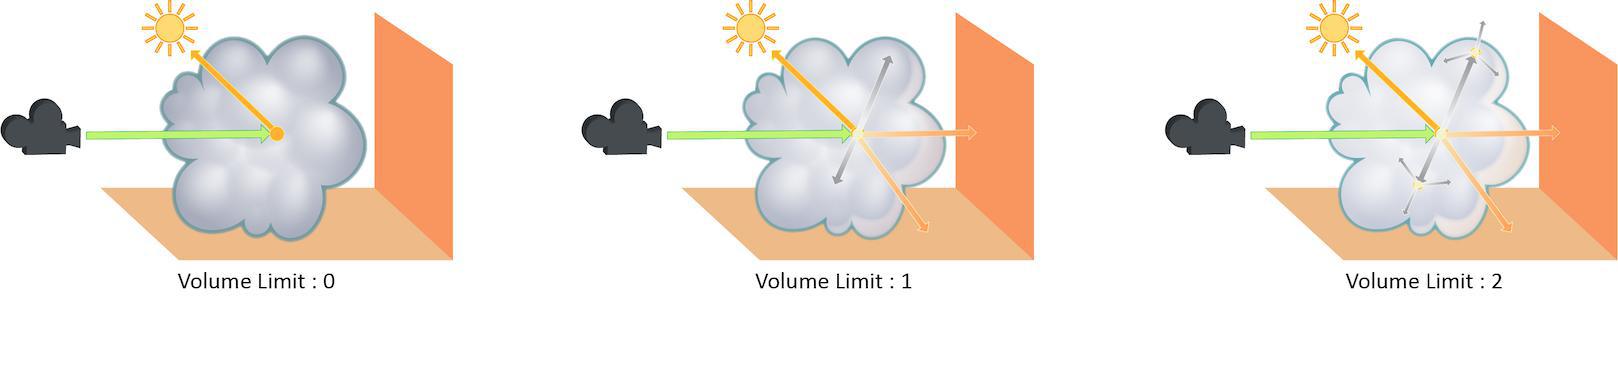
Increasing the Volume Limit parameter will result in much more realistic volumetric effects. This is especially noticeable in situations where only part of a volume is receiving direct lighting. Also, in order for a volumetric object to receive indirect light from other objects, the Volume Limit parameter must be set above 0.
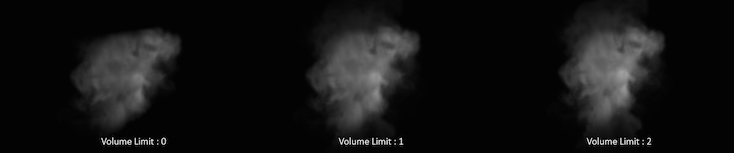
With the Volume Limit set to values above zero, the fog volume takes on the characteristic light scattering you would expect from light traveling through a volume. However, as with the Diffuse Limit, the light contribution generally decreases with each bounced ray and therefore using values above 4 does not necessarily result in a noticeably more realistic image.
Also, increasing the value of this parameter can dramatically increase the amount of time spent rendering volumetric images.
This is a float because all limits are stochastically picked per-sample, so for example you can set the diffuse limit to 3.25 and have 25% of the rays with a diffuse limit of 4 and 75% of rays with a diffuse limit of 3.
SSS Limit
The number of times a SSS ray can propagate through a scene. It functions in a similar fashion to the Diffuse Limit parameter.
This is a float because all limits are stochastically picked per-sample, so for example you can set the diffuse limit to 3.25 and have 25% of the rays with a diffuse limit of 4 and 75% of rays with a diffuse limit of 3.
Light Tree 
Karma automatically builds a light tree to make rendering scenes with many lights more efficient. This helps Karma efficiently decide which lights should be sampled the most, and are most likely to resolve faster. Karma automatically builds a light tree, and automatically adds lights to it, when it reaches certain thresholds:
Karma CPU |
10 Lights |
Karma XPU |
2 Lights |
There are some cases where lights will not be added to the light tree, such as dome and directional lights, or lights which have light filters. Light Sampling Mode can change this behavior, and tell Karma to sample all lights in a scene. Long, thin rectangle lights are not great for the light tree. Internally it represents lighting with bounding spheres, so these lights can cause the light tree to add more noise.
Once Karma determines which light to sample at a given hit position, the Light Sampling Quality parameter determines how many rays are fired towards the light.
![]() Light Properties
Light Properties
Local Sample Overrides 
Many of the sampling settings for each render delegate can also be set on objects of the scene. Per-light and per-object settings are usually multpliers on their global counterpart. If a property does not mention “scale” or “multiplies” in its description, then it overrides the equivalent global property.
Also it’s worth noting that if a render delegate or convergence mode does not support a given sampling style/feature, per object overrides won’t have an effect.
Note
Karma does not support per-object overrides for Primary/Path Traced Samples.
To understand sampling and noise better, follow the next chapter for your render delegate of choise.
Next Sampling: Karma CPU
Next Sampling: Karma XPU