| On this page |
Previous Getting Started
Overview 

Karma can render all of the geometry primitives defined by USD. One departure USD makes from traditional workflows is that many geometry properties are not renderer-specific, but are part of the schema defining the primitive. For example, subdivision surfaces are a built-in property of the Mesh schema.
Note
Karma’s log messages or documentation sometimes refer to objects; these are primitives transmitted from USD via Hydra, to Karma.
Properties are often shared between primitive types, as their schema definitions inherit from one another. For example, meshes, curves, and points are “points-based”, and have the points attribute.
Creating prims and setting properties 
The three most common nodes for controlling render properties on geometry are:
|
This node makes it convenient to edit primitives. There are several tools based on this node for creating or editing specific primitive types ( |
|
|
This node provides renderer-specific attributes and settings. Any third-party renderer can add their own spare parameters to this node, alongside Karma’s properties. Nearly all properties can be applied to any primitive type. Geometry and Light properties are specific to those prim types. |
|
|
This node lets you set the visibility and activation of primitives. |
When lighting and rendering in Solaris, you might need to create or modify geometry primitives or attributes. This document highlights some prim-specific nodes, but you can also use these general nodes:
|
Creates new geometry from SOP networks. SOP primitives are converted into their USD equivalents. See Importing SOP geometry into USD for more information. |
|
|
Edits geometry using SOPs. Useful for in-line modifications when rendering with Karma and Solaris. |
|
|
Alters geometry attributes using VEX snippets. Use the Run on Elements of Array Attributes parameter to run the snippet on each point of a mesh. |
Note
Advanced USD pipelines may have custom Prim Adapters, which should work with Karma, as long as your plugin paths are configured properly.
Basic primitive shapes 
Tip
While these primitives behave like parametric solid shapes, what USD sends through Hydra to Karma is a polygonal mesh. This is why rendered spheres often don’t look perfectly round, and pinched poles are visible at certain angles.
|
Create or edit capsule primitives. |
|
|
Create or edit cone primitives. |
|
|
Create or edit cube primitives. |
|
|
Create or edit cylinder primitives. |
|
|
Create or edit sphere primitives. |
Meshes 
Polygonal surfaces are represented by Mesh primitives in USD. USD supports both right- and left-hand oriented meshes, though SOP geometry is left-handed by default. Meshes can also have primvars, surface-wide attributes you can use to drive shading graphs.
|
This node’s true power lies in its Edit mode, for changing mesh properties. You can define subdivisions here, or with SOP attributes. |
|
|
Useful for adding geometry subsets to USD meshes. You can also define Subsets in SOPs, using attributes or primitive groups. |
Note
Mesh prims do not have to be contiguous, nor are they required to be watertight.
![]() Subdiv Render Properties
Subdiv Render Properties
Cull Backface
If enabled, geometry that are facing away from the camera are not rendered.
GeomSubsets 
GeomSubsets appear in the scene graph tree hierarchy, but are not actually primitives. They represent face sets for material assignments. When pieces of geometry don’t need to independently transform or change visibility, you can consolidate them using GeomSubsets to boost performance.
Subdivs 

Meshes become subdivision surfaces when their subdivisionScheme property is set to one of the supported schemes. Any authored normals attribute values are ignored when the subdivision surface is rendered. Karma supports both edge and point creases. The Dicing quality property adjusts how much Karma subdivides the surface.
Scheme |
Creases |
Description |
|---|---|---|
|
n/a |
No subdivision scheme is applied; this is the default for Mesh prims. |
|
Yes |
Industry standard subdivision surfaces, good for smoothing quad-dominant meshes. |
|
Yes |
Good for smoothing triangulated meshes. |
|
No |
Subdivides faces into quads, without any smoothing. |
![]() Subdiv Render Properties
Subdiv Render Properties
Dicing Quality
This parameter controls the geometric subdivision resolution for smooth surfaces (subdivision surfaces and displaced surfaces). With all other parameters at their defaults, a value of 1 means that approximately 1 micropolygon will be created per pixel. A higher value will generate smaller micropolygons meaning that more shading will occur - but the quality will be higher.
The effect of changing the shading quality is to increase or decrease the amount of shading by a factor of karma:object:dicingquality squared - so a shading quality of 2 will perform 4 times as much shading and a shading quality of 0.5 will perform 1/4 times as much shading.
Dicing 
-
When dicing instances, Karma sets the dicing based on the nearest instance to the camera. Animated camera moves can thus sometimes cause flickering in the dicing, if the instances and camera distances are changing slightly between frames.
-
A separate dicing camera can be specified to control the frustum for dicing.
Curves 
Curves in USD are of the type BasisCurves. Each primitive represents potentially many thousands of individual strands. The size of the curveVertexCounts property is number of individual curves on the primitive.
|
This node can create BasisCurves primitives, but it’s true value lies in its Edit mode, for changing curve properties |
There are two types of BasisCurves: Linear and Cubic. Most of the properties defined by the schema apply to cubic curves.
Tip
If the default Non-periodic linear curves look almost right but you want a smoother curve, use Pinned cubic B-splines. These two flavors of curves should handle the vast majority of cases.
Property |
Purpose |
|---|---|
Curve Basis |
When Curve Type is Cubic, this parameter controls how the curve is interpolated.
|
Wrap |
Defines how the ends of each curve gets resolved:
|
Different curve types require different numbers of vertices for a strand to be valid. Incorrect topologies can cause curves to disappear, or look strange, when rendered with Karma.
Curve |
Vertex Count (N) |
|---|---|
Non-Periodic Linear |
N>=2 |
Periodic Linear |
N>=3 |
Periodic Bezier |
N*3 |
Non-Periodic Bezier |
4+3*N |
All Other Cubics |
N>=4 |
Karma renders curves as rounded tubes by default, but can also render ribbons and oriented ribbons. You can also override the curve basis at render time.


Tip
Scenes with lots of hair/fur tend to resolve better with Path Traced convergence, and with Karma XPU. Relying extensively on secondary samples to clean up noisy fur gets very expensive in these situations.
Karma renders curves as rounded tubes by default, but can also render them as ribbons and oriented ribbons (using normals to orient the curves). The curve basis can also be overridden at render time.
![]() BasisCurves Render Properties
BasisCurves Render Properties
Render Curves As
When rendering curves, they can be rendered as ribbons oriented to face the camera, rounded tubes or ribbons oriented to the normal attribute attached to the points.
Override Curves Basis
USD supports Curve Basis types that may not be supported directly in Houdini. In some cases, you may want to override the Houdini curve basis. For example, if you have linear curves in Houdini, you may want to render them with a Bezier, B-Spline or Catmull-Rom basis. This menu will force Karma to override the basis that’s tied to the USD primitives.
Note that the topology of the curves must match the target basis. For example, when selecting any cubic curve basis, every curves must have at least 4 vertices. For the Bezier basis, curves must have 4 + 3*N vertices.
Karma can provide a nice texture space for curves. Flat and oriented ribbons get textures automatically. Adding normals to rounded curves lets karma compute textures around the curve.
Particles 

Particles or point clouds are represented as a Points prim in USD. Karma renders points as sphere by default, but you can change their appearance in Render Geometry Settings. Points-based primitives can have different point counts across time, as particles are born and die. The existence of the Points prim must be consistent across time in the stage, but within the prim itself, individual points can vary.
Note
In past releases, Karma provided some basic procedurals for instancing geometry onto points. These have been deprecated, because they current don’t provide performance/memory benefits compared to Point Instancers.
|
Create or edit points primitives. |
![]() Points/Particles Render Properties
Points/Particles Render Properties
Render Points As
When rendering point clouds, they can be rendered as camera oriented discs, spheres or discs oriented to the normal attribute.
Instances 
USD provides instancing in two forms:
-
Native instancing is a property that tells USD to generate a single "prototype primitive” in order to efficiently represent many copies of an asset.
-
Point Instancer is a special schema that allows for representing vast copies of geometry efficiently.
Both types of instances support transforming the top-level of each primitive and they also allow you to author primvars (on the native instance individually, or on the point instancer primitive) to set per-instance material properties. Native instances are actual transforms on each instance, and each instance is represented in the scene as unique namespaces. They are easily promoted from instances to hero (you just turn their “instanceable” property off).
Point Instancers are fast, but the transforms of all instances are set as array attributes on the point instancer primitive. Promotion involves mutating the scene. Point instances should be preferred mostly based on the number of instances that will exist.
|
Creates Point Instancer or native instances using SOP points. |
![]() Instance Render Properties
Instance Render Properties
Instance Velocity Blur
When defining motion blur on instances, the transform of each instance can be blurred in addition to any motion blur occurring on the prototype. This option controls how the instance will compute the motion blur of the transform on each instance. For example, when instancing prototypes to a particle system, you'd likely want to use velocity blur to compute motion blur (the transform on the prototype would be blurred by the velocity on the particles).
No Velocity Blur
Use deformation blur of the instance to compute the blur on the transform.
Velocity Blur
To use velocity blur, the instance must be a point instancer with velocity attributes on the points.
The velocities attribute value is measured in Houdini units per second.
Acceleration Blur
To use acceleration blur, the instance must be a point instancer with point velocities and acceleration values. The renderer uses this attribute, if it exists, to render multi-segment acceleration motion blur (assuming the renderer is set to allow motion blur). The accel attribute may be created automatically by simulation nodes, or you can compute and add it using the ![]() Point Velocity SOP; this will be converted to
Point Velocity SOP; this will be converted to accelerations when the SOP geometry is converted to USD.
Instance Motion Samples
When motion blur on instances is computed using Acceleration Blur or Deformation Blur, this parameter specifies the number of motion segments used for motion blur.
Volumes 
USD volumes are represented by multiple primitives, and the volume data is not actually stored in USD.
|
Volume |
Represent the 'whole' volume, including materials. |
|
Houdini Field Asset |
Houdini volume primitives from SOPs or |
|
OpenVDB Field Asset |
VDB volume primitives from SOPs or |
|
Field3D Asset |
Field3D volume primitives stored in |
The Volume primitive represents the volume as a whole, while field primitives represent individual grids, such as density or temperature. As children of their parent volume, Field primitives inherit the volume prim’s transform, but can also transformed individually.
Houdini has nodes for creating the volume-field combination:
|
Create or volume and field primitives from files on disk. |
|
|
Create volumes of VDB or Houdini field primitives from SOPs. |
By default Karma expects the density field, in order to sample a volume. You change this using the Volume Sampling Field property (see below).
![]() Volume Render Properties
Volume Render Properties
Volume Limit
The number of times a volumetric ray can propagate through a scene. It functions in a similar fashion to the Diffuse Limit parameter.
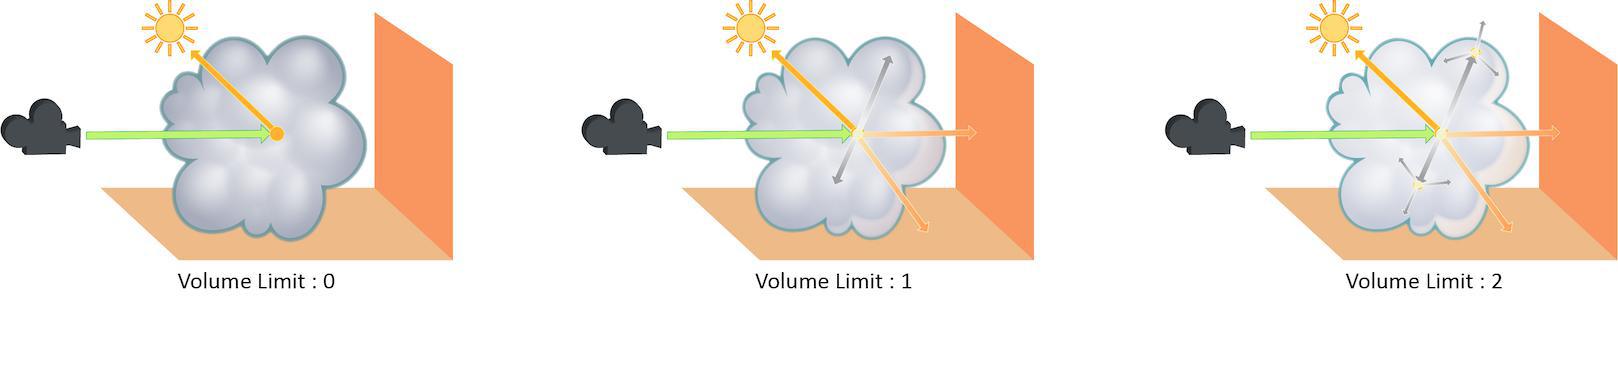
Increasing the Volume Limit parameter will result in much more realistic volumetric effects. This is especially noticeable in situations where only part of a volume is receiving direct lighting. Also, in order for a volumetric object to receive indirect light from other objects, the Volume Limit parameter must be set above 0.
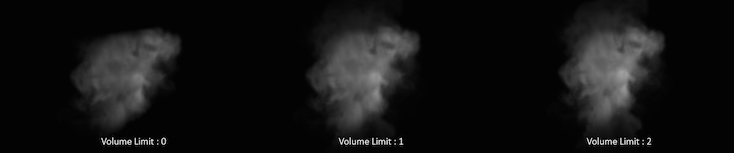
With the Volume Limit set to values above zero, the fog volume takes on the characteristic light scattering you would expect from light traveling through a volume. However, as with the Diffuse Limit, the light contribution generally decreases with each bounced ray and therefore using values above 4 does not necessarily result in a noticeably more realistic image.
Also, increasing the value of this parameter can dramatically increase the amount of time spent rendering volumetric images.
This is a float because all limits are stochastically picked per-sample, so for example you can set the diffuse limit to 3.25 and have 25% of the rays with a diffuse limit of 4 and 75% of rays with a diffuse limit of 3.
Volume Samples
Specifies the quality of indirect volumetric shading. A value of one translates to roughly one additional volumetric sample per shading computation. A sample of 4 translates to roughly 4 additional volumetric samples per shading computation.
Volume Step Rate

How finely or coarsely a volume is sampled as a ray travels through it. Volumetric objects are made up of 3d structures called Voxels, the value of this parameter represents the number of voxels a ray will travel through before performing another sample.
The default value is 0.25, which means that every one of every four
voxels will be sampled. A value of 1 would mean that all voxels are
sampled and a value of 2 would mean that all voxels are sampled twice. This
means that the volume step rate value behaves in a similar way to pixel
samples, acting as a multiplier on the total number of samples for
volumetric objects.
Keep in mind that increasing the volume step rate can dramatically increase
render times, so it should only be adjusted when necessary. Also, while
increasing the default from 0.25 can reduce volumetric noise, increasing
the value beyond 1 will rarely see similar results.
Volume Velocity Blur Scale
Velocity multiplier used to reduce or exaggerate amount of motion blur on volumes.
Volume Sampling Field
Specifies the volume field by name that will be used for empty space culling. By default karma will use the 'density' field if it exists. If you are rendering an emissive volume in which some parts of the volume have a 0 density but still need to be rendered, you should specify a different field using this parameter.
Uniform Volumes 
You can render Surface geometry as a uniform volume using these render properties. You can control the color using displayColor. You can also bind a basic volume shader to uniform volumes.
![]() Uniform Volume Render Properties
Uniform Volume Render Properties
Uniform Volume
Whether to render this object as if it was a uniform-density volume. Using this property on surface geometry is more efficient than actually creating a volume object of uniform density, since the renderer can assume that the volume density is uniform and place samples more optimally. The surface normal of the surface is used to determine which side of the surface will render as a volume - the normal will point away from the interior. The surface need not be closed - if the surface is not closed, the volume will extend an infinite distance away from the surface. Non-closed surfaces may produce unexpected results near the edge of the surface, so try to keep the viewing camera away from the edges.
Uniform Volume Samples
The number of samples to generate when rendering a uniform volume
(karma:object:volumeuniform is enabled). The samples will be distributed
so as to produce an equal image contribution if they were all equal in
brightness. Note that this property has no effect when global Screendoor
Limit is greater than 0, so for all practical purposes it is deprecated.
Xforms and scopes 
Karma does not directly render xforms or scopes. In fact, Hydra does not send them to Karma. Karma only receives the gprims that will actually be drawn/rendered.
|
Create or edit xform primitives. |
|
|
Create or edit scope primitives. |
Scopes and xforms can help organize the scene graph, and can hold render properties or other primvars. Because xforms can be transformed, they can also be used as ![]() Coordinate Systems. You can then use them in shaders to transform data from one space to another.
Coordinate Systems. You can then use them in shaders to transform data from one space to another.
Render Visibility 
Rendering primitives in Karma respects the visibility attribute found on nearly all USD prims. In addition to visibility, Karma-specific properties exist to determine the prim’s render visibility.
* (default)
primary
primary|shadow
-primary ![]() Render Visibility Properties
Render Visibility Properties
Render Visibility
Controls the visibility of an object to different types of rays using a category expression. This parameter generalizes the Phantom and Renderable toggles and allows more specific control over the visibility of an object to the different ray types supported by karma and VEX.
|
Rays sent from the camera |
|
Shadow rays |
|
Diffuse rays |
|
Reflections |
|
Refractions |
For example, to create a phantom object, set the expression to -primary. To create an unrenderable object, set the expression to an empty string . These tokens correspond to the string given to “raystyle” in the VEX trace() and gather() functions.
How to 
| To... | Do this |
|---|---|
|
Edit a primitive from the Viewer or Scene Graph Tree |
Tip Instead of selecting New node… you can choose Jump to node… and re-edit the Houdini node that either created or edited the primitive in this scene. |
|
Edit a specific property from the Scene Graph Details pane |
|
|
Edit many primitives via their inherited class |
Multiple primitives which inherit from a single class prim can be edited at the same time. Assets made using the Component Builder inherit from a class prim by default.
|
Next Lights