| On this page |
Overview 
A TOPs Feedback Loop block lets you run a sequence of serially executed steps for multiple iterations.
A TOP network already behaves like a parallel loop: it runs as many work items at the same time as possible based on the scheduler settings. So there’s no need for a typical loop construct since “repeating the same action with different inputs” is how the network works.

Sometimes, you may want to run a series of steps serially rather than in parallel, and use the output of previous work items as input for subsequent work items. For simple simulations this is already handled by the ROP Fetch node, which is able to create batches that run as a single job, one frame at a time.
For more complicated use cases, such as looping that spans multiple nodes, or where the size of the feedback loop isn’t fully known, you can use a feedback loop.
In a feedback loop block, the network runs the work items node by node, with later work items depending on the previous work items, forcing them to execute serially. Then when all work in an iteration is done, if the block specifies more than one iteration, it loops back to the start and executes the next loop.
Tip
Depending on the settings, a feedback loop block can also run multiple serial loops in parallel.
For example, you perform an RBD simulation where a jar is being filled with marbles, one handful at a time. The entire process could be run as a single simulation, however marbles at the bottom of the jar might become unstable and the numbered of simulated objects would keep growing. One way to manage this is to run the RBD simulation for the first handful of marbles and use its results as a static object in the second simulation. The result of the second sim and first sim combined would be static objects in the third sim, and so on. You can do this in TOPs using a feedback loop with a ROP Geometry in the loop block.
(Feedback loops are also used to implement Service Blocks, where the work itemes are assign to a a service process and execute sequentially in-depth first order).
How to 
Create a feedback loop block 
-
In a TOP network editor, press ⇥ Tab and choose For-Loop with Feedback.
This tool puts down a
Block Begin Feedback and a
Block End Feedback node.
-
Select the Begin node. In the parameter editor, choose how to specify the number of iterations:
-
The default is to run the number of iterations specified in the Iterations parameter. If the Begin node has upstream items, the loop runs ‹iterations› times for each incoming item.
For example, you might have a loop that builds up a scene over the certain number of iterations (such as the “dropping marbles in a jar” example from the overview). You could then repeat the loop for each item generated by a
Wedge node you wire into the Begin node.
-
If the Begin node has static work items, you can turn on Iterations from upstream items. This sets the number of iterations to be the number of upstream items. This repeats the sequential series of steps within the block once for each input item.
For example, you could use a
File Pattern node to list all of the files in a directory, and a loop block to iterate over the files and append the contents to a temporary file.
-
-
If your Begin node generates items dynamically, you must also turn on Use dynamic partitioning on the End node.
-
Wire nodes between the start and end nodes to make them part of the loop.
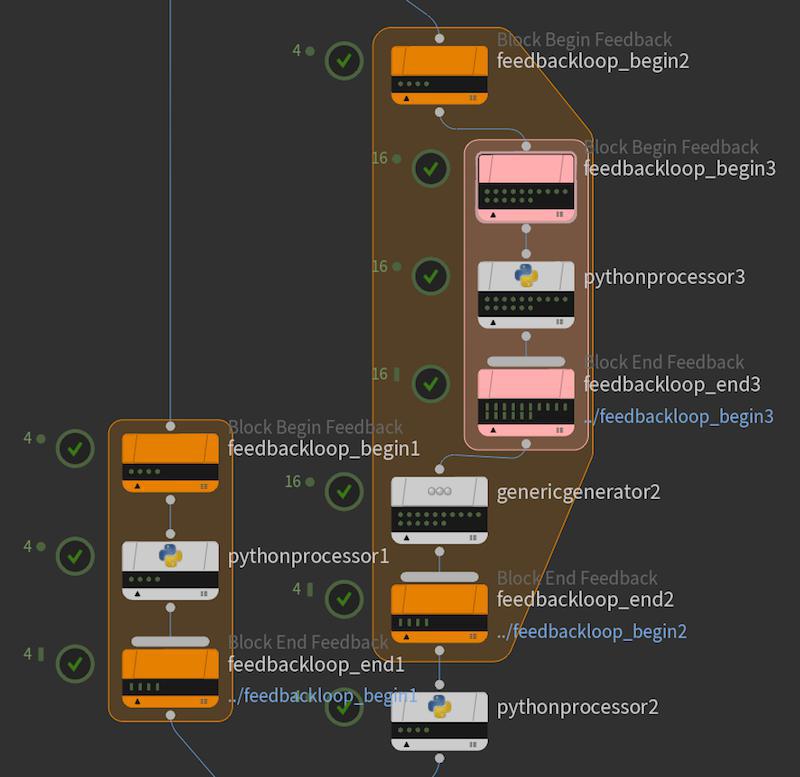
Houdini draws a border around the nodes in the block to help you visualize it.
Cook parallel side tasks based off work items in the loop 

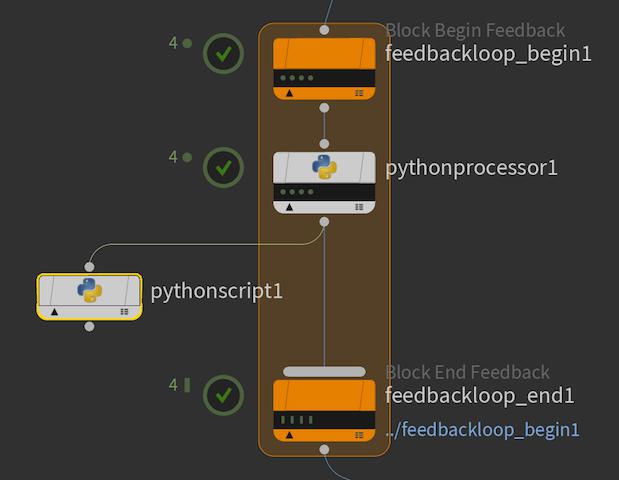
If you wire out from a node inside the loop to a processor outside the loop (not connected to the loop’s end node), the work items in that processor generates based on the in-loop work items, but will be scheduled normally in parallel.
This can be useful for “side work” based on items in the loop but not required by the loop. For example, if the loop involves generating and manipulating images, you might generate thumbnails of the images outside the loop.
Tips and notes 
-
You can use any processor node in a feedback loop. Currently, you cannot use a dynamic partitioner inside a feedback loop. You can use static partitioners, if the partitions only contain work items from the same loop iteration. If work items from different iterations are somehow partitioned together, the partition node reports an error.
-
You should color the start and end nodes of a block the same to make their relationship clear. The default nodes put down by the For-Loop tool are colored orange, but you can change the node colors. This is useful to distinguish nested loops.
The border around the block takes on the color of the end node.
-
The begin node is a processor that generates loop iteration work items.
-
Each work item depends on the previous item from the same loop, and has attributes to identify the iteration and loop number.
The feedback end node is a partitioner which partitions work items based on the loop iteration they're associated with. This is useful because the nodes in the feedback loop are free to fan out into as many additional items as needed, and the partitioner will collect them. The second loop iteration item in the begin node depends on the partition for the first loop iteration, and so on. If the loop begin is generating work items dynamically, the feedback end node must be set to use dynamic partitioning.
-
You can wire a node from outside the feedback block into a node inside the block that has multiple inputs.