Thank you for checking out this tutorial, my name is Jonathan Coetzer. I am a CFX artist in the film and commercial industry. In this short tutorial I will be going over some advanced tips and tricks for grooming in Houdini19, specifically pertaining to curls and braids. I will also go over a simple method for Houdini to Unreal Engine workflow
Skin Setup
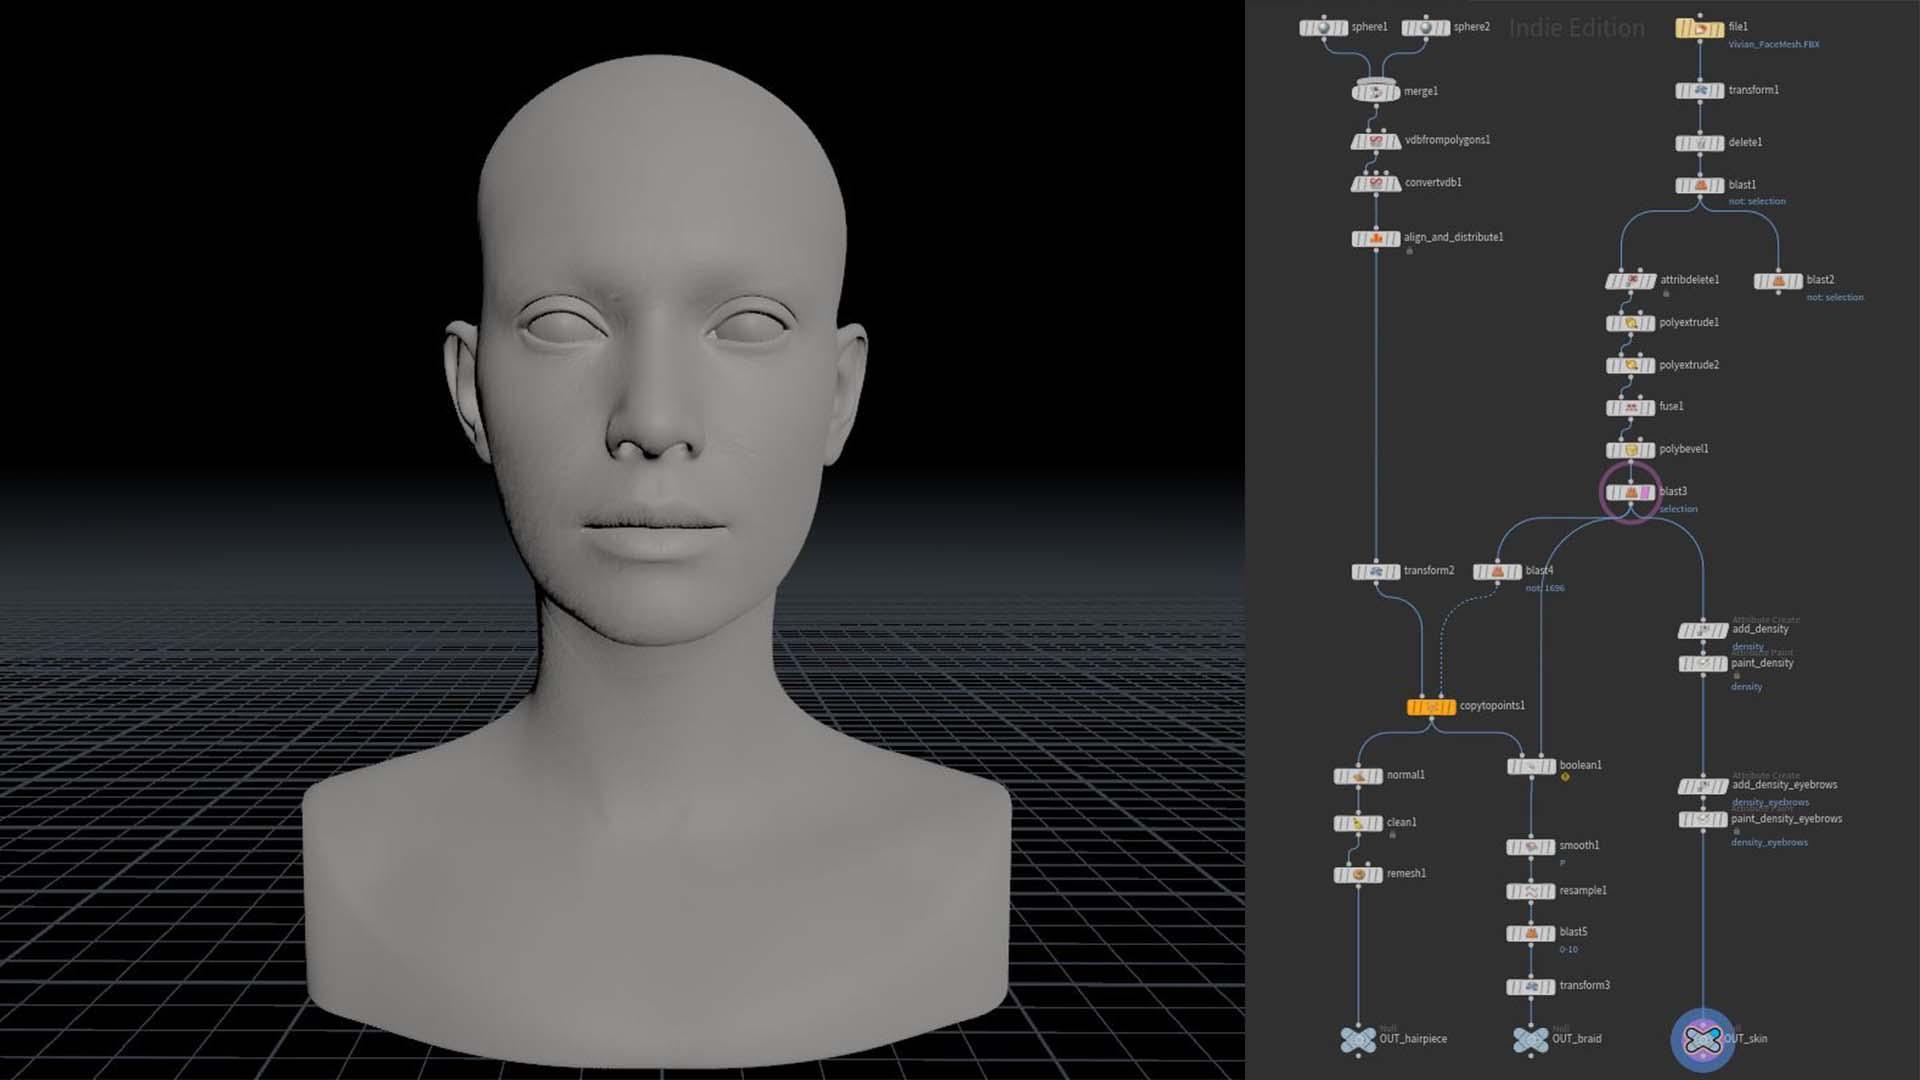
For the base geometry in this tutorial we will use a Metahuman from Unreal’s Metahuman Creator. The base geometry of the head is exported from an Unreal Engine scene as an FBX export. The FBX can then be imported into Houdini using a simple File node. a few simple operations follow to prepare the geometry for the grooming process.
Firstly a transform to bring the geometry into houdini scale and a Delete to isolate the highest res LOD head mesh as the import will bring in all LOD’s from Unreal. A blast follows to clean up some problem areas such as the eyelashes and the eye lenses. Lastly delete all the un-necessary attributes such as Cd(color) that are carried in from the import and close up the mesh to allow for an easier VDB process forthe groom later on. This could be done quickly with a Polyfill or as shown above by extruding out the base edge loop followed by a polyfill to create a solid volume.
Base Groom and Curls Using Clumping
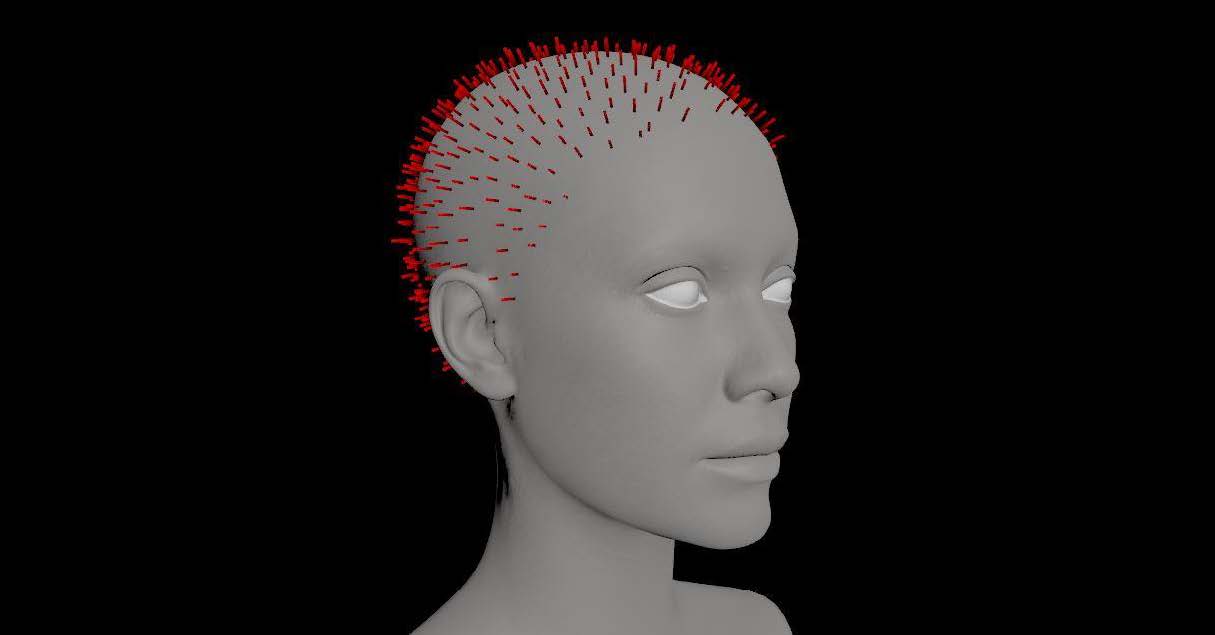
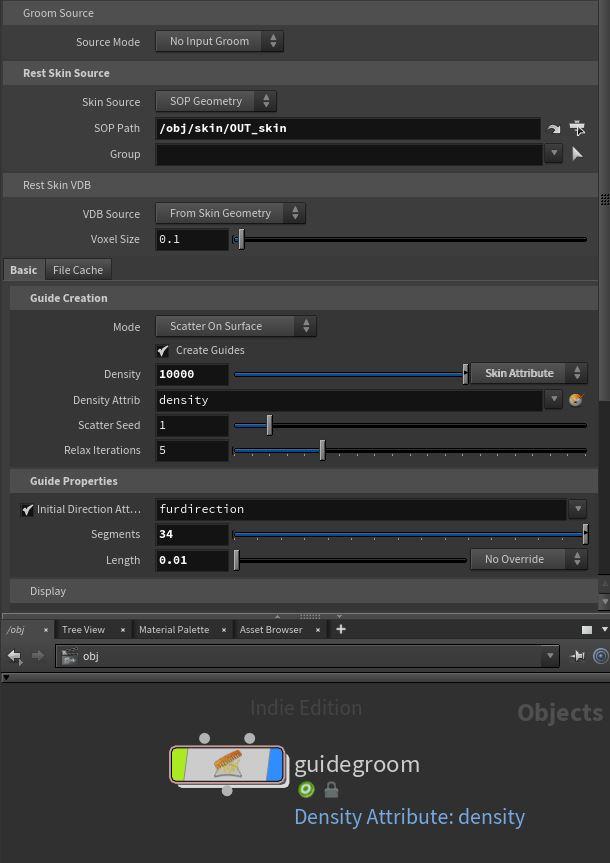
Start with assigning the Null output of our skin geometry to the SOP path of the Rest Skin Source. Next, change the override of the density to skin attribute and change the name to your requirement. In this case, I have left it as default density. Click on the icon next to the name. This will create an Attribute Create and Attribute paint Node above the node you assigned in the SOP path.
Using the attribute paint simply fill the geometry with a value of ‘0’ (Blue) and paint in the area of the head where you want the guides to be scattered with a ‘1’ value (Red). Also, adjust the density of the guides to a medium-density as shown in the image above.
After that return to Object level and go inside the Guide Groom. Create a guide process (set length) node. Change the mode to "multiply" and activate randomness, then adjust the min value to be slightly below the max. This will create a little more breakup in the length of hairs generated going forward.
Go back to Object level and place a Hair Gen object node. This is the node used to generate the hair curves around the guides created by the guide groom. To assign the guide groom as the groom object for the hair gen, simply drag the guide groom node to the parameter field of the hair gen node labeled Groom Object. The result should read "../guidegroom".
Assign the density attribute created earlier in the same fashion using the skin attribute override. Adjust density to the desired number and then repeat this process for thickness. This will grow hairs across the head and due to the nature of the attribute paint tool having a falloff, will make the hairs on the border of the density attribute thinner and allow a better-blended hairline.
Should you see gaps where the hair doesn’t grow evenly on the head, adjust the influence radius until full and use density for skin attribute override if required.
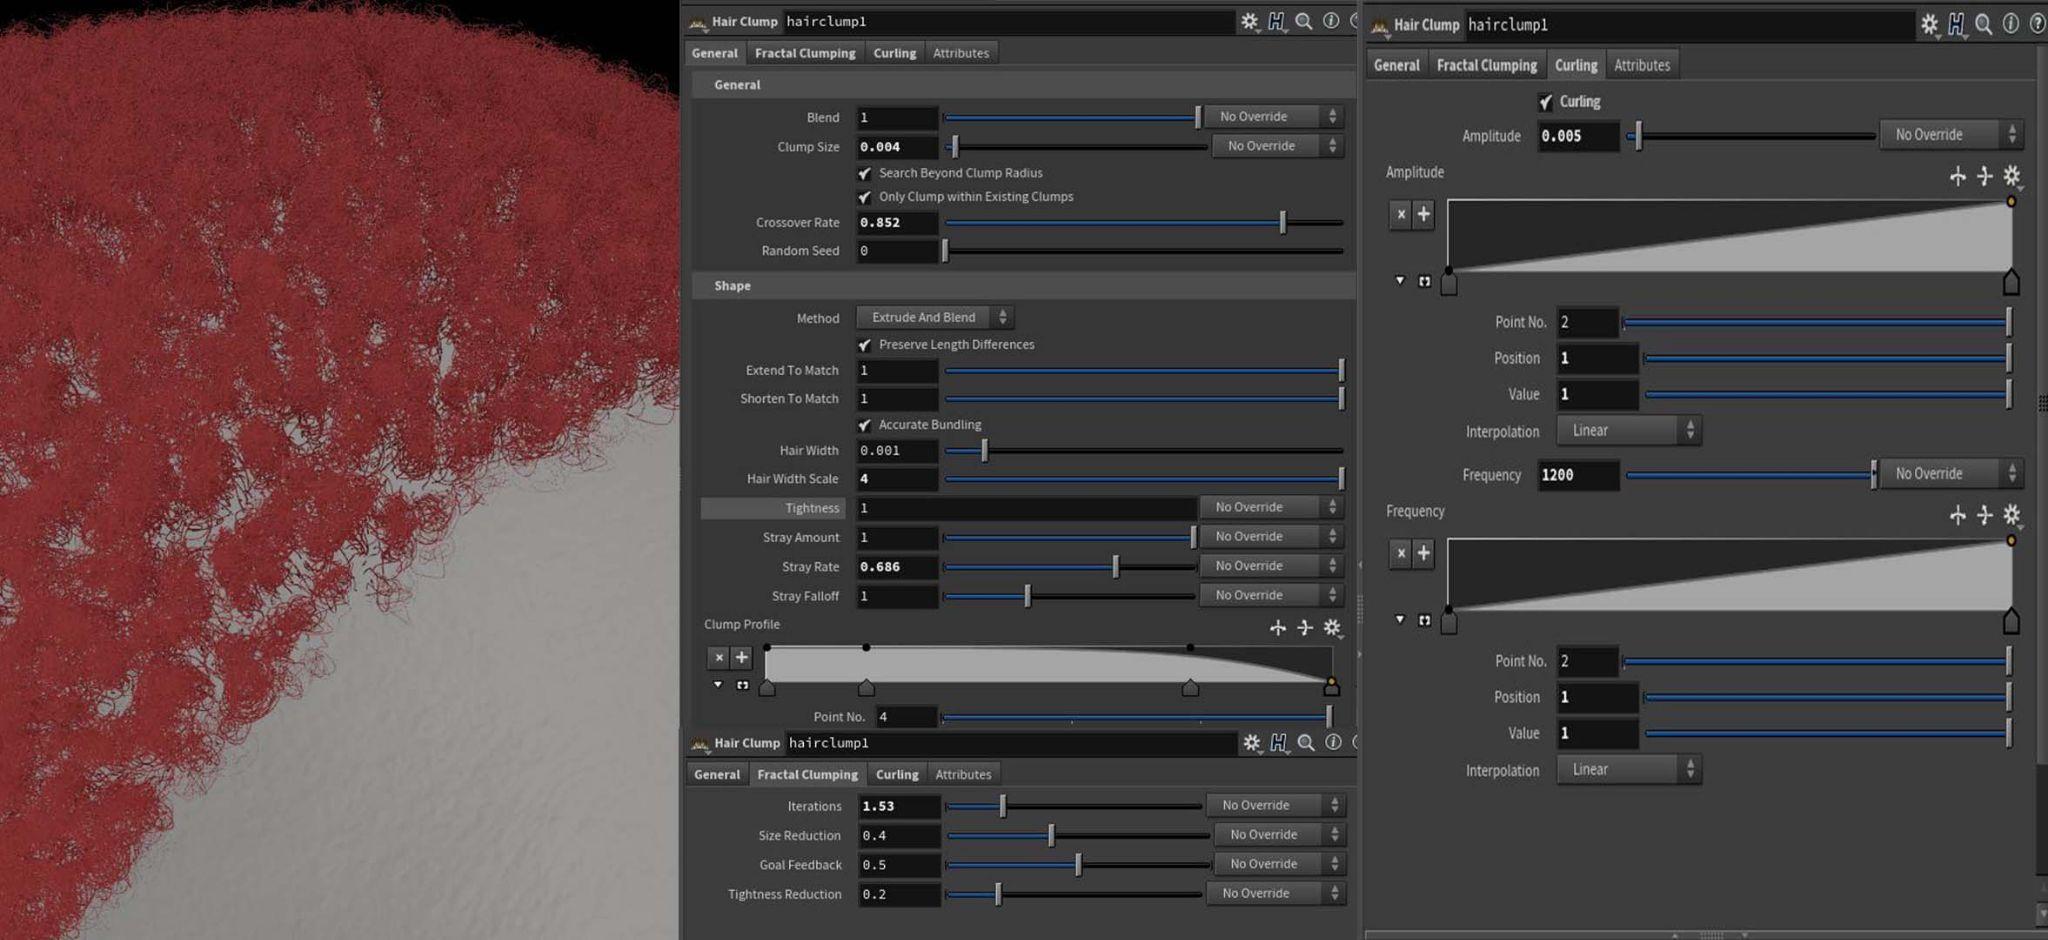
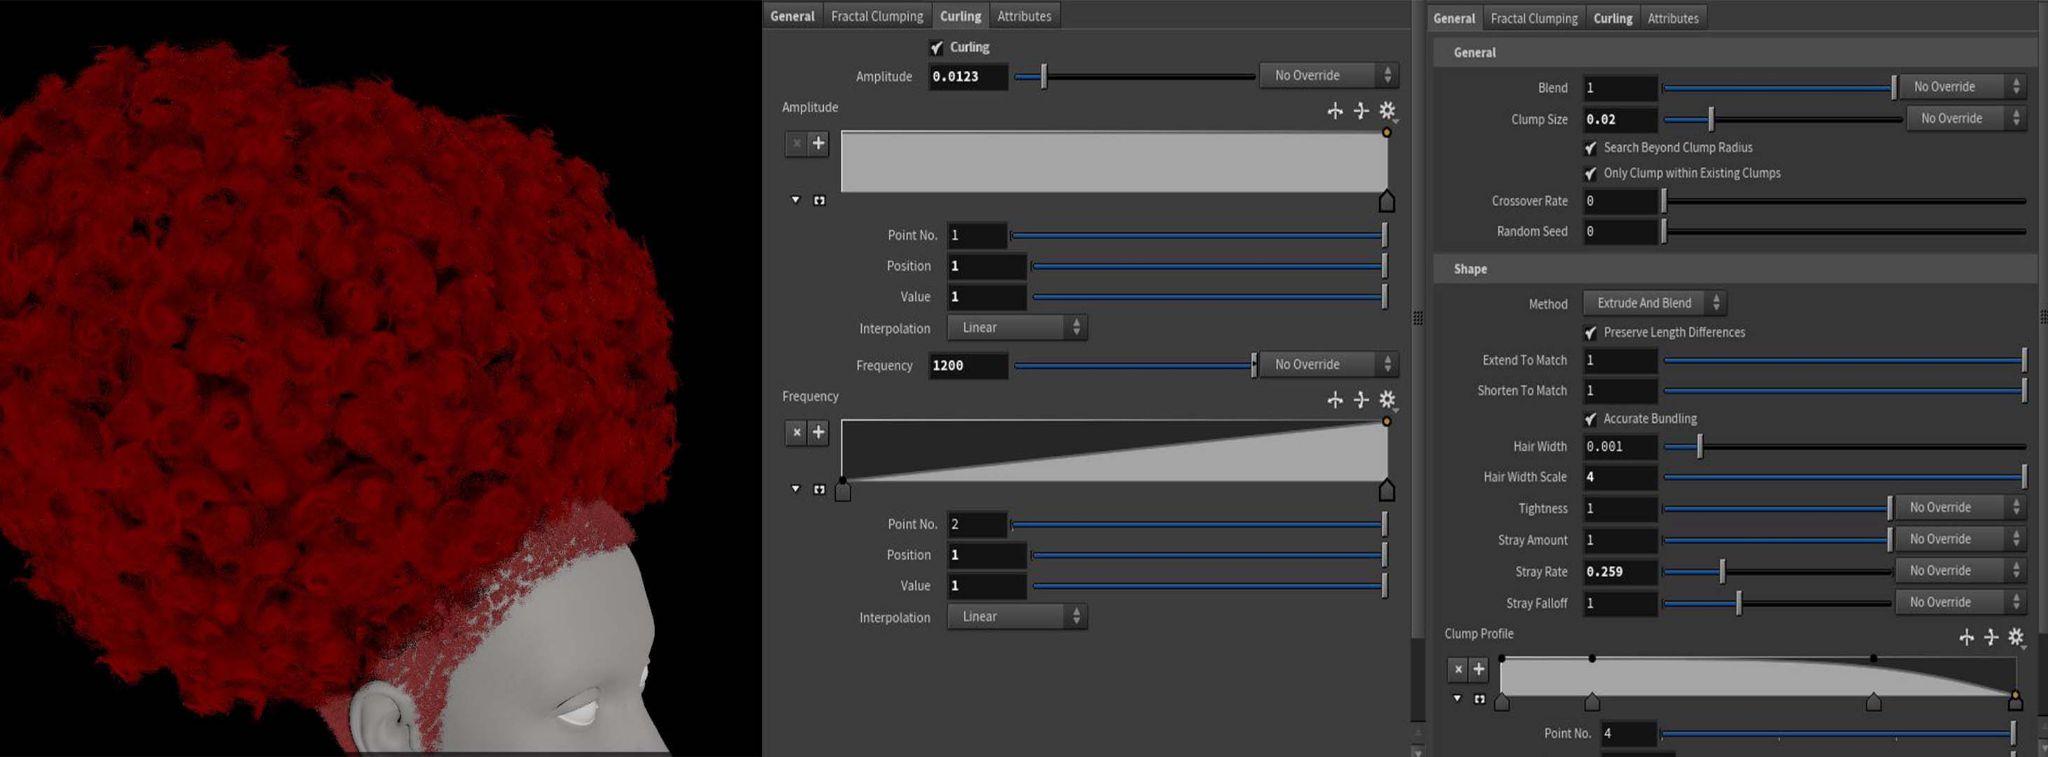
Going inside the Hairgen, place a clump node and connect the skin input. The clump node is a very powerful and versatile tool in Houdini's grooming kit. Using it you can achieve a wide range of effects and looks. In this case, we will be making use of the curling feature in an unintended way to simplify a usually complex process.
Braid Setup
I have always found braids an interesting problem to solve when it comes to grooming. The multiple challenges associated with making a good realistic braid are often compounding only present themselves as you try further integration with conventional hair setups. It is my hope that the braid setup demonstrated here can prove useful in providing a basis to expand upon.
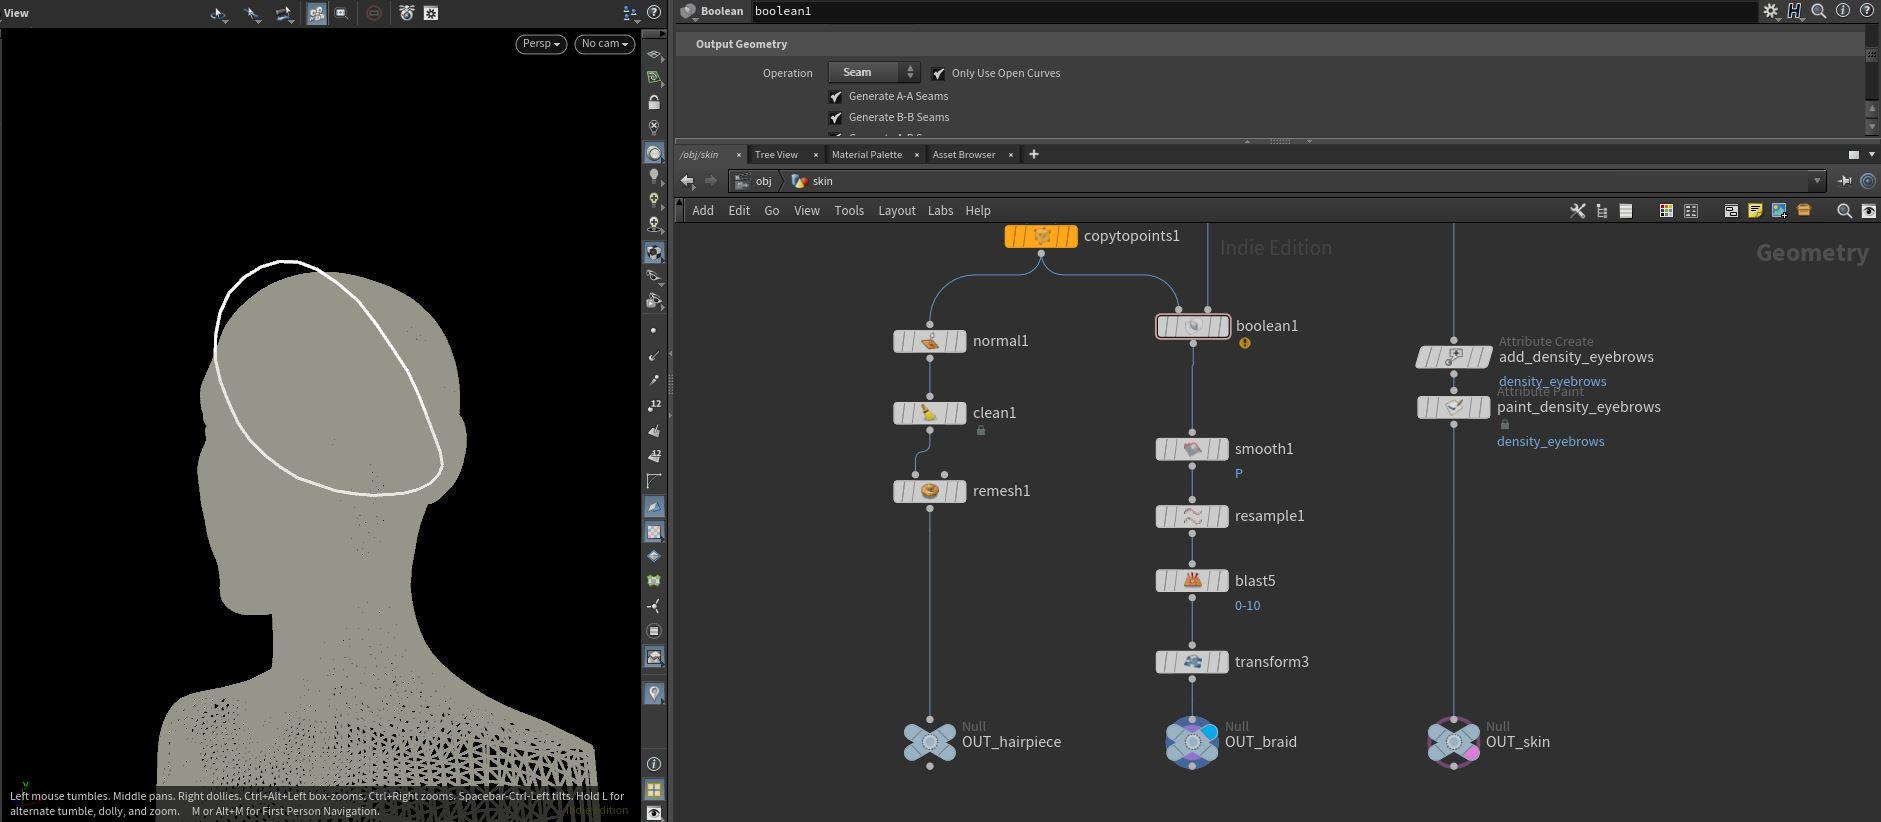
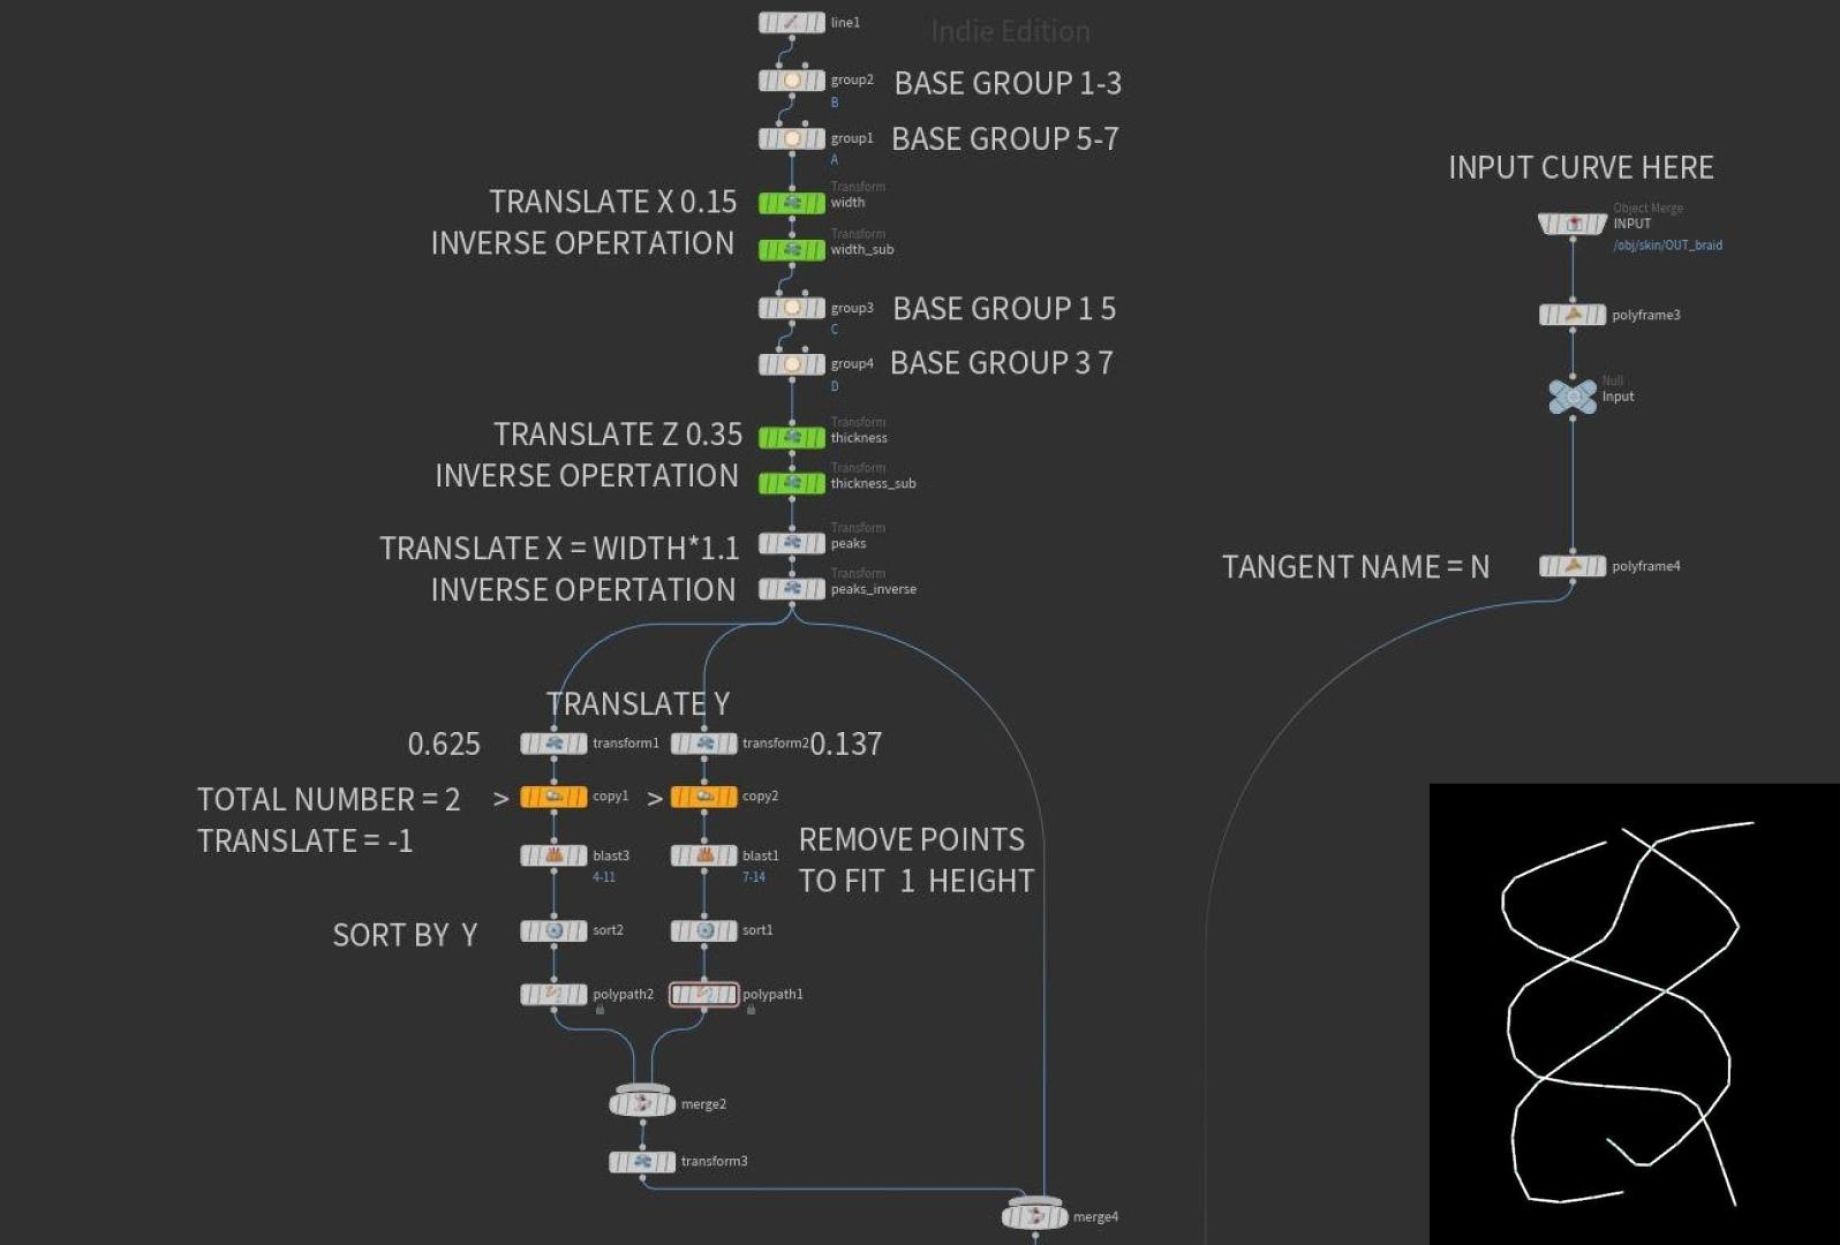
The primary approach in this technique for braid generation is creating a base curve shape that will be chained onto a path curve. Step by step instructions:
- Add a Line, set the Points to 9, and leave the rest of the parameters at default. Group point 1-3 as A and 5-7 as B;
- Translate A by 0.15 in X and copy the parameter. Paste a relative reference in a new transform below in the X channel and add a *-1 to the end i.e:(ch("../width/tx")*-1). The first transform acts as the width control;
- Group point 1 and point 5 as C and point 3 and 7 as D;
- Translate C by 0.35 in Z and copy the parameter. Paste a relative reference in a new transform below in the Z channel and add a *-1 to the end i.e: (ch("../thickness/tz")*-1). The transform above acts as the thickness/height control;
- Translate point 6 In X by the width relative reference*1.1 i.e: (ch("../width/tx")*1.1) and then translate point 2 by the inverse i.e: (ch("../width/tx")*-1.1). Note these values can be adjusted to increase or decrease the outer peaks of the braid;
- Pull two chains off of the Peaks Inverse transform and transform the left chain by 0.625 in Y and the right chain by 0.137 in Y;
- Copy and transform each chain by 2 copies with a transform of -1 in the Y. This creates an offset Reference flag for the two chains in conjunction with the Peaks Transform root to see the positioning and offset of the braid segments;
- Blast points 4-11 on the Left Chain and 7-14 on the right which brings the offset curves back into 1 high length to match the root;
- Sort the point order in Y;
- Polypath to combine the primitives and merge the chains. Add any other post deformational transforms here;
- Merge the previous merge with Peaks Inverse Transform Node. This is the basis of the braid geometry;
- For the far-right chain, the input add an object merge the input curve comes in here;
- Add a poly frame for corrective and a second poly frame for changing the tangent to N. This allows us to use N as forward direction.
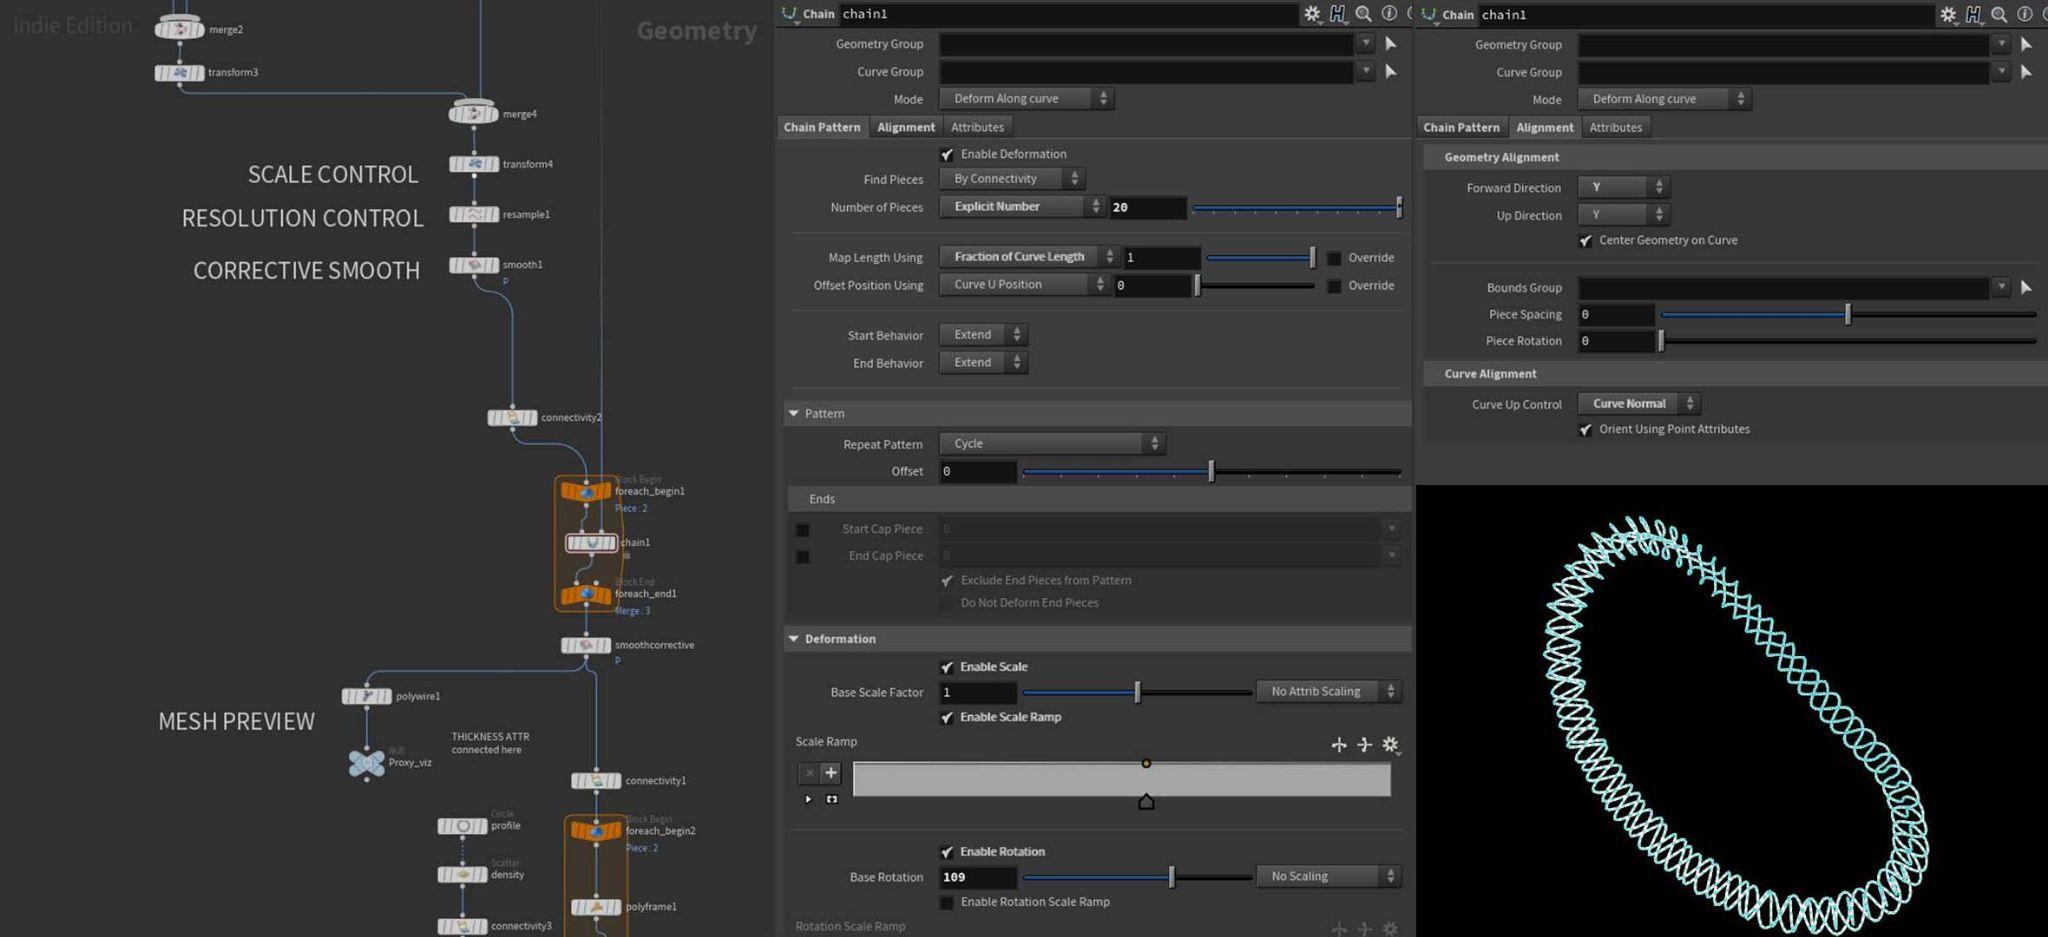
- Add a transform under the merge. This is the global scale control, change the uniform scale to 0.008;
- Resample the curves to 25 max segments this will act as the base resolution control;
- Add a corrective smooth;
- Add a chain for each connected piece loop. Connect the line from the poly frame of the Input curve to the second input of the chain. The Chain SOP parameters are:
- Under Chain pattern, the Number of Pieces changes to an explicit number and is set to 20 or personal preference. This will act as the frequency of the braid;
- Change Map Length Using to Fraction of Curve Length;
- Open Deformation Drop Down. Enable the scale, this can be used to scale the braid, and easily and with the built-in ramp can be used to taper the braid;
- Enable Rotation, use this to rotate the braid to face desired direction/orientation, and use the ramp to add further art direction and control to the rotation. For example, this is set to 109;
- Open fusing and set snap dist to 0.49;
- Open the alignment tab;- Set forward direction and up direction to Y;
- Change curve up control to Curve Normal which was set on the input curve previously with a playframe;
- Add a smooth corrective to the output for each loop;
- Pull off a chain to the side and add a poly frame with the value set to desired thickness to visualize the braid as geometry tubes and check for any issues. Below you can see the mesh preview.
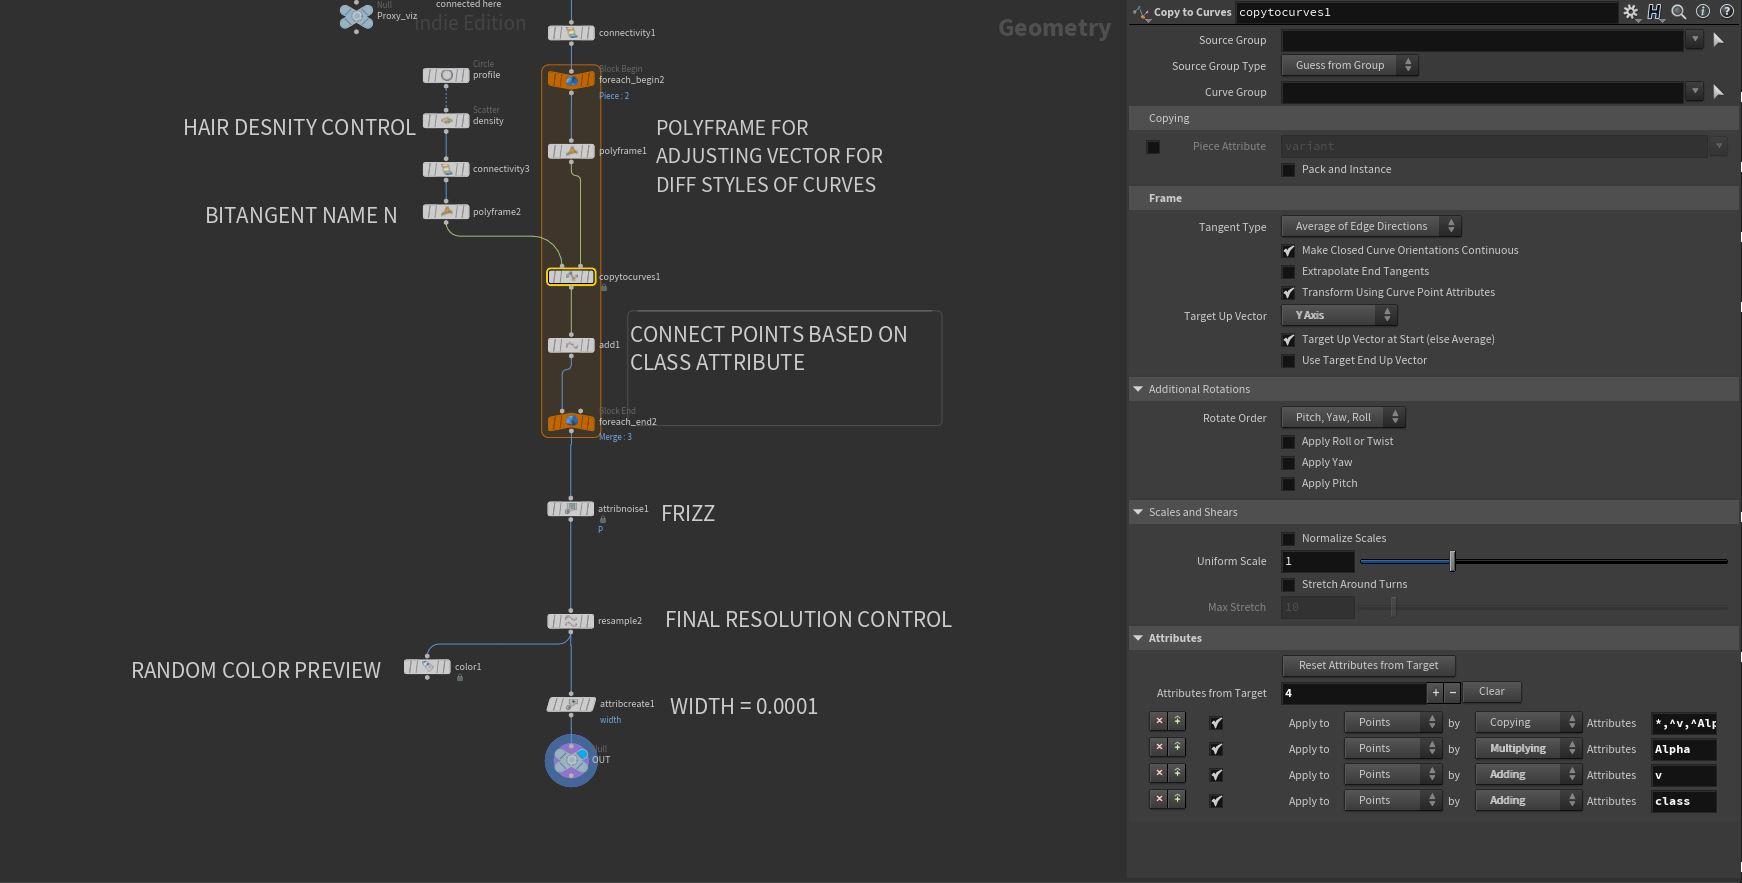
Place a for each connected piece loop, inside the loop place a poly frame, this can be used to force adjustment should need to arise, for this example un-tick all boxes.
- Off to the side create a circle with the uniform scale of 0.004, this will be the control for the thickness of each braid piece;
- Scatter points across the surface of the circle forcing the total count to 250, this is the density of the final Hair that is generated and can be adjusted later to the desired levels;
- Add a connectivity node-set to the pint, this will generate a class attribute per point;
- Add a poly frame with Bitangent name as N;
- Connect this to a copy to curves node with the copy to curves second input connected to the poly frame in for each loop we created above. The copy to Curve parameters are:
- Target Up Vector Y-axis;
- Add an attribute called class applying to points by adding it at the bottom under the attributes drop-down tab.
- Place an add node, select polygons tab, and set to add by group and add to attribute, setting the attribute name to the class. This will connect a curve between the points we scattered earlier;
- Add an attribute noise to the output for each loop (do not do this if you plan to deform this mesh using this setup in Houdini, you would need to point deform it as a rest position);
- Add a final resample to act as a final Resolution control to control the resolution of the final product, in this example set to Maximum segments, 250;
- Add a color node set to random from the attribute and set class as the attribute name, this will generate a random color per strand to better visualize the result;
- Finally, add an attribute create and make it a float value called width, set this to 0.0001.
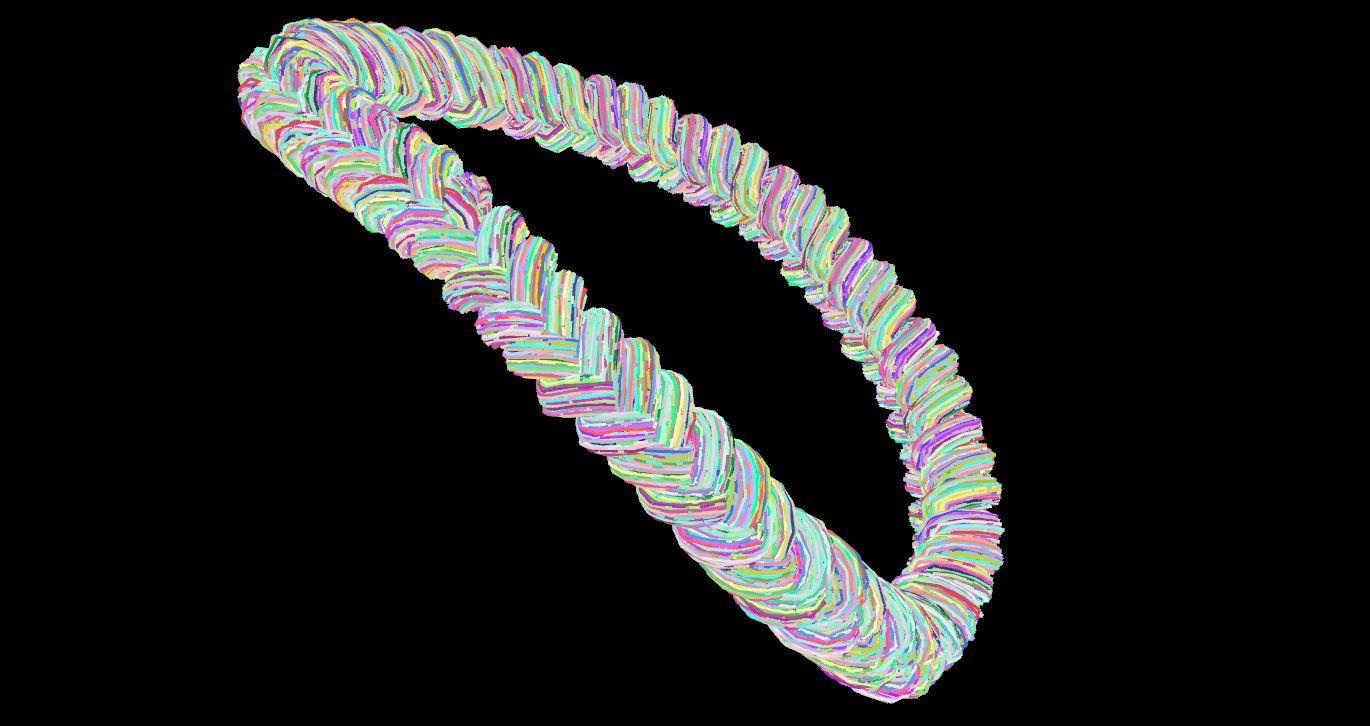
As we can see, the final result is a full braid loop. You can apply the exact same shader to standard hair grooms. The system is flexible and can easily be made into a tool, one could add different base curve profiles for various braid types, to build the setup into a fully packed HDA to generate ropes and braid curves for various needs and requirements.
Feel free to add any other elements to the setup we have so far like eyebrows or accent curls, or even more braids using the techniques shown above.
Export from Houdini to Unreal Engine
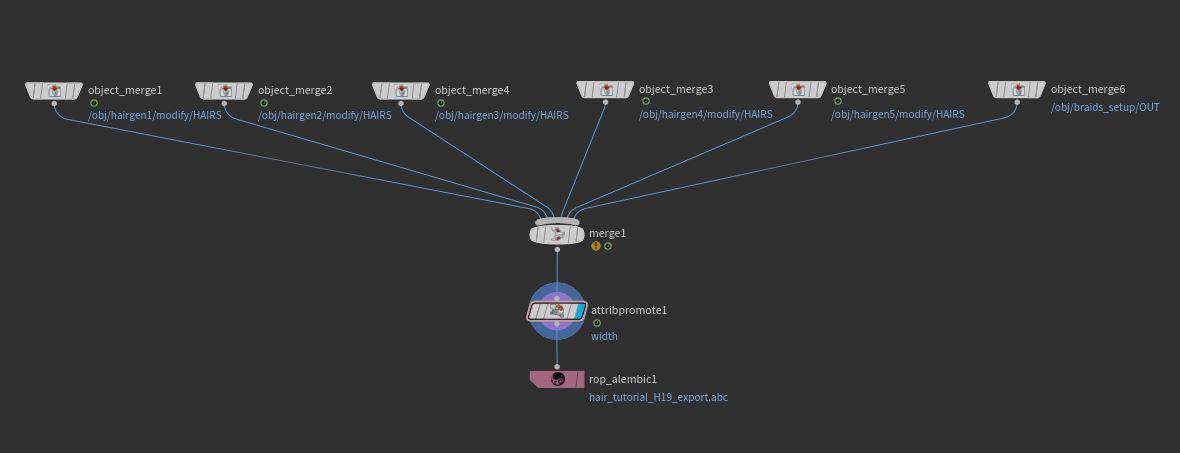
The first step to exporting the hair setup from Houdini to Unreal is the caching process. Start by making a simple empty geo node on the object level labeled export, inside the object, merge in all of the outputs you wish to cache. Merge all of the outputs and under the merging place, attribute promote.
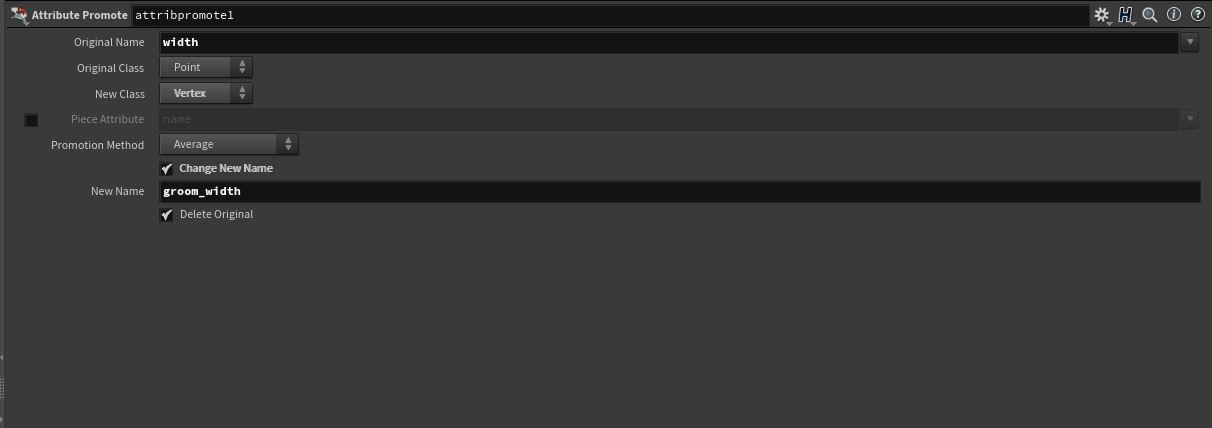
In the attribute promote, find the width attribute and promote it from a point class to a vertex class then change the new name to "groom_width" and select "delete original". This is so that Unreal Engine reads this as the hair width when it imports the alembic file. You can find a full list of other groom attributes that can be read natively by Unreal Engine here.
I have selected UE 4.27 for the purpose of easy MetaHuman workflow, however, the same would apply to UE5. Next place an Alembic ROP and using the default settings write out the static hair alembic to your desired file location.
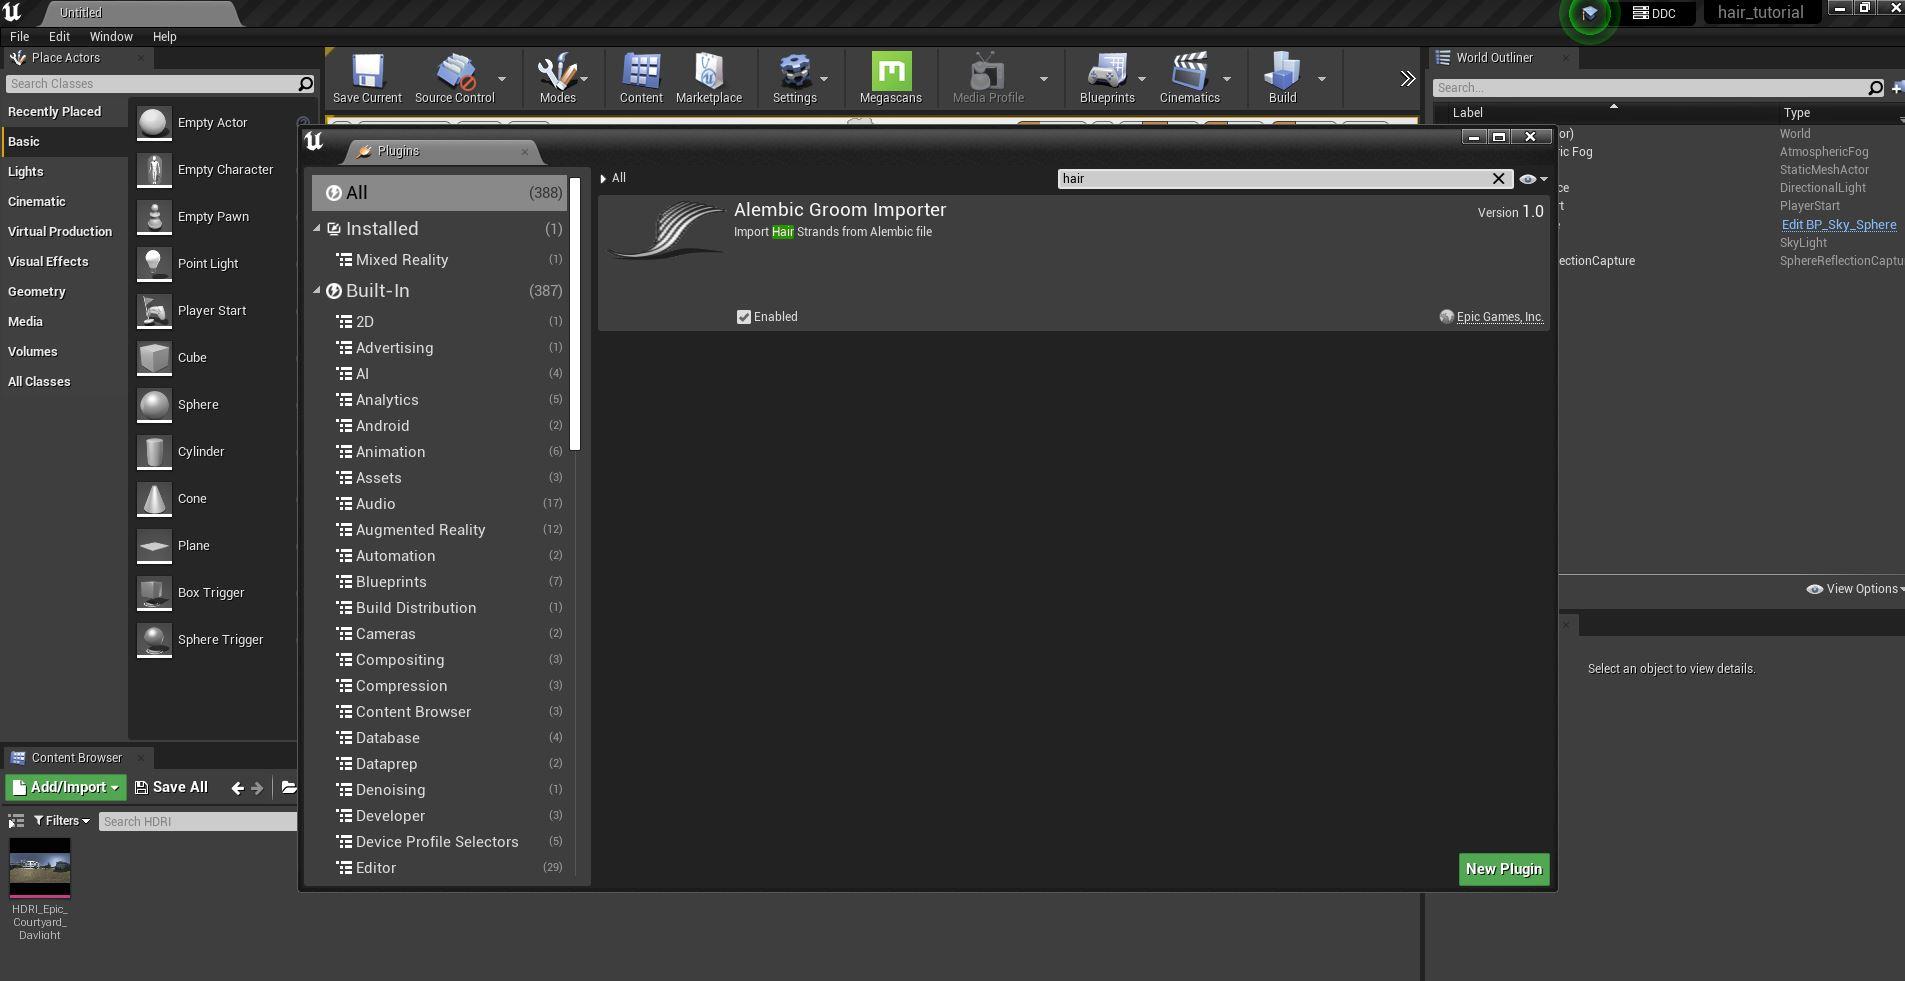
The first thing to do in Unreal Engine is to search for the hair under Edit > Plugins. Enable the alembic groom importer. Unreal Engine will prompt to restart.
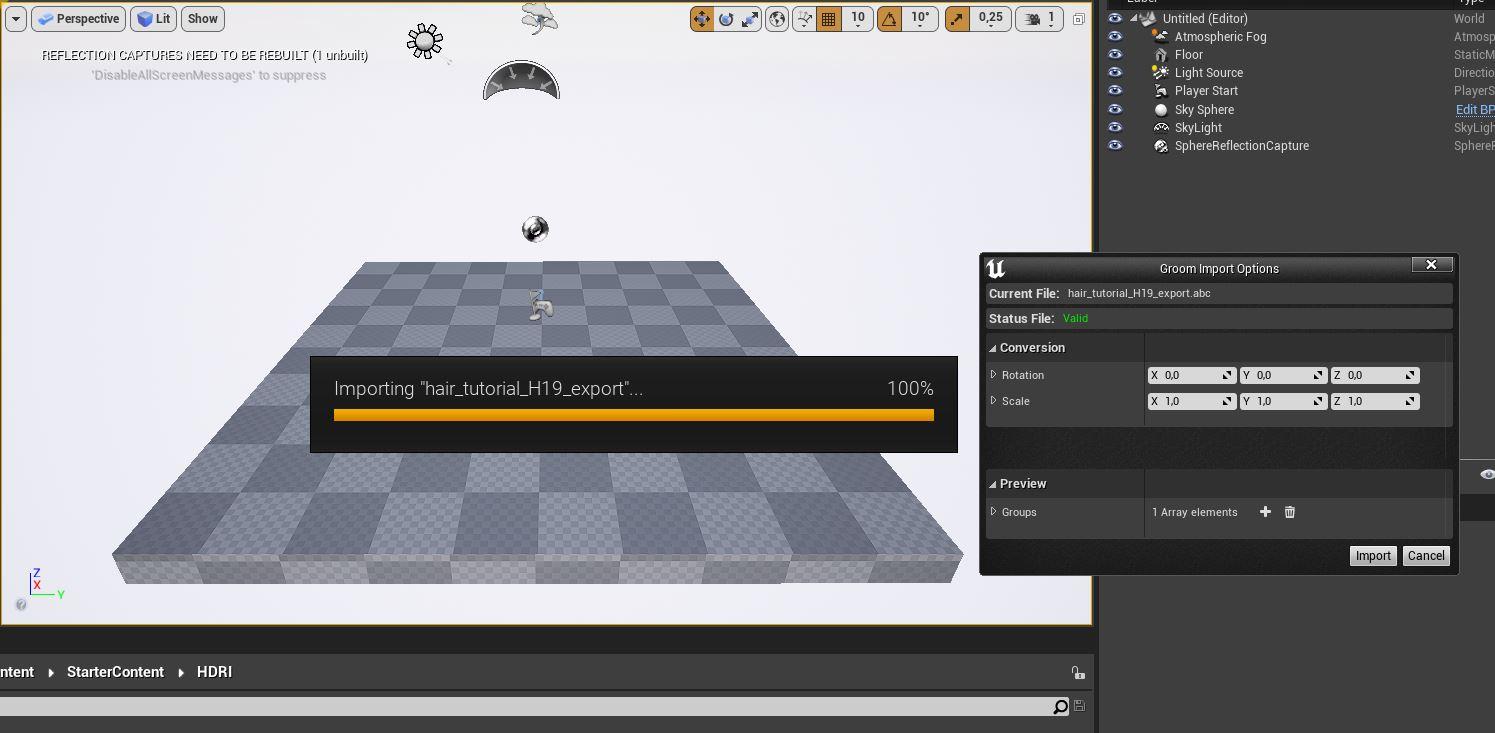
After the restart, simply take your alembic export and drag it into the content browser of the UE scene. A dialogue will be shown requesting the conversion settings for your groom, I prefer to do this post-import and clear the transforms after but should you know in advance feel free to execute those transforms here.
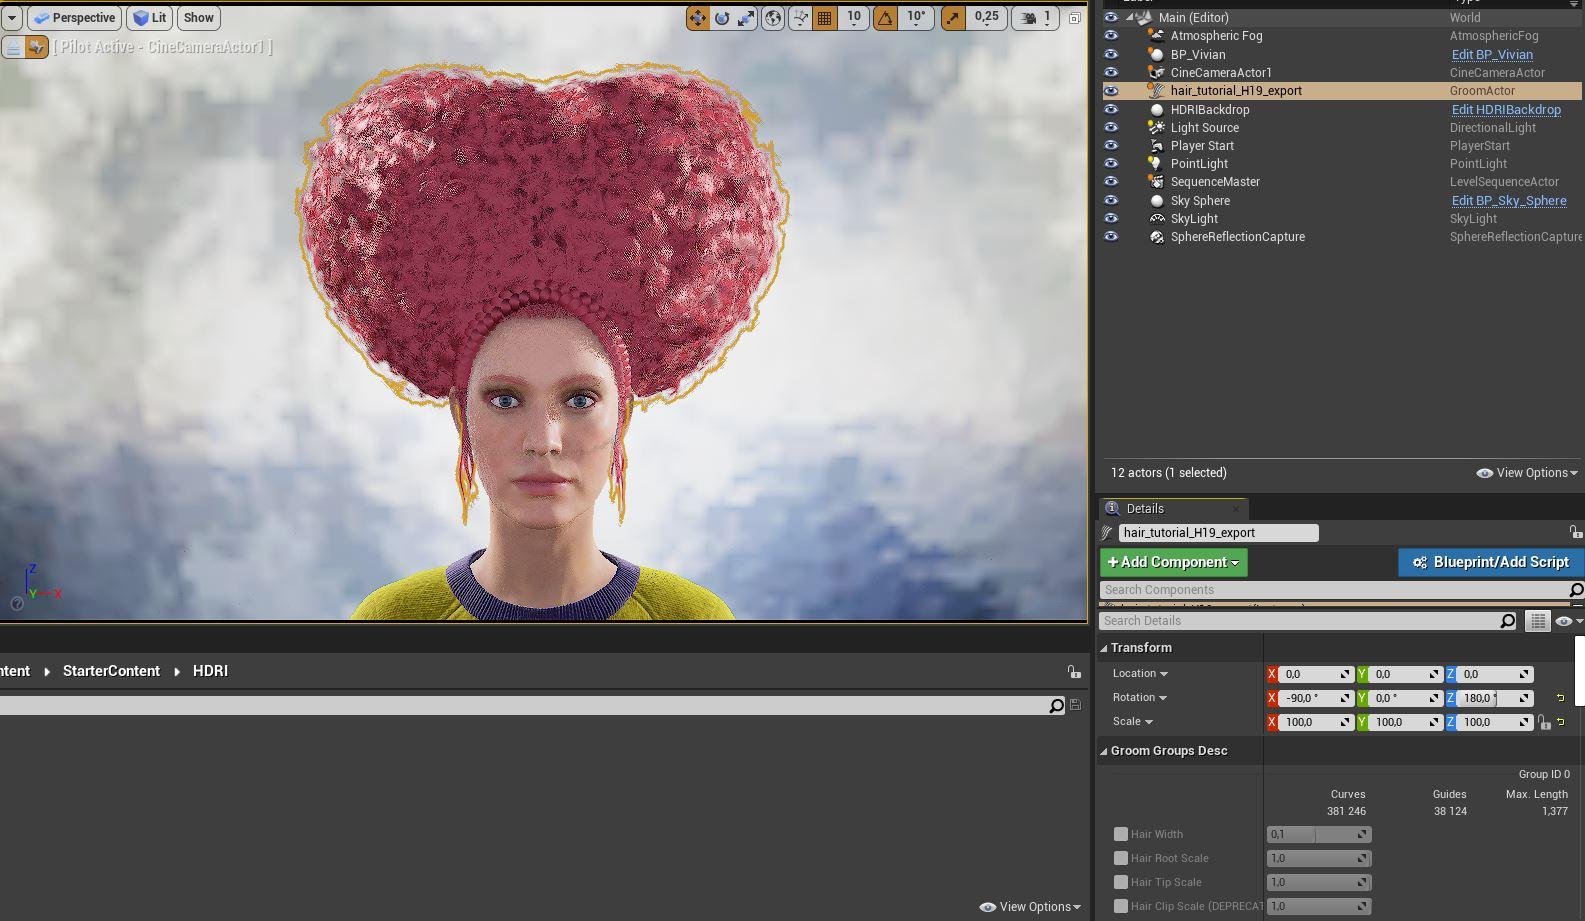
As shown above you can see the changes in the groom's transforms. Also, note that the width is correct when run through Houdini to Unreal scale conversion.
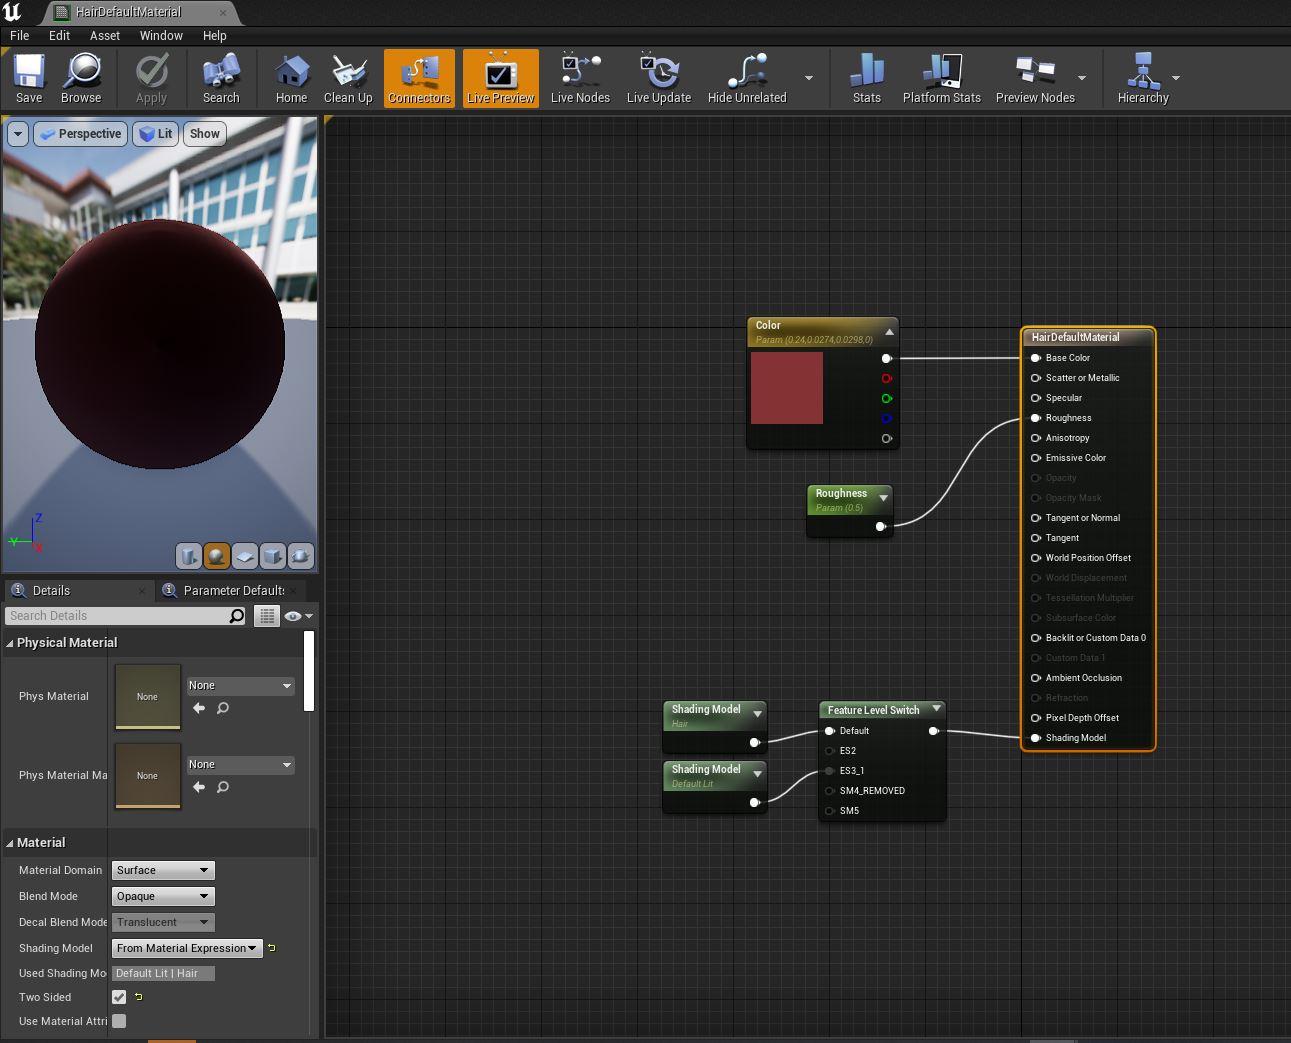
Lastly, to adjust the groom material, you can open the groom material found in the properties menu on the right of the Unreal viewport. Double clock the material to bring up its Blueprint and make any adjustments to your preference. In this example, I simply adjusted the color to more closely match what was present in Houdini.
Thank you for taking the time to check out this tutorial.
COMMENTS
Arvan 2 years, 10 months ago |
Looks really cool, can't wait to check this out. Thanks!
scritorr 2 years, 4 months ago |
Why can’t I watch this video ?
John Payne 1 year, 1 month ago |
Anyone else having trouble with the braid, in the polypath node after the merge on the braid make sure "connect end point" is checked.
On the chain node I turned off "orient using point attributes" for alignment but the "curve up normal" is checked. The curve does have Normal,
Tangent and Bitangent attributes so I'm not sure what the problem is, unless the data has not been set properly.
Please log in to leave a comment.