Introduction
This is a tutorial on how to use Principal Component Analysis to de-jitter faulty animation or simulation data over time. PCA is a statistical method used in data science and machine learning applications to reduce the dimensionality of a data set. The tutorial is in addition to the corresponding project files released in the content library. You can download them here!
This is one of the projects I presented at the Houdini HIVE Horizon event hosted by SideFX in Toronto. You can watch the full presentation here:
PCA Shenanigans and How to ML | Jakob Ringler | Houdini Horizon
This text tutorial dives into more specific setup details.
The Problem
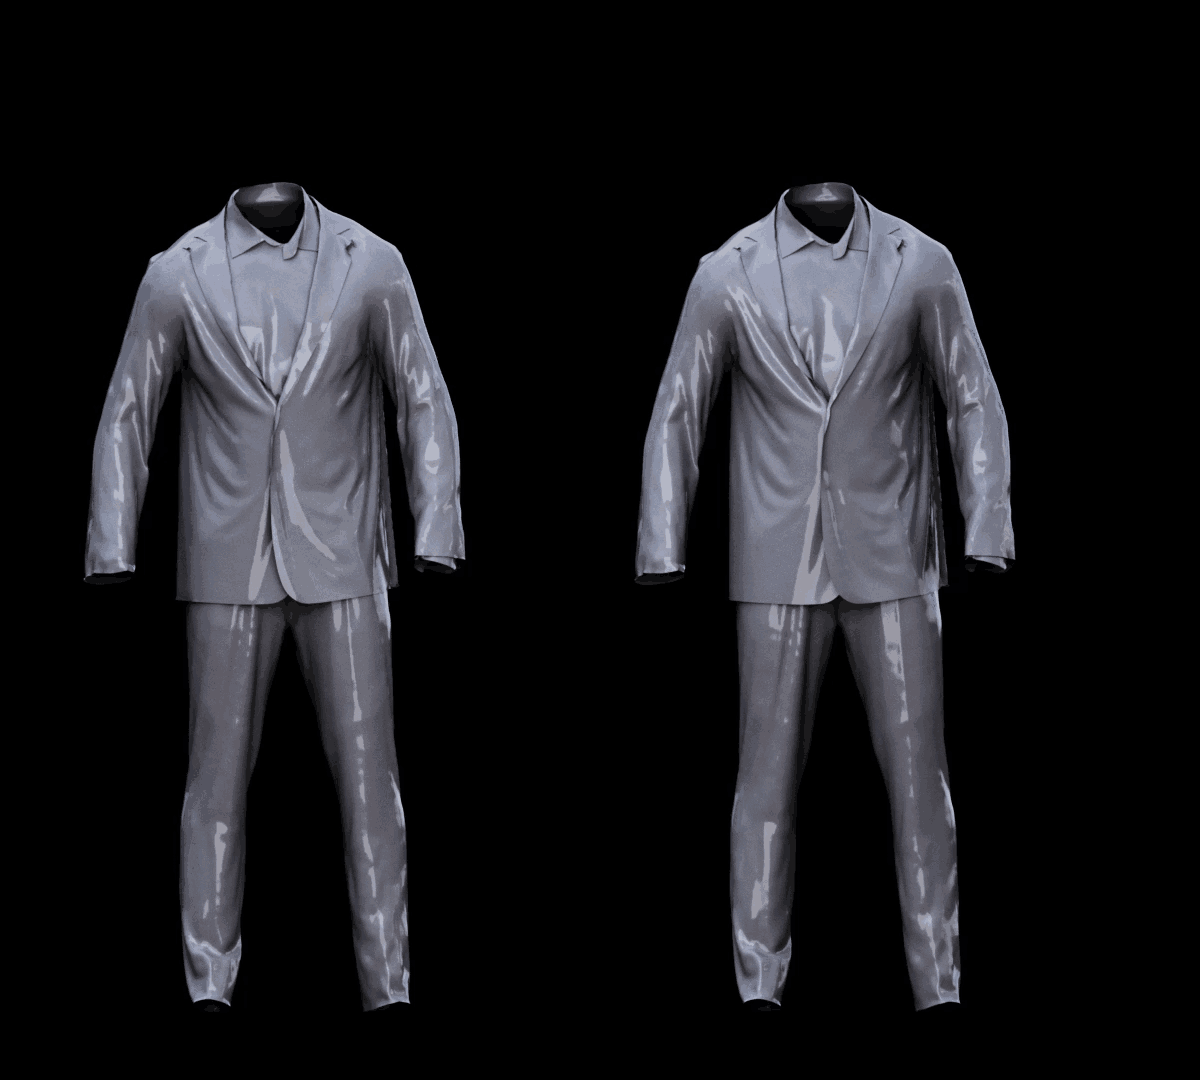
Here we can see the jittery input on the left and the result of PCA filtering on the right.
What is PCA?
I recommend reading this explanation on stack exchange. It really helped me wrap my head around the concepts:
The Solution
The content library file looks pretty involved, but the actual important part is in the 3 network boxes in the middle (purple, green, other purple?). Those are also exactly the same setup. The only thing that changes is what we feed into it. More on that later!
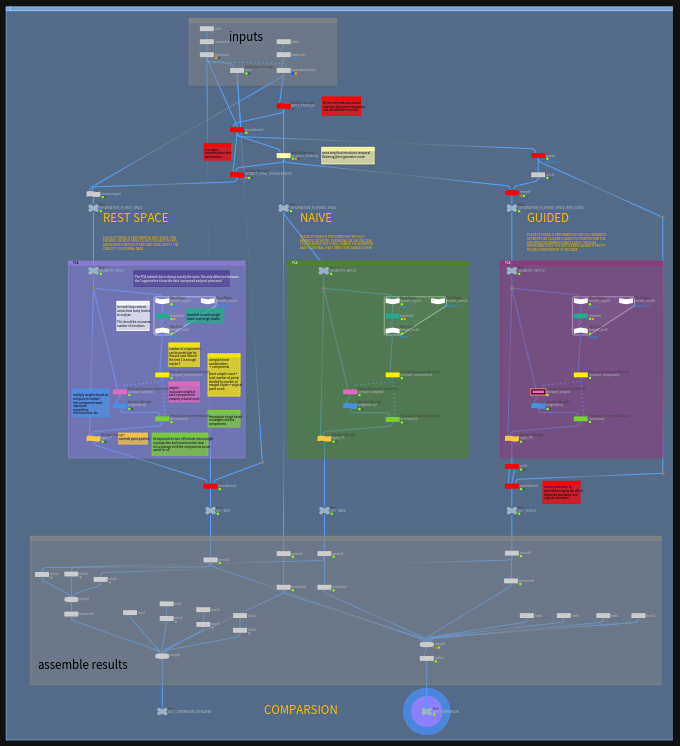
PCA Setup
The core of this setup consists of just a few nodes and the PCA node is used 3 times for different steps. De-jittering and filtering usually works by comparing past and future frames and finding which part of our data is the signal we want to keep and which part is the noise we want to remove.
Merging Frames
First we need to merge all the frames we want to look at. Ideally the number of frames should be uneven (say 7 -> 3 past frames, the current one and 3 future frames). That way, we get an equal amount of past and future frames. The output of the for loop is the different geometries stacked on top of each other. We access them through a timeshift that shifts based on the current frame and the iteration number.
Pseudocode:
$F- ( NumIterations / 2 ) + Iteration
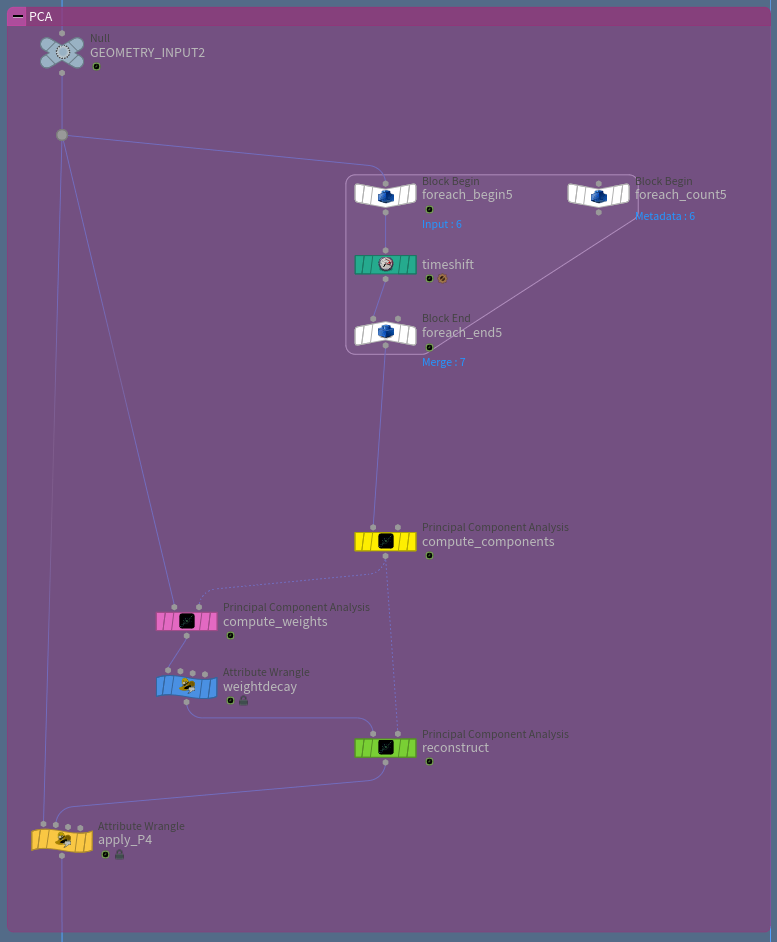
Computing Components
Next, we let PCA compute the components. In most of the simple PCA explanations, each sample is a single point in 2D space. For us, a sample is the entire geometry of a single frame (top row). So in this case, we have 7 samples (7 frames). We give PCA a giant list of all the point position vectors (bottom row) and let it figure out what is the most important bit of information across all the samples given.
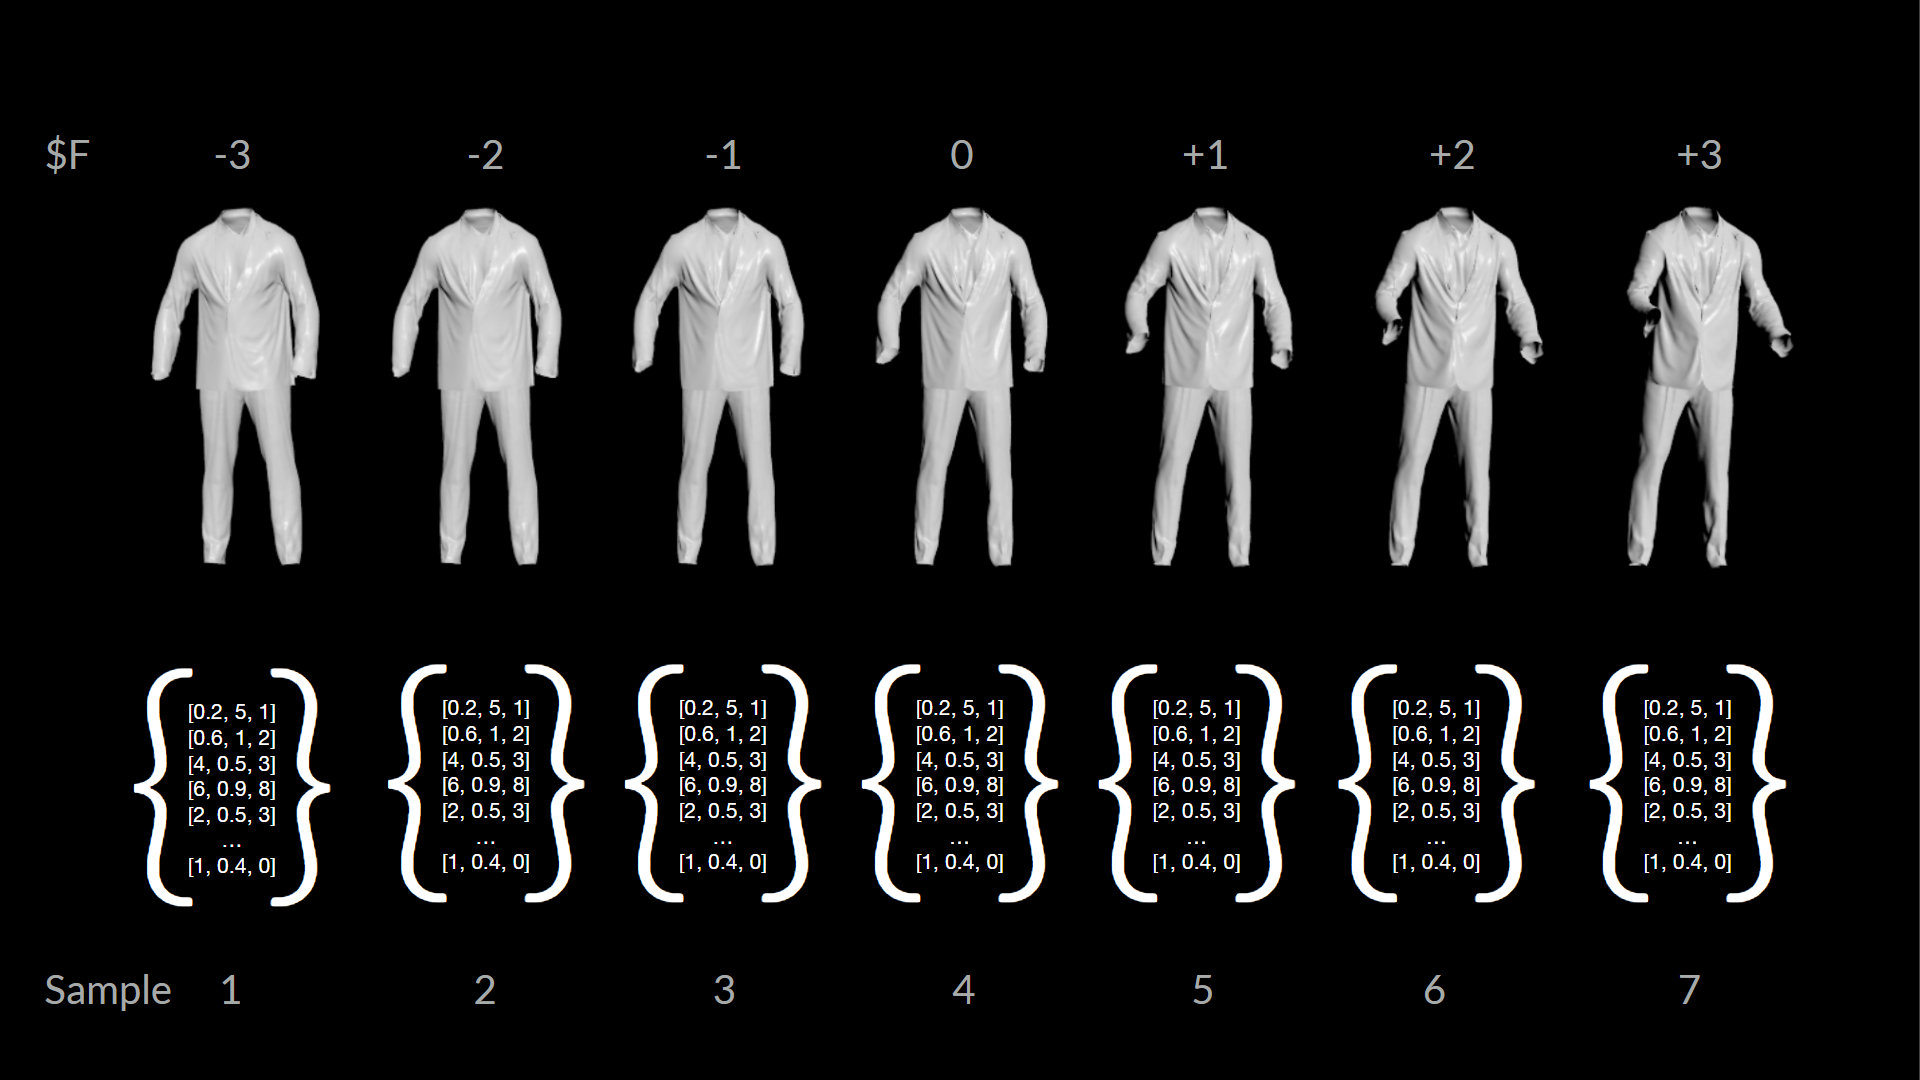
Because the PCA node only reads attribute data in series and doesn't have any option to deal with id or piece attributes, we need to tell the PCA node how big each sample is: npoints(0) / NumIterations
PCA then "invents" one or more components that can be thought of as blendshapes. Creating one component creates one blendshape that best fits all of the input samples. Creating more gives us multiple blendshapes that we can later mix and match to rebuild a specific pose.
Projecting and Reconstructing
Now that we have our components, we can compute a weight for each by projecting our original pose onto the new subspace. Sounds complicated, but all we need to do is pipe our geometry to the first input and the components to the second one. Set the mode to project and set the points per sample to the geometry point count (npoints(0)). Make sure to disable include mean weight, which is the 0th component (an average of all other ones).

We then multiply those weights with a falloff, so that the higher order components have less or no influence.
float range = 1-(float)@ptnum/@numpt;
float weightdecay = chramp("decay", range);
@weight *= weightdecay;
Then we can use those new modified weights and reconstruct the input point positions with them. To do that, just set the mode to reconstruct and set the points per sample to the point count again. Also make sure to disable include mean weight. Again!
That returns this point cloud and if we copy the point positions to the input geometry, we have a de-jittered animation.
v@P = point(1, "P", @ptnum);
The approach works because the components PCA generates are ordered by importance. Or in other words by the influence they have on the end result. We can abuse this to filter out less important information, by discarding higher order components. The noise/jitter that is present in the input data changes a lot frame by frame and isn't really important for the general shape. The assumption is that this less important information will be stored in higher order components. Reconstructing the geometry without those removes the fine grained movements, noise and jitter.
The Result
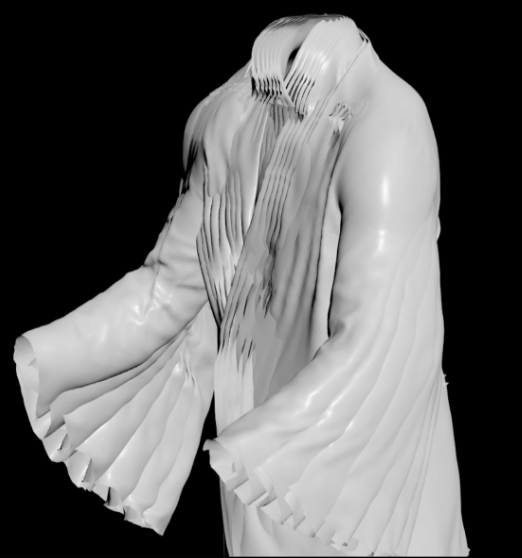
As we can see below, we got rid of most of the jitter. Depending on how aggressive we dial the settings in, we can remove even more movement.
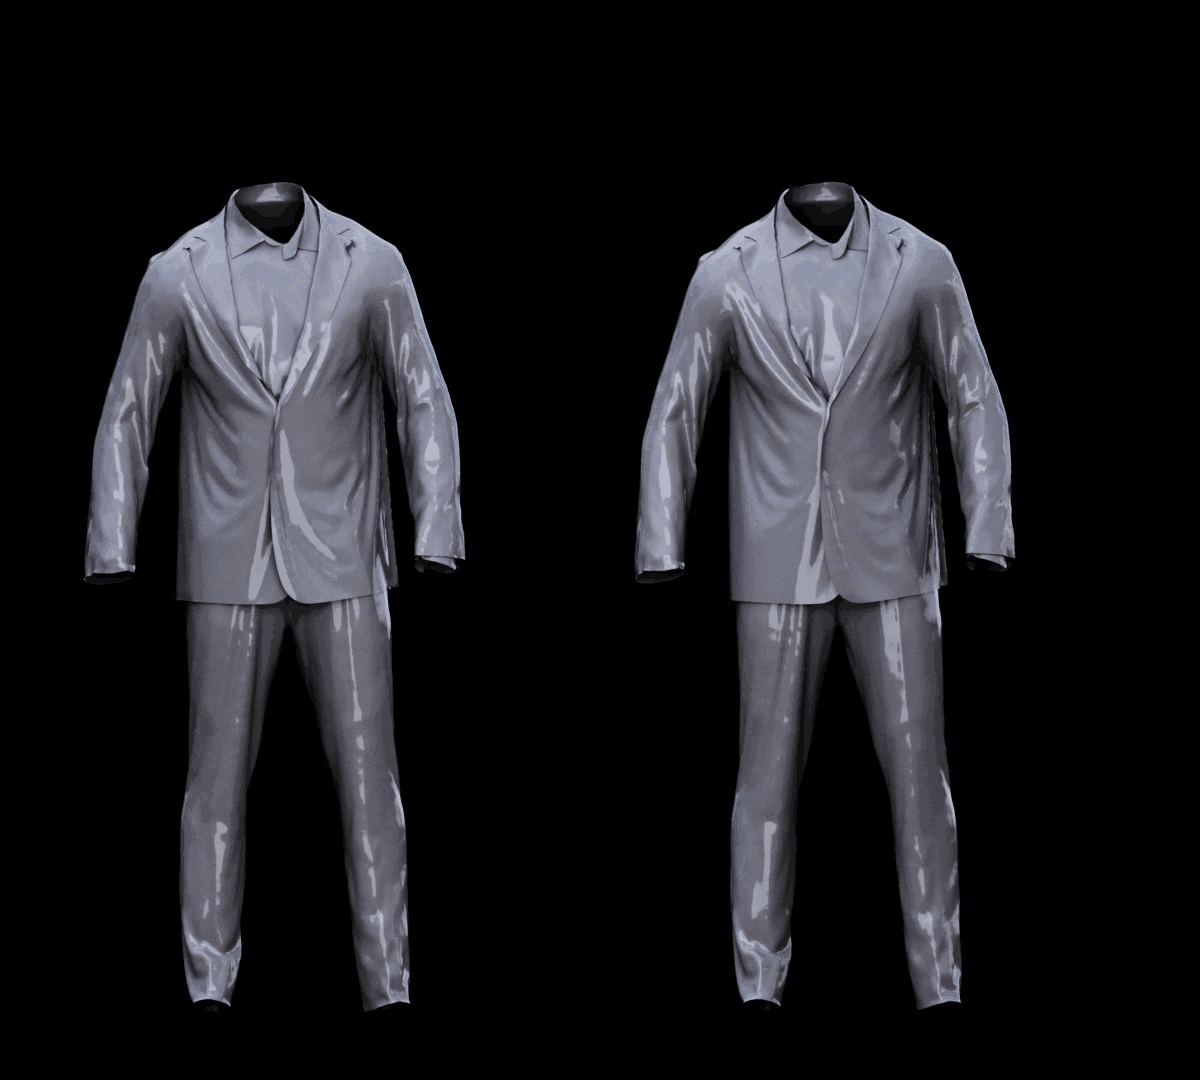
There is one issue though. By removing all the small movements and quick direction changes, we also de-jitter the animation itself, which we can especially tell when the character claps and the hands seemingly get stuck in the air.
Improvements
There are some workarounds that we can implement to counter that problem, but we would need a full rig to do so. This is external data and we only have alembic cashes of the character and the cloths. That however, is enough to save us.
De-Jittering with a Guide
The simple approach is to add a guide mesh to the geometry that doesn't have any jitter on it, but also follows the animation. So we just add our character mesh that drove the simulation in the first place. We then de-jitter both meshes at the same time. Afterwards we can point deform the cloth by the difference of the original character mesh and the de-jittered one.

For the cloth simulation the result looks like this:

The same amount of jitter is removed, while the animation is maintained.
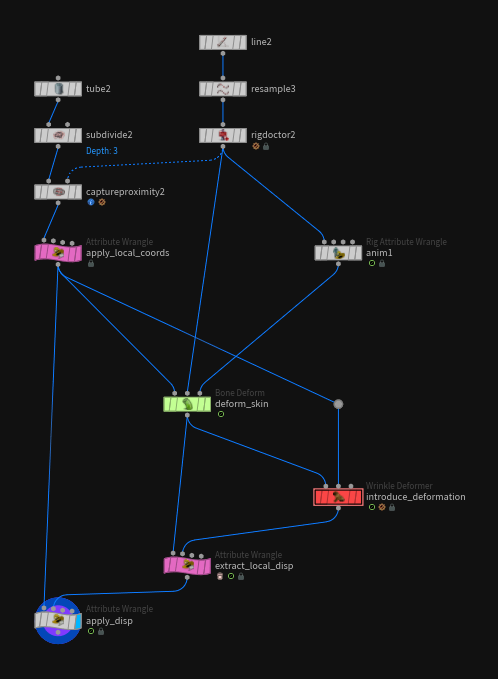
De-Jittering in Rest Space
The ideal way to deal with that problem is to de-jitter in rest space. To do this, we need to create a local coordinate system for every point and then deform those too (bonedeform does that by default when the attribute parameter is set to *).
code of point wrangle "apply_local_coords":
v@axis_x = set(1, 0, 0);
v@axis_y = set(0, 1, 0);
v@axis_z = set(0, 0, 1);
setattribtypeinfo(geoself(), 'point', 'axis_x', 'vector');
setattribtypeinfo(geoself(), 'point', 'axis_y', 'vector');
setattribtypeinfo(geoself(), 'point', 'axis_z', 'vector');
We can then introduce some sort of deformation that goes beyond the linear blend skinning one. In this case I'm using the wrinkle deformer, but this could be anything really (Vellum Sim etc.). This is the part where the jittering can happen.
We can then apply this displacement to the rest geometry. The resulting geometry has all the deformation data on it without the input animation. We can easily filter or process this now and use the default bonedeform to move it back to the correct pose after.
code of point wrangle "extract_local_disp"
matrix3 local_from_global = invert( set( v@axis_x, v@axis_y, v@axis_z ) );
vector global_delta = point(1,"P",@ptnum) - v@P;
vector local_delta = global_delta * local_from_global;
v@P = local_delta;
code of point wrangle "apply_disp"
v@P += point(1, "P", @ptnum);
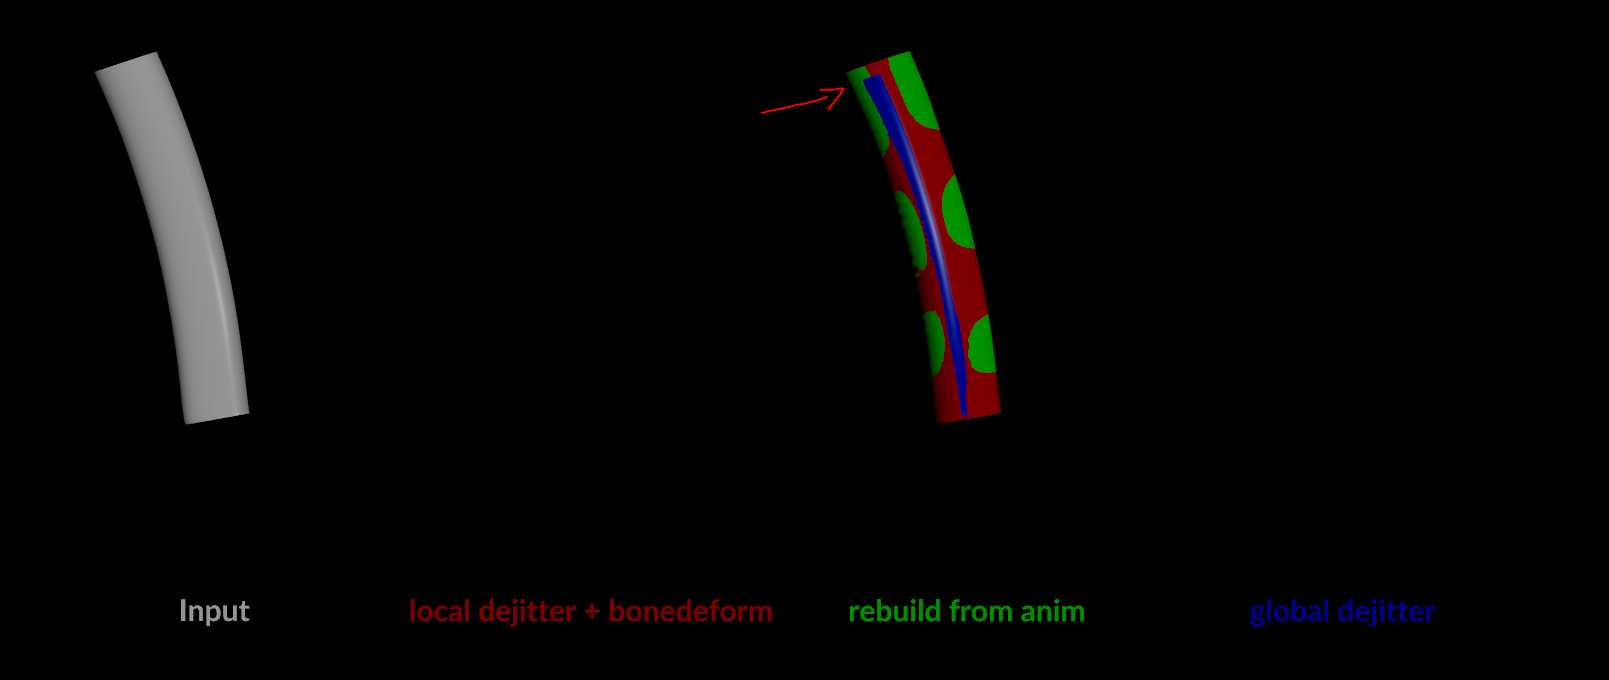
While this is only really practical for characters/rig based deformation, where the rig (bones + weighted skin) exists inside of Houdini, it gives the most accurate results. The point deform method we looked at earlier is pretty accurate and sufficient in most cases though.
In the image below, we can see how the two methods (red & green) line up pretty well and maintain the original animation much better then the naive approach (blue).
Credits
Thanks to the amazing team at SideFX for all the help with this project!
Support on All Fronts: Fianna Wong
ML Tools Developer: Michiel Hagedoorn
CREATED BY

COMMENTS
Please log in to leave a comment.