| On this page |
The ![]() Houdini Procedural: Crowd LOP is a convenient tool that lets you optimize crowd simulations directly at render time. The procedural tries to find background agents with very similar poses and turns them into instances of the same deformed geometry.
Houdini Procedural: Crowd LOP is a convenient tool that lets you optimize crowd simulations directly at render time. The procedural tries to find background agents with very similar poses and turns them into instances of the same deformed geometry.
The tool determines an agent’s pixel size in the image, based on the scene’s camera and resolution. If an agent is distant enough according to the LOD Threshold parameter, the procedural can replace it by an instance of another agent’s deformed geometry if the pose is similar enough. The other agent must be an instance of the same SkelRoot prototype. This reduces the amount of unique geometry and makes the scene more resource-friendly.
Note
A SkelRoot is basically a transform primitive that has
-
geometry primitives (e.g. meshes) underneath with primvars, describing the skinning weights and joint indices
-
a
Skeletonprimitive underneath, describing the joint hierarchy -
a
SkelAnimationprimitive, describing an (animated) pose for the skeleton -
attributes that bind the animation and skeleton to the skinned primitives.
A very similar mechanism already existed in Mantra, where it was automatically enabled and ran in the background. In Solaris/Karma, however, you have full control over the procedural’s parameters. Aside from memory and performance improvements, the tool also aims to make the transition process from Mantra to Solaris/USD smoother and more user-friendly.
There are several benefits of the procedural in contrast to “traditional” workflows, e.g.
-
general workflow improvements
-
works with Solaris/USD, Karma and any other render delegate
-
preview procedural to see the result in the viewport
-
unified workflow with other Houdini procedurals.
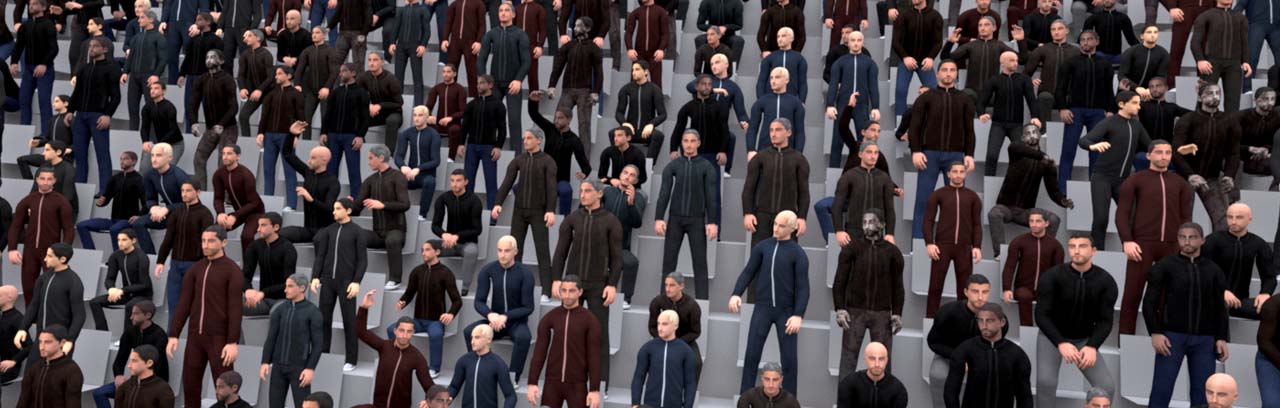
The following chapters guide you through a typical example, where you create a crowd in SOPs and connect the result to a procedural. There you can control the number of agents and instances through appropriate parameters. Colors let you inspect where you will see agents and instances.
Crowd scene 
The scene is based on the Stadium Example that ships with Houdini. You can find the example in the Crowd ![]() shelf.
shelf.

-
Open the shelf and click the example’s
 icon to add it the scene. It’ll take a few moments until the setup is completed.
 -
In upper right corner of the viewport you can see two button. Click the second button with the No cam entry to open a dropdown menu. From there, choose stadiumcrowdexample/cam1_side to get a good view of the crowd.
When you look at the network, there are three grey boxes. The Simulation box contains a node that is of particular importance: crowd contains the animated characters used by the procedural.
Solaris setup 
Tip
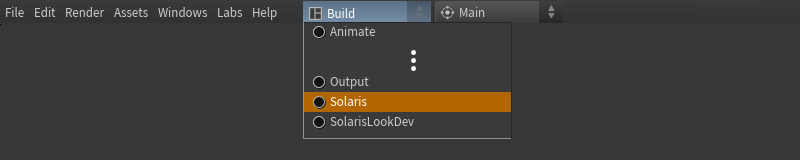
Before you start to create your Solaris network, we recommend changing Houdini’s desktop. From the main menu bar, open the first dropdown menu (set to Build by default) and choose Solaris or Solaris LookDev. It’s important to have access to the Scene Graph tree pane, where you can see the scene’s primitives and their hierarchy.
Geometry import 
The scene has a stadium section for the audience. This object isn’t necessary for the procedural, but you course we want to get the full picture.
-
On the stage level, create a
 SOP Import LOP. Go to SOP Path and click the
  Open floating operator chooser button. Use the browser to navigate to the
 stadiumnode and click Accept to confirm your choice. In this example, the full path is/obj/stadiumcrowdsexample/stadium. -
In Solaris/USD, names play an important role. In the Scene Graph Tree, the name of the freshly imported geometry is just
sopimport1- the node’s name. Rename the import node tostadiumto make identifiable.
Camera import 
A camera is required, because the procedural uses it for measuring distances and pixel sizes to decide, whether an agent can be substituted through an instance or not.
Press ⇥ Tab to open the tab menu. From there, choose Scene Import (Cameras). This is a preconfigured ![]() Scene Import LOP that will automatically fetch the scene’s three cameras from the SOP network.
Scene Import LOP that will automatically fetch the scene’s three cameras from the SOP network.
In the viewport’s upper left corner you can see a No cam dropdown menu. Open the menu and choose one of the imported cameras.
Crowd import 
The crowd has a rest and an animated state. Both states are required by the procedural to make it work. The ![]() SOP Crowd Import LOP was designed to load both states through one node. You also get a wide range of attributes with your crowd. The node provides various toggles that let you import only those attributes you really need. This will make your Solaris scene more resource-friendly.
SOP Crowd Import LOP was designed to load both states through one node. You also get a wide range of attributes with your crowd. The node provides various toggles that let you import only those attributes you really need. This will make your Solaris scene more resource-friendly.
-
On the stage level, add a SOP Crowd Import LOP and connect its input to the output of the camera import node.
-
The SOP Path parameters points to the aforementioned
crowdgeometry node. Click the Open floating operator chooser button. Use the browser to navigate to the crowdnode and click Accept to confirm your choice. If you're using the shelf tool, the path is/obj/stadiumcrowdsexample/crowd. -
You can also specify an Import Path Prefix. The parameter’s entry defines how the crowd primitive appears in the Scene Graph Tree. The default
$OStakes the node’s name, but that’s not very catchy. A better name is/crowd, because it’s directly related to the SOP network.When you expand the
/crowdentry in the Scene Graph Tree (see image below), you have access to every single character of the crowd, itsSkelRootandMesh, as well as its primvars/attributes in the inspector next to the tree.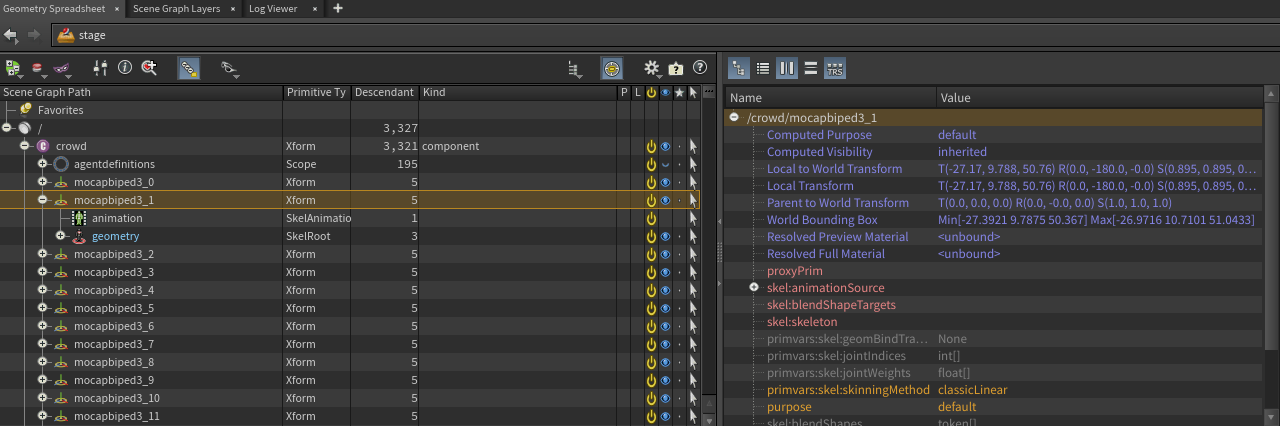
Click the image for a full view. -
Expand the Import Rest Geometry Data section and turn on Attributes to load only the necessary attributes. What you really need for the rest state is
P transform uv boneCapture. -
You can also limit the number of attributes for the animated state with Import Animation Data. The mandatory Attributes are
bounds transfrom.
Render settings 
Many users apply the render settings to the end of a network, but in conjunction with the Houdini Procedural: Crowd, you must apply the settings before the procedural. The reason is that the procedural needs the image resolution to predict an agent’s pixel size in the final image. Agents that are, for example, just a couple pixels in size, can be swapped without affecting the crowd’s appearance.
-
Add a
 Karma Render Settings LOP and connect its first input with the output of the crowd import node.
 -
If you have multiple cameras, open the Camera parameter’s associated dropdown menu and choose the camera you want to use for the final render.
-
Use Resolution to specify the image’s size in pixels.
Other parameters like Engine Settings or the number of samples don’t have any influence on the procedural.
It’s not necessary to use the camera, specified in the render settings, to measure the distance between an agent and the camera to define the crowd’s level of detail (LOD). Instead, you can also specify an LOD camera directly on the procedural.
Note
If your network contains a ![]() USD Render ROP with overrides for camera and resolution, the procedural will take them into account.
USD Render ROP with overrides for camera and resolution, the procedural will take them into account.
Houdini Procedural: Crowd 
The procedural is the network’s center piece and collects all the upstream data to optimize your crowd simulation directly at render time. Most of the work is done under the hood and in fact you can proceed with the default settings. However, there are LOD settings that let you preview the procedural’s output in the viewport. There you can adjust the amount of instances and visualize them through different colors.
-
Add a Houdini Procedural: Crowd LOP and connect its input with the output of the Karma Render Settings LOP.
LODs 
By default, the procedural reads out the render setting node’s Camera parameter’s entry to calculate the distance between camera and each agent. You can determine the ratio between prototypes instances, and default agents through the procedural’s LOD Threshold parameter.
-
The deformed geometry of a
SkelRootprimitive can be used as a prototype for background primitives. -
A background
SkelRootprimitive can become an instance of another primitive’s deformed geometry. -
A default
SkelRootprimitive was not modified by the procedural and keeps its original state.
-
Turn on Visualize Instances to visually differentiate the three types described above through colors.
-
To finally see the colors, lay down a
 Preview Houdini Procedurals LOP and connect its input with the output of the upstream crowd procedural.
 -
Turn on the preview node’s blue Display/Render tag to activate the node.
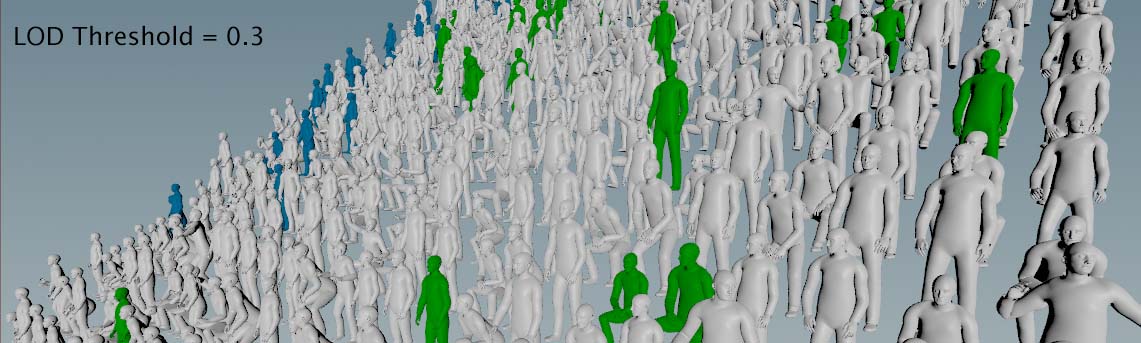
Drag the crowd procedural’s LOD Threshold parameter’s slider to the left. In this case, you’ll see more and more white default agents, because you need a lot of detail. In the left part of the comparison image below, LOD Threshold is 0.3 and there are just a few blue agents in the background.
Conversely, when you drag the slider to the right, you’ll get more blue and green characters, because you're actually far away. The agents become smaller in the render and you don’t need a high level of detail. The right image uses a LOD Threshold of 2.0.

As mentioned, the distribution of agents is based on the camera defined in the render settings. However, you can also do the LOD calculation based on another camera. The stadium shelf scene comes with three different cameras.
When you turn on LOD Camera, you can use the parameter’s associated dropdown menu to choose any other available camera and see how the ratio between the types changes with increasing or decreasing LOD Threshold.