| On this page |
The Stage Manager LOP in Houdini 20.5 has been completely revised with lots of improvements in both interface layout and functionality.
The Stage Manager’s user interface consists of two main columns with several tabs. You can drag items between the columns, for example from the File Browser to the Scene Graph. The Stage Manager now also supports methods like duplicating, variant selection, copy and paste, transformations, and asset management to name but a few. The node is a convenient control center for many USD-related workflows with a clearly structured UI.

Once you have added a Stage Manager to your Solaris stage, you can hover the mouse over the viewport and press Enter to turn on a HUD with the node’s most important shortcuts. To leave the HUD, press ⎋ Esc.

Scene Graph Tree 
The Scene Graph Tree of the Stage Manager is a reduced version of the tree in Houdini’s Solaris desktop. In the LOP you have path, visibility and activation. There are also on-demand buttons for removing a reference from the tree and adding
a child.
Note that the Scene Graph is not an isolated UI element, but instead it communicates with the tabs on the Stage Manager UI’s right column and the Transforms tab. You can find more information on the interplay of the Scene Graph Tree with the managers other tabs in the appropriate chapters of this help.
Of course, you can ⇧ Shift-click multiple entries and change their visibility and activation states at once. And, when you double-click the name of an entry, you can change its name.
A right-click menu provides a wide range of convenient features like copy and paste, duplicating or grouping. Grouping is also available through the ⌃ Ctrl + D shortcut. This action duplicates all selected references and creates siblings next to their originals.
You can also use ⌃ Ctrl + C and ⌃ Ctrl + V shortcuts to copy and paste primitives inside the Scene Graph Tree. To paste an item from the clipboard to one or more references, select the item(s) and press ⌃ Ctrl + V. Depending on your selection you will see different behaviors
-
Paste to a single item: paste as children.
-
Paste to the same items as copied: paste as siblings of each copied item.
-
Paste to multiple different items: create a group at
rootlevel and paste as children.
Transforms 
This tab shows the nodes of the Scene Graph Tree along with their current transformations for position, rotation and scale in XYZ direction. If you're familiar with the Edit LOP, you might recognize the Transform tab’s layout. because its exactly the same in terms of UI and functionality.

When you change any of those parameters in the viewport, you can see the new values directly in the Stage Manager. Alternatively, you can also double-click an entry and enter a value.
The transform handle is automatically enabled when you select a reference. With multiple selections, the handle appears in the centroid of all selected items.
Like on the Edit LOP, there’s also a Physics column with checkboxes.
Note
On the Stage Manager, physics is currently experimental and might not work correctly due to fundamental differences in how the Edit and Stage Manager LOP handle the stage.
To use the physics option, select the Stage Manager LOP and go to the viewport. On top of the viewport you can see a toolbar. There, turn on Use Physics.

-
Select the prims you want to be able to move and click Add Physics on the viewport toolbar or turn on the appropriate checkbox on the Stage Manager’s Transforms tab. Selected prims can have their positions and rotations affected by the simulation. Not selected prims act as static colliders that don’t move.
-
You can use the handles to transform the selected prims all at once.
-
Alternatively, you can drag on a selected prim to “push/pull” that prim by that point. Other selected prims can be affected by the prim you're dragging. Not selected prims act as static colliders that don’t move.
-
Shrift-drag on a selected prim to “push/pull” all selected prims at once. Use the
to drop or raise the selected prims with physics. This is useful to the objects into a natural-looking pile.
Inspector 
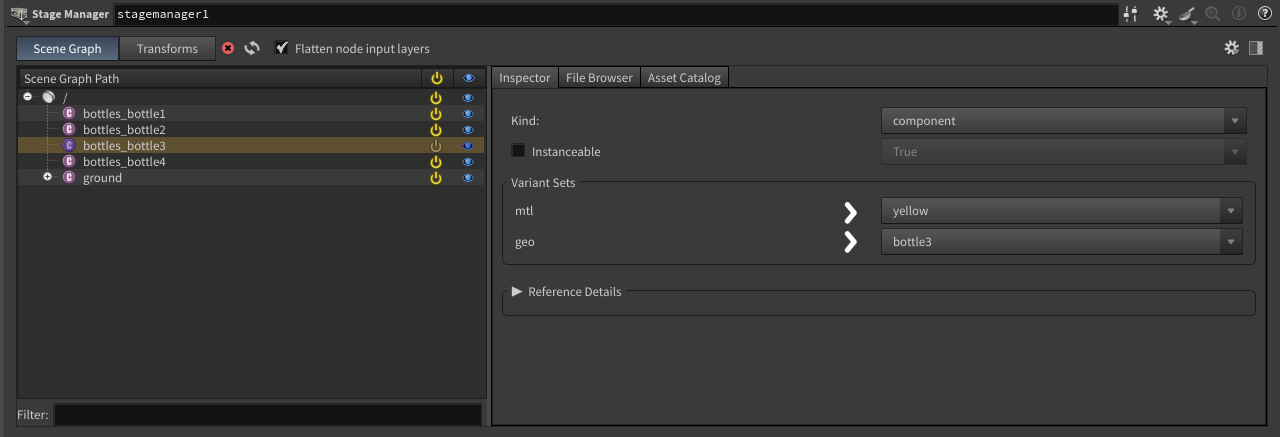
The Inspector tab is not only for your information, but it’s also a versatile and convenient tool for your work with object and material variants from assets.
For example, when you load an asset with multiple variants and select it, you will see that the tab’s UI elements are now fully functional. The Kind dropdown menu indicates that you've loaded a component, but you can also assign a different kind.
To save memory, you can make a primitive a native instance and explicitly mark it as instanceable. USD supports two types of instancing
-
Instanceable primitives, where multiple copies of the same branch are aliases to shared storage.
-
Point instancing, where USD stores points and prototypes to copy onto the points, but only draws the copies at render time.
Tip
If you want to know more about instances, we recommend reading the Instances page.
The Variant Sets section lets you quickly switch between an asset’s variants by choosing a material and/or a geometry from the appropriate dropdown menu. The chosen object/material is then visible in the viewport. Note that Variant Sets are not available for multi-selections.

The Reference Detail section is collapsed by default. Expand it to see its parameters. The Reference Prim button opens a pop-up dialog that lets you choose the prim to reference in. Currently, Asset Paths and Resolved Asset Paths are identical, but this will change in the future.
File Browser 
By default, the File Browser shows a tree structure of your computer’s user directory. The browser works in the same way as the Scene Graph Tree with collapsible and expandable branches. If you want to jump to another drive you can enter a root path or a complete path to the input field. When you leave the input field blank, you will see all mounted drives. The dropdown menu next to the input field saves a history of the last paths used.
You can expand the tree’s drives and folders to navigate to a USD file or an asset folder. To add the file/folder to the scene you have two possibilities. Drag the item onto the
-
Scene Graph Tree of the Scene Graph tab
-
viewport, then press Enter to finally add the object.
Alternatively, you can also use an external file browser - typically the one from your operating system. With this method you have the same possibilities listed above: tree and viewport.
When you drag items from the File Browser onto a reference in the Scene Graph, you have these options
-
Dragging an entry from the File Browser onto an existing reference will child the new item and set the appropriate Kind (Group parent →
componentchild, Component parent →subcomponentchild). Note that Kind hierarchies have not been enforced beyond this as you might have bespoke kinds. If you require to change the child’s Kind, you can also do that in the Inspector tab. -
⌃ Ctrl-dragging onto an existing reference will replace the reference while maintaining the original name. You can see the change in the Inspector tab’s Reference Prim parameter.
Asset Catalog 

The Asset Catalog, also known as Layout Asset Gallery, has the exact the same functionality as described in the link.
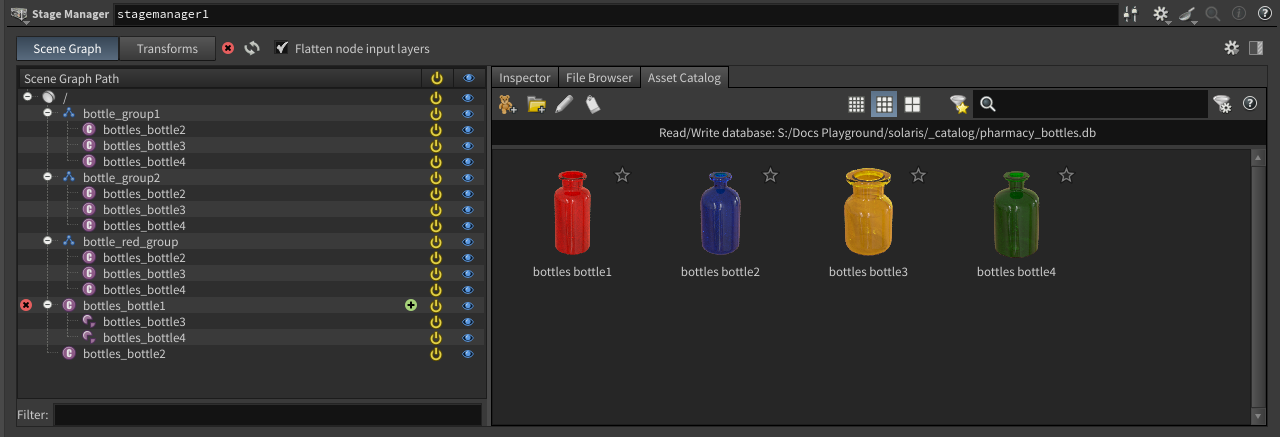
Of course, you can load custom catalogs and populate the stage with your own assets. If an asset has multiple variants, you can see them in the Inspector tab’s Variant Sets section and choose a material or a geometry from the dropdown menus.
The Asset Catalog supports the same drag options as the File Browser.
Using the Stage Manager 
The previous chapters illustrate what you can do with the Stage Manager, but what does that mean practically? Typical scenarios include assets with object or material variants. The Stage Manager helps you to quickly populate a scene by creating copies, parent-child pairs, groups, and apply different materials with very few clicks.

The following example explains how to quickly create a large number of objects with texture variants. Here, the objects are differently colored pharmacy bottles from a custom asset catalog. We assume that you've already prepared a catalog.
Loading a catalog 
The Stage Manager has a built-in instance of the asset catalog. Click the button and choose Open Asset Database File… to load a catalog.
Lay down a Stage Manager LOP and make sure that the Scene Graph tab is active. Then, on the manager’s right column, open the Asset Catalog tab to see the catalog’s entries.
Adding an asset 
To add an asset to your scene, drag it from the catalog to the Scene Graph Path area. It’ll then appear under /. You’ll also see in the viewport that the object has transformation handles that let you position, rotate and scale the asset like any other object. Another thing you might notice is that the Stage Manager adds new assets, but no new nodes on the stage itself. This mechanism keeps your network clearly arranged and small.

On the Inspector tab you can see the available Variant Sets. You can, for example, have a single asset with different materials, or multiple assets with one shared material, etc. This scene lets you assign any material to any available object.

You can proceed to add other assets and arrange them in your scene. Or you create copies of the already existing asset and scatter them.
Duplicate 
You can duplicate the currently selected asset(s) with the ⌃ Ctrl + D shortcut or when you -click the entry in the Scene Manager’s Scene Graph, and choose Duplicate. To multi-select more than one entry, ⌃ Ctrl +
-click the objects.
The interesting thing is that you can now replace the copied object(s) through another variant or assign one of the available materials. When you do this, the name of the original asset will not be updated in the Scene Graph Tree, but maintained. However, you can double-click an entry in the tree and rename it.
With ⌃ Ctrl + C and ⌃ Ctrl + V you can copy and paste an asset, but the result is the same as with duplicating. The only difference is that it might more convenient to keep your assets in the clipboard and reuse them on demand.
Children 
You can also create parent-children pairs when you drag an entry from the Asset Catalog (= child) directly onto an entry in the Scene Graph Tree (= parent). When you transform the parent, all children will perform the exact same transformation. However, it’s still possible to transform the child. In this case, the parent will not be affected.
Group 
To group assets, ⌃ Ctrl + -click entries from the Scene Graph Tree. Then,
-click one entry and choose Grouping or press ⌃ Ctrl + G. The objects will appear under
group1 entry. You can rename the group by double-clicking it.

You can now
-
move, rotate or scale the entire group or again individual group members
-
duplicate a group and its elements
-
make a group a child of a parent object.