| On this page |
Note
Before you proceed, please read the animation setup page of this workflow guide.
The APEX Add Groom in the animation setup treats feathers and character separately and that’s one of the big strengths with this node: you can handle completely different geometry sets through a single node. At the node’s output, however, both streams are merged. In this example, all information is stored inside the ANIM Null SOP from the animation network.
To keep things clearly arranged and avoid very large networks, you’ll create the render setup inside a new Geometry OBJ on the obj level. There you can separate the streams and prepare everything for the ![]() Houdini Procedural: Feather LOP. Here’s a preview of the render setup.
Houdini Procedural: Feather LOP. Here’s a preview of the render setup.
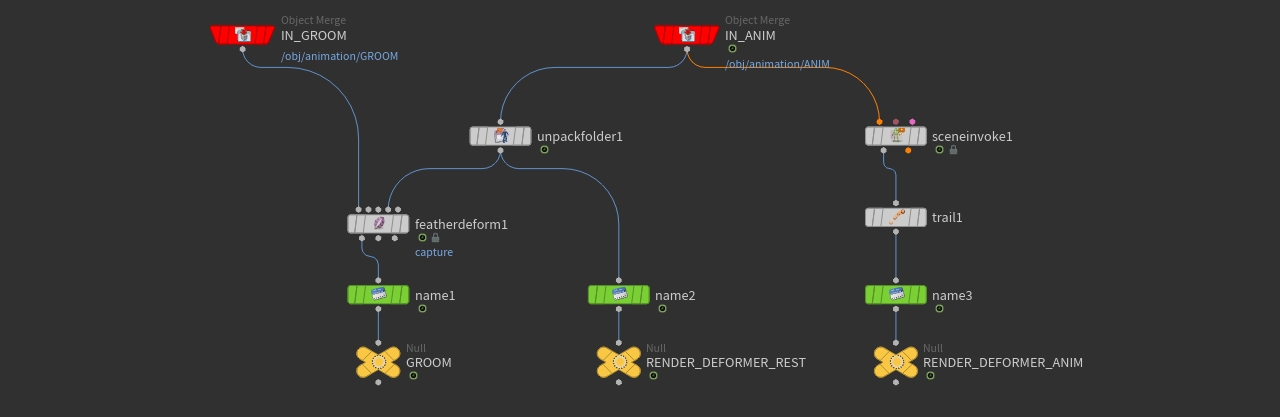
Import 
Similar to the animation setup, you also need groom and feathers to prepare your scene for rendering.
-
Go to the obj level and add a Geometry OBJ. You can rename it, e.g. to
render_setup. Double-click the node to dive inside. -
Inside the node, create an
 Object Merge SOP and rename it, e.g. to
 IN_ANIM. -
Next to Object 1, click the
 Open floating operator chooser button. Use the tree menu to navigate to the
 ANIMNull SOP inside theanimationnetwork. Click Accept to confirm your choice. -
Create another Object Merge SOP and rename it
IN_GROOM. This node imports the original feathers before they're processed in the animation setup. Again, use the Open floating operator chooser to navigate to theGROOMNull SOP inside thegroomnetwork and Accept your choice.
The stream from the IN_ANIM object merge can be tricky, especially for beginners, because it requires some knowledge about rigging. The first thing to consider is that the stream contains a rest and an animation state. Both states are required for the Houdini Procedural: Feather LOP, so you have to separate them.
IN_ANIM: rest 
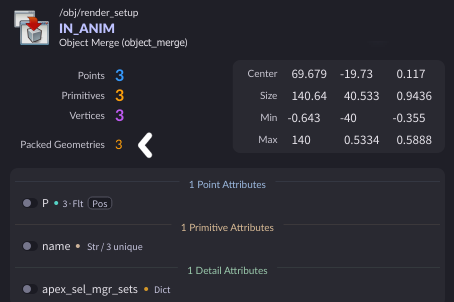
The character rig in this example is packed and you can see this when you click the IN_ANIM node’s Node info flag. Your task is to unpack the information to get access the individual parts again.
-
Add an
 Unpack Folder SOP and connect its input with the output of the
 IN_ANIMnode.The node has an Exact Pattern parameter that specifies which part of the animation stream you're going to use. The pattern is a path from the rig tree.
-
Select the
IN_ANIMnode and open the Rig Tree pane to see the node’s content. To understand what you need, you have to know what kind of data you will be processing in the rest and animation streams: feathers, converted into surfaces.In this scene, the only entry with surfaces is
/toucan.char/GroomSurfaces.shp. This is the path you must enter to the Unpack SOP’s Exact Pattern input field.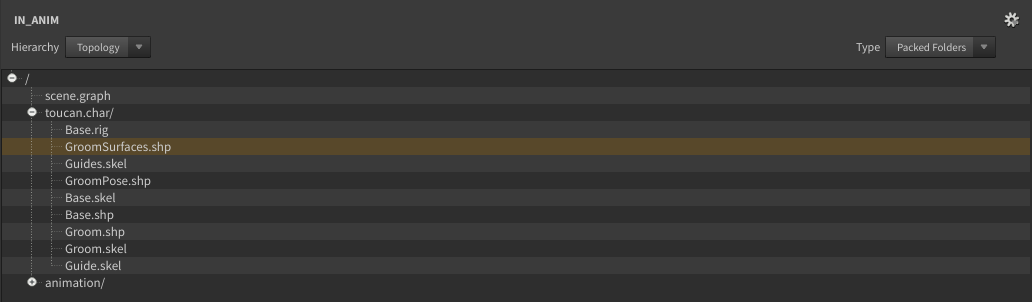
-
Add a
 Name SOP and connect its input with the output of the unpack node.
 -
Set Name to
deformer_rest. This name will appear in the Solaris Scene Graph Tree. -
Put down a
 Null SOP and connect its input with the name node’s output.
 -
Rename the null to
RENDER_DEFORMER_REST.
IN_ANIM: animation 
This stream contains the animated state of the feathers and, similar to the rest state, you have to separate the appropriate data from the IN_ANIM node’s other content.
-
Lay down an
 APEX Scene Invoke SOP and connect its first input with the output of the
 IN_ANIMnode. This node shows the actual motion of the animated feathers.Similar to the unpack node in the rest stream, you also have to define a path under Scene Output Path and Key. The node provides dropdown menus that let you choose the appropriate path. If you're not sure which entry you have to choose, try Output All Character Shapes.
This button collects all eligible entries and here you also have to choose the
GroomSurfaces.shppath-key combination. Make a note of the entries. You can also see that the Bind Multiple Outputs toggle is turned on. Unfortunately, this mode complicates the setup, so it can be better to revert this step. -
Turn off Bind Multiple Outputs to return to a single output.
-
Go to Scene Output Path and open its dropdown menu. From there choose
/toucan.char/Base.rig/output. -
From the Key dropdown menu, choose
GroomSurfaces.shp.
As before, add a Name SOP and connect it. Set its Name parameter to deformer_animation. Another Null SOP terminates the network branch. Rename the node to RENDER_DEFORMER_ANIM.
GROOM 
The IN_GROOM stream contains the feathers' curves that describe the shape of the entire feathering. Here you transfer the deformation from the rest state to the groom curves as a point attribute.
-
Lay down a
 Feather Deform SOP and connect its first input to the output of the
 IN_GROOMnode. The fourth input goes to the output of the unpack node. -
In the
animationnetwork you've been working with polygon surface. Therefore, set Deformer Type to Surfaces. -
Open the Mode dropdown menu, and choose Capture, because here you only want to transfer the information without performing the actual deformation.
As in the previous streams, add another Name SOP and connect it. Then, set its Name parameter to groom. Terminate the branch with a new Null SOP and rename it to RENDER_GROOM.
Conclusion 
You have now split the streams from the APEX Add Groom SOP into rest and animation. You also have the original groom that is deformed by the rest state.
In the next step you import all three Nulls to Solaris and sent them to the Houdini Procedural: Feather LOP for rendering.