| On this page |
Once you've created the feathers you can spread them over an object or character. To get you off to a good start and make things less complex, this guide starts with a single feather. If you're new to hair, fur and feathers, it might need a little routine to become familiar with the grooming process. Experienced artists will find tools, nodes and workflows they already know from their work with hair and fur.
Note
You need at least one feather and this doesn’t have to be a fully detailed model. This workflow guide uses just two feathers, named body and down, to keep things manageable.
Adding the character geometry 
In fact you can use any object or geometry - static or animated. For animated objects, you should always start from a rest position like the typical T-pose.
Note
Atlas and grooming networks can be become very complex. We therefore recommend to have both parts inside separate containers.
-
Go to the obj level and press ⇥ Tab to open the tab menu. Add a
Geometry OBJ. You can also apply a name like
groom. -
IMPORTANT: Open the geometry node’s Misc tab and turn on Shade Open Curves in Viewport. Without this option you’ll only see the guides, not the feathers!
-
Double-click the geo node to dive inside and add an object. You can use one of Houdini’s test geometries or an imported character, etc. This example uses the
Test Geometry: Rubber Toy SOP.
-
Put down a Normal SOP and connect its input with the output of the geometry node. This node (re)computes the object’s normals. The normals are used by the groom node to orient the feathers.
-
Increase Cusp Angle to a high value like
180to average the normals.

Connecting the feather geometry 
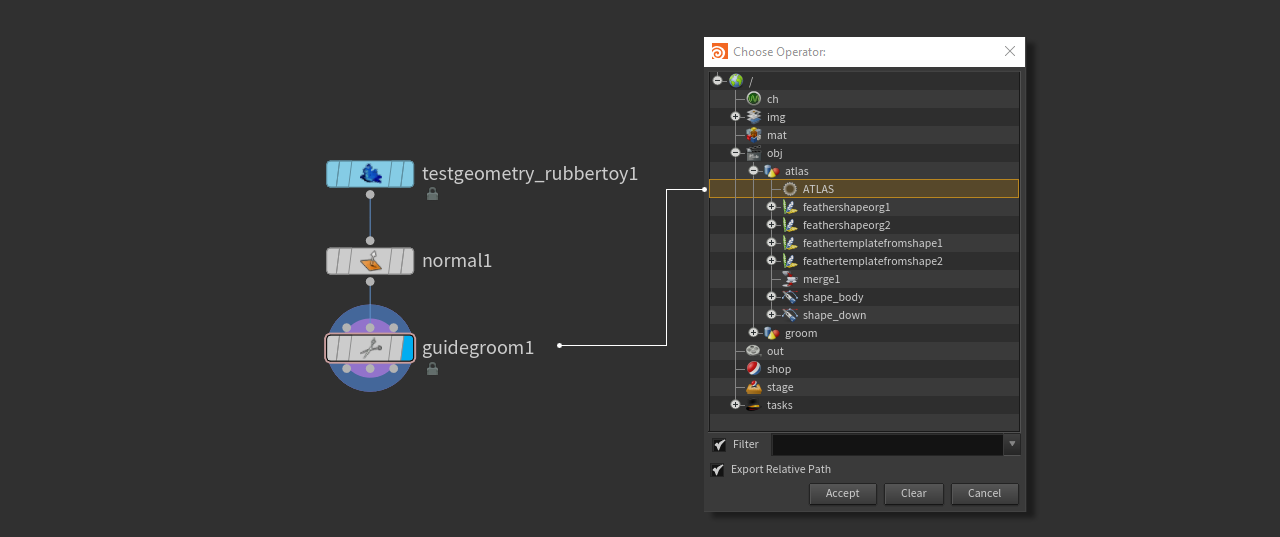
Before you start to add feathers, it’s necessary to make the groom node aware of the feather geometry and do some other preliminary adjustments. Here’s a preview of the network’s first part.

-
Add a
Guide Groom SOP and connect its second input (Skin) with the output of the Normal SOP.
-
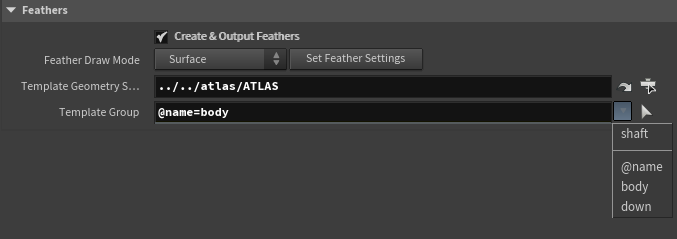
Open the Feathers section and turn on Create & Output Feathers.
-
The Template Geometry SOP defines the path to the feather geometry. Typically, this is a
Null SOP. We always recommend applying a name to the null, e.g.
ATLAS.Click the
Open floating file chooser and navigate to the
ATLASnull. Confirm your choice with Accept, as shown in the screenshot above. -
Once connected, you can specify a Template Group that corresponds with the
nameprimitive attribute of the feather.All available names are listed in the dropdown menu next to the Template Group parameter’s input field - here it’s
bodyanddown. When you choose the first entry, you will see@name=body.
-
Click Set Feather Settings. This button does two things: it turns on Orientation Attributes ▸ Create and Maintain orient Attribute and creates the
barborientattribute along with aNup vector attribute.
Adding the feathers 
The geometry is now prepared and you're ready to create feathers on the object’s surface. The node you need is the Guide Groom SOP and it’s also used for hair and fur. There are two modes for adding feathers: Draw and Plant.
-
Draw lets you draw out curves from the object’s surface.
-
Plant, however, lets you add points where you want the feathers to appear. Plant also lets you create many hairs at once through a Scatter mode.
-
Clear lets you remove all feathers at once.
Drawing guides 
As mentioned in the introduction, you can draw individual feather guides on the surface. Select the Guide Groom SOP and go to the Tool dropdown menu. There you can see that the default choice is Draw. This mode lets you add feathers/guides one by one. Other modes let you Delete, Brush and Clump the guides and feathers.
Guides are used to set up the initial direction and length of the feathering. Later, the instances are interpolated between the guides. Length and orientation are also interpolated to create smooth transitions between different feathers. Therefore you don’t have to cover the entire character with hundreds or thousands of guides; a few lines are normally enough. Instead of grooming large amounts of feathers, you only manipulate the guides and the interpolated feathers will follow.
Tip
When you change the template geometry from wireframe to shaded in the Display Options, you can use the character’s pink Template flag to display the shaded character together with the feathers. To turn on this mode, click the button to open the Display Options.
-
On the Marker tab, change Set display options for to Template Model Geometry.
-
From the Use dropdown, choose Display Model Geometry.
-
Most likely you would like the feather guides to be mirrored. Go to the Mirroring section and turn on Mirror Groom.
-
When you're using the Draw tool for the creation of the initial guides, you can turn off Interpolate Orient. Without this option, feathers are aligned to the character surface normals. Otherwise, the orientation of the current guide will match its neighbor guides.
-
Hover the mouse cursor over the viewport and press Enter. A HUD appears in the viewport’s upper left corner, showing the current mode along with the active settings and options.
-
Click the surface of your character to create the root, and drag with your mouse to draw the curve in the viewport.
The line’s length also determines the feather’s length If you want to avoid extremely large feathers, turn on Brush Options ▸ Limit to Template Length. The feather’s shape will also follow the guide’s curvature. By default, a guide has a Segment Count of
8. This is normally enough to create a smooth curve, but for short or straight feathers you can decrease Segment Count.
Changing the feather type 
In most cases you’ll need more than just one feather type. To apply different feathers you don’t have to add another Guide Groom SOP, but you can manage multiple feathers through a single node instead.
-
Once you've created all guides for a feather type, you can go back to Template Group and choose another entry from dropdown, e.g.
down. The input field will change accordingly. -
When you start to brush, you will see that the down has the same length as the body feathers. However, for a type like down you most probably want to have smaller feathers. To do that go to the Brush Options section and turn off Interpolate Guides. Now the changes on Default Length will be correctly applied.
-
On the viewport, press ⎋ Esc to finish the drawing process.
The images shows a typical setup with feathers of different size and orientation in the facial area or along the neck and tail.

Planting feathers 
Instead of drawing guides and interpolating the feathers you can also create larger number of feathers with a brush. This process is called planting. As with drawing, all settings are made on the Guide Groom SOP.
-
If not already done, move the mouse cursor over the viewport and press Enter to show the HUD with all relevant information on current brush settings and shortcuts.
-
From the Tool dropdown menu, choose Plant.
This choice will also change the parameters of the Brush options section. All relevant settings for planting feathers are located there.
-
You might not be able to see the brush’s red viewport gizmo if the default brush size is rather small. Use the
to change brush size interactively. If you need an exact size, enter a value for Object Radius.
-
With Density you control the number of feathers that is planted per square unit.
-
The length of the feathers depends on Default Length. When Interpolate Guides is turned off, you can define different length values for different areas of your character.
You can also plant single feathers when you change Mode to Single. This is interesting for a finishing touch, e.g. around a bird’s eye or in other areas where you need full control over the feathers' size and position.
Note
With the Plant tool, the brush is always in Surface Brush mode, because feathers are always planted on the character’s surface.
Swapping feather types 
It can happen that you've drawn or planted feathers of a certain type, but then you want to assign a different type. One option is delete some feathers and start again, but there’s a better solution: the Guide Groom SOP’s Paint Template tool.
Let’s say you've created body feathers somewhere on the character. The workflows to do that are described on Adding the feathers. Now you want to turn some the body feathers into down.
-
On the same Groom Guide SOP you've used to create the
bodyfeathers, open the Tool dropdown menu and choose Paint Template. -
Go to the Feathers section and open the dropdown to the right of the parameter’s input field. Choose
down. The entry for Template Group changes to@name=down. -
Draw over the feather you want to convert into
down. You’ll see how the feathers change while brushing.
This means that you can add redesigned feathers through the same Guide Groom without having to start from scratch. You can keep the original guides and turn them into something different. When the feathers are interpolated.
Displaying the feathers 
By default, feathers are displayed as surfaces. If you need a better view on the character’s surface or when performance is low you can go to the Feathers section and change Feather Draw Mode. Other available modes are Curve with Barbs and Curves.
Deleting and brushing 
The Tool menu on the Guide Groom SOP provides many different modes and brushes for grooming your feather setup. Note that all tools require that you're in edit mode on the viewport. To turn on the edit mode, move the mouse cursor over the viewport and press Enter. Then, a HUD appears in the viewport’s upper left corner. To exit the tool, press ⎋ Esc.
Note
The Guide Groom SOP offers a wide range of tools for manipulating feathers. For a complete list of functions and how to use the tools, read the Working with brushes and tools chapter.
Some tools also only work in screen or surface mode, but most support both modes. You can switch between both modes in the Brush Options section with the Surface Brush checkbox. The brush itself is indicated through a red circle in the viewport.
-
The screen mode projects the brush onto the viewport plane. You’ll always see the same planar view of the brush independently from your perspective or the object’s orientation in space.
-
The surface mode projects the brush onto the character geometry. When you move the brush, it will follow the object’s surface. When the brush leaves the object, it disappears.
Tip
All tools are also available from the radial menu.
Delete 
To remove guides and feathers, go to the Tool menu and choose Delete. This option turns on a brush. In the viewport, you can use the to change the size of the brush. Then, paint over the feathers/guides you want to delete.
Brush 
The Brush tool grooms the feathers by changing orientation and alignment. This tool is the artistic centerpiece for your work. You can control the size of the brush with the in the viewport or directly through the Screen Radius and Object Radius parameters in the Brush Options section.