| On this page |
With larger templates, naming is essential to make each feather identifiable. There are several methods to apply names, also for large feather sets. The name is stored in a name primitive attribute that is unique to each feather.
Note
An important thing to consider with naming is that you have to differentiate between condensed and uncondensed feathers. When you uncondense a feather, you will also lose its name attribute. Methods to apply/keep a feather’s name are described in the Uncondensed naming chapter below.
Condensed naming 
With condensed feathers you have basically three methods for applying names. The most fundamental network for condensed feathers looks as shown in this network.

-
The fastest way is to use the
Feather Template from Shape SOP Name parameter. When you turn it on, you can see a
$OStoken. This token indicates that the node’s name will be used to name the feather, e.g.feathertemplatefromshape1. In most cases it’s better to enter something more meaningful like the feather’s type:primary_wing_1ordown_body_1. -
Of course, you can add a separate
Name SOP instead. There you also have a Name parameter. If the Name SOP is downstream of the Feather Template from Shape SOP, the template node’s Name will be overwritten. If it’s upstream, the template’s name (if used) will be kept.
-
Another method uses the
Feather Shape Organize SOP’s third input (Label Points) and is discussed directly below.
Label points 
This, more advanced approach uses the Feather Shape Organize SOP’s third input: Label Points. Here you add points to create unique names for the template feathers. With larger feather templates, the advantage is that all names are listed on a single node.

Using a line’s points 
In the image above, the template consists of ten feathers with more or the less the same distance from each other. This circumstance lets you use a line to create the names. A feather’s organize node searches for points nearby. If the node finds a point, it takes the name attribute from a Name SOP and assigns it to the appropriate feather.
-
Add a
Line SOP and set its Primitive Type to Points. The line will be the network’s first node.
-
Most probably, the feathers' are aligned with the scene’s X axis. Change Direction to
1, 0, 0. -
Set Points to the number of feathers. Here it’s
10. -
Now use the Length and Origin parameters to shift the points near the feathers, e.g. close to the starting point of each rachis. In this scene, Length is
0.14and Origin is-0.65, 0, 0.45. -
To get a better view of the points, place the mouse cursor over the viewport and press W until you're in wireframe mode.
The Name node 
This node creates the names based on the Line SOP’s points.
-
Add a Name SOP and connect its input with the output of the Line SOP.
-
Change Class to Point.
-
Number of Namings equals the number of line points. In this example, the value is
10. You will now see ten Group-Name pairs. -
For Group you enter consecutive number from
0to9. -
The Name parameters carry the unique names of your feathers, e.g.
primary_wing_0toprimary_wing_9. -
Connect the output of the Name SOP with the third input of all Feather Shape Organize nodes you want to use. Here, all ten nodes are used, so you need ten connections.
A feather’s name from this node is stored in a name primitive attribute and available throughout the network. Note that this node overwrites the name attribute from the Feather Template from Shape SOP.
Displaying the names 
You can display the names in the viewport as labels.
-
Click the Node info (i) flag of the selected node.
-
A window appears with all relevant information about the node’s points, primitives, etc. There’s also a Prim Attrs section. There, look for
nameand click it.
Alternatively, you can also select the last node of your template.
-
On the Display Bar, right-click the
icon to open the Visualizers dialogue. You can find the icon to the right of the viewport.
-
Click the
icon next to Scene. From the dropdown menu, choose Marker.
-
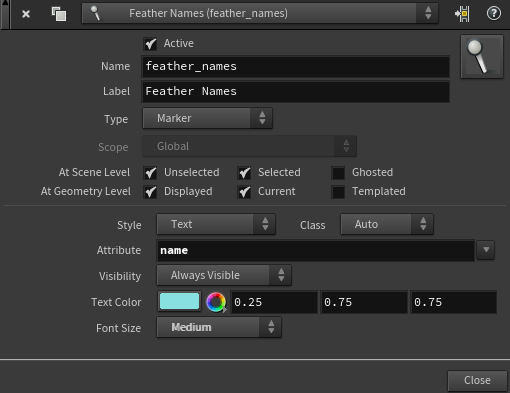
Apply the settings as shown below.

All available names will be shown in the viewport.
Uncondensed naming 
In uncondensed networks, the name attribute from the Feather Template from Shape SOP or any nodes before the Feather Uncondense SOP will be lost. One method uses a Feather Match Uncondensed SOP. This node restores the resource-friendly condensed state of feather. Since match node’s first input is connected to the network’s Feather Template from Shape, all attributes are transferred.
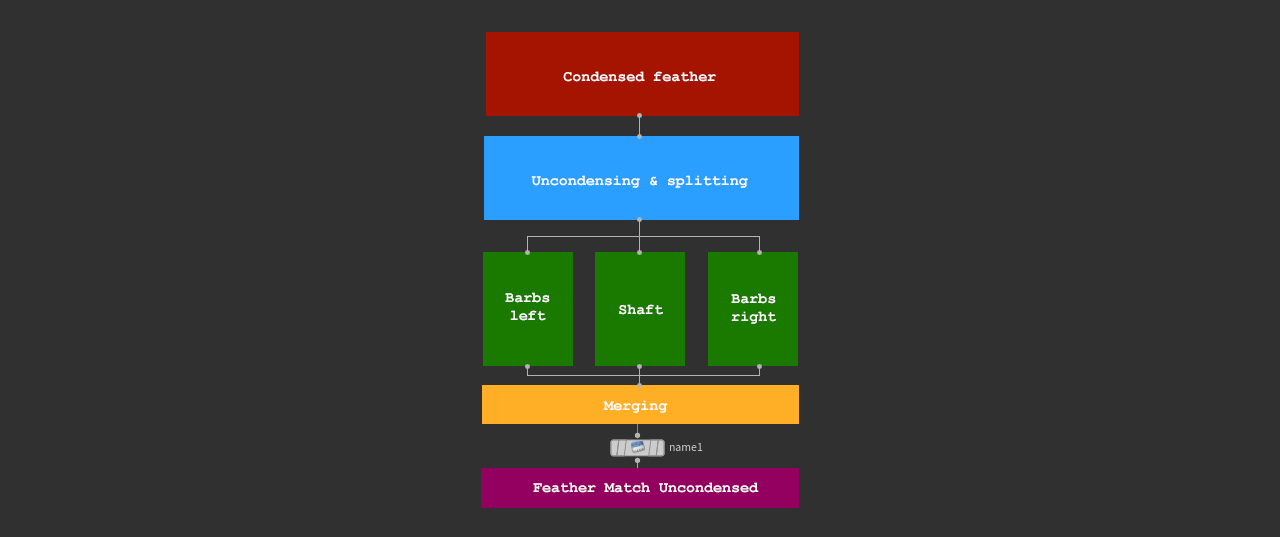
Another approach is to add a Name SOP after the merging of the different network streams.
-
Add a Name SOP and connect its input with the output of the
Merge SOP.
-
If you also have a
Feather Match Uncondensed SOP in your network, connect the name node’s output with the first input of the feather match node.
-
Go to Name and enter the feather’s name.
-
Make sure that Class is set to Primitive.
This image shows a schematic depiction of an uncondensed feather network and where to place a Name SOP.
