| On this page |
The workflow descriptions on the Clumping and Guide processing pages show you how to shape feathers and their barbs. However, the main limitation with these operations is that you can’t work on the barbs' geometry itself.
-
The barbs from the
Feather Template from Shape SOP are only virtual: they don’t consist of curves with points. This state is called condensed.
-
You can convert virtual barbs into real curves with points through a
Feather Uncondense SOP. This state is called uncondensed.
-
Uncondensed feathers can potentially consist of several hundreds of millions of points. To restore the less expensive virtual state, you can introduce a
Feather Match Uncondensed SOP.
-
Some nodes let you operate on (virtual) barbs and curves; others only support barbs or curves.
For highly detailed feathers or certain operations, it’s sometimes necessary to split a feather into shaft, left and right barbs. Splitting also lets you make use of the Guide Groom SOP and do things like side-depending clumping.
Note
This workflow guide requires basic knowledge about the creation of feathers. To keep things as understandable as possible, the following considerations are based on the network from the Drawing feathers page. Note that the network below is located inside a Geometry OBJ on the obj level.

Uncondensing 
Converting virtual condensed barbs into real geometry requires only one node.
-
Add a Feather Uncondense SOP to the network shown above.
-
Connect its first input to the upstream Feather Template from Shape SOP.
When you open the Output Groups section, you can see two toggles. Turn them on to separate the feathers' left and right barbs from the shaft. You can see that Right Barbs Group depends on Left Barbs Group. Both are combined inside a common
barbsgroup. -
If you want to work on the feather’s left and right barbs separately, right-click Right Barbs Group. From the menu, choose Delete Channels to separate the parameters.
-
For Left Barbs Group, enter
barbsl. -
For Right Barbs Group, enter
barbsr. -
Turn on Create Shaft Group.
The feather is now separated into three groups: shaft, barbsl and barbsr. Note that the attribute names are only suggestions. You can, of course, apply any other valid name.
Tip
You can see a feather’s attributes when you open the Geometry Spreadsheet. Click the Primitives button to see the groups mentioned above.
Isolating shaft and barbs 
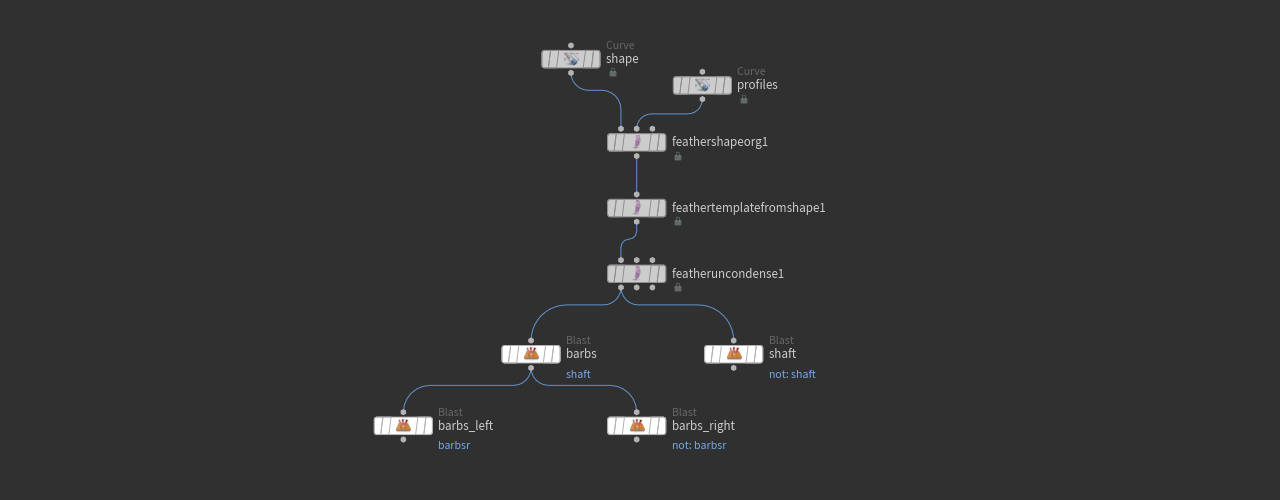
In the Feather Uncondense SOP you have created three groups: shaft, barbsl and barbsr. In order to work on each group separately, you must isolate the individual elements and create separate network streams. Here’s a preview of the complete network.

Tip
With Houdini’s default blue background it can be difficult to see and evaluate the result of your operations. It can be helpful to add a Color SOP and make it always the last node in the network. Set its Color to black (or any other color) to enhance the feather’s contrast and visibility.
-
Add two
Blast SOPs and connect their inputs with the first output of the Feather Uncondense SOP. Don’t chain the Blast nodes, because you need two streams.
-
Rename the first node to
barbs, the second one toshaft. -
Select
barbs. Go to the Group parameter and entershaftto delete/blast the shaft and keep the barbs. -
On the
shaftnode, the Group is alsoshaft. Then, turn on Delete Non Selected to remove the barbs.
Separating the barbs 
To separate the barbs into left and right, you need two more Blast nodes and you can also address each group individually.
-
Add two more Blast SOPs and name them
barbs_leftandbarbs_right. -
Connect the new blasts' inputs to the outputs of the
barbsnode. Again, don’t chain the two nodes, because they’ll also create two streams. -
The Group entry for both nodes will be
barbsr. -
On the
barbs_rightblast node, turn on Delete Non Selected.
Once you've finished your work on the vanes, you can bring the individual components together again by connecting them to a Merge SOP (not depicted in the image above).
Shaping the shaft 
Currently, the shaft is just a thin line, but in fact it tapers from bottom to top. The most convenient way uses a Feather Width SOP.
-
Add the Feather Width SOP and connect its first input with the output of the
shaftblast. If there’s already a Merge SOP, connect the width node’s first output to the merge. -
With Shaft Width you can apply a uniform value to the shaft. To create the tapering effect, click the Ramp button.
-
Click the
Presets icon and choose Smooth from the dropdown menu. Right now the tip is thick and the base is thin.
-
If you want to invert the ramp, click the
Reverse Domain button.
-
You can add more control points to create a custom shaft profile. Make sure that the outermost left and right control points' Values are at least slightly greater than
0. Otherwise, the shaft vanishes into nothing.
Shaft and barbs also have a width attribute, so you can also manipulate width through a wrangle. The image shows a custom shaft shape (tilted by 90 degrees) and its associated ramp.

Attributes 
When you uncondense a feather, you will lose attributes from the Feather Template from Shaft SOP, but some attributes are necessary for other process. Without barborient, for example, it’s not possible to properly orient the feathers on a character during the grooming process.
One method is to add a Feather Match Uncondensed SOP to terminate the feather network. The node’s first input is connected to the Feather Template from Shaft SOP and transfers its attributes.
Another approach is to add the attributes, you want to transfer, to the Feather Uncondense SOP’s Attribute and Group Copy section.
To keep the aforementioned barborient attribute, open the section and go to Point Attributes. There, append barborient. Note that attribute lists are space-separated, e.g. width barborient.