| On this page |
Overview 
You can use Copernicus nodes with Content Library HDAs to add Hatching in your scene. Use hatching in your Copernicus scene to add a drawing effect. Hatching impacts the light gradient and density of your shading.
See the Content Library to access and download HDAs for hatching. The project file includes the following built-in HDAs:
-
Hatching
The Hatching HDA merges hatching layers to apply a crosshatching effect.
-
Hatch Tile
With the Hatch Tile HDA, you can apply horizontal, vertical, and cross hatching. You can then control the density, scale, and length of the hatches. The Hex Tile COP in the HDA node’s subnetwork controls the Hatches Tiling and Tiling Blend parameters. You can also point the Hatching Shape parameter to a SOP, which applies a geometry shape to your Hatch Tile.
-
Tangent
The Tangent HDA computes gradients, impacting how the light changes and distributes across the scene.
The following are examples of different hatching types you can apply:
-
Crosshatching
-
Circulism
-
Contouring
-
Scribbling
-
Stippling
-
Blending
See the Content Library for more complex hatching workflows, such as using contour lines and color.
Adding a Hatch Tile 
Follow these steps to add a Hatch Tile HDA node in your scene.
-
Create a File COP in your COP network to import an image or video.
-
Add a Hatch Tile HDA node and configure the hatching type.
-
Wire the File COP’s
Coutput into the Hatch Tile node’scamera_refinput. -
(Optional) Add more Hatch Tile nodes and wire the File COP’s
Coutput into each node’scamera_refinput.
Blending Hatch Tiles 
Follow these steps to blend multiple Hatch Tile HDA nodes.
-
After you add your Hatch Tiles, add a Constant COP, Ramp COP, and Sequence Blend COP.
-
Wire the Constant COP into each Hatch Tile node’s
directioninput. -
Wire the File COP’s
Coutput into the Ramp COP’ssize_refinput. -
Wire the Ramp COP into the Sequence Blend COP’s
blendinput. -
Wire the Hatch Tile nodes into the Sequence Blend COP’s
imageinputs. There should be animageinput for each Hatch Tile node.
Applying uniform direction hatching 
Follow these steps to blend your hatches by direct diffuse and add uniform direction hatching. This means all the hatches go in the same direction.
-
Create a File COP in your COP network to import an image or video.
-
Add the amount of Hatch Tile HDA nodes that you want to blend, and configure the hatching type for each.
-
Add a Mono COP.
-
Wire the File COP’s
Coutput into each Hatch Tile node’scamera_refinput and the Mono COP’ssourceinput. -
Add a Channel Join COP and set Signature to
UV. -
Wire the Mono COP into the Channel Join COP’s
redandgreeninputs. -
Add a Constant COP. This COP’s values determine the hatching direction.
-
Wire the Channel Join COP into the Constant COP’s
sourceinput. -
Wire the Constant COP into each Hatch Tile node’s
directioninput. -
Add a Sequence Blend COP.
-
Wire the Hatch Tile nodes into the Sequence Blend COP’s
imageinputs. There should be animageinput for each Hatch Tile node. -
Add another Mono COP and rename it to
Direct Diffuse. -
Wire the File COP’s
directdiffuseAOV output into the Direct Diffuse node. -
Add a Remap COP.
-
Wire the Direct Diffuse node into the Remap COP’s
sourceinput. -
Wire the Remap COP into the Sequence Blend COP’s
blendinput. Turn on the Sequence Blend COP’s display flag to see the blended hatches.
Applying non-uniform direction hatching 
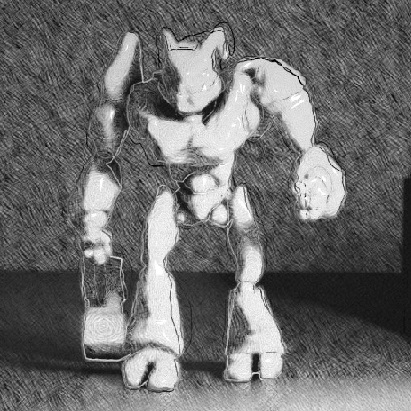
Follow these steps to add non-uniform direction hatching, which lets you control how the hatches follow the lighting gradient (see the following image example). This workflow reduces the resolution, computes the gradients, and then increases the gradients of the image.

-
Create a File COP in your COP network to import an image or video.
-
Add a Hatch Tile HDA node and configure the hatching type.
-
Wire the File COP’s
Coutput into the Hatch Tile node’scamera_refinput. -
Add a Null COP.
-
Wire the File COP’s
directdiffuseAOV output into the Null COP. -
Add a Denoise AI COP. This decreases the difference between neighbors' pixels (noise).
-
Wire the Null COP into the Denoise AI COP’s
sourceinput. -
Add a Mono COP and rename it to
Direct Diffuse. -
Wire the Denoise AI COP into the Direct Diffuse node.
-
Add a Tangent HDA node. Set the Pixel Scale parameter to
2to further reduce the noise.Note
If you set the Tangent node’s Pixel Scale parameter to
1, the viewport displays the regional image. -
Wire the Direct Diffuse node into the Tangent node.
-
Wire the Tangent node into the Hatch Tile node’s
directioninput. Turn on the Hatch Tile node’s display flag to see the hatches distribute around the lighting.
Combining direction hatching 
Follow these steps to combine uniform and non-uniform direction hatching. For example, you can add uniform direction hatching to the background and non-uniform direction hatching to characters in your scene.
-
Create a File COP in your COP network to import an image or video.
-
Add the amount of Hatch Tile HDA nodes that you want to blend, and configure the hatching type for each.
-
Add a Mono COP and rename it to
Direct Diffuse. -
Wire the File COP’s
directdiffuseAOV output into the Direct Diffuse node. -
Wire the Direct Diffuse node into each Hatch Tile node’s
camera_refinput. -
Add a Sequence Blend COP.
-
Wire the Hatch Tile nodes into the Sequence Blend COP’s
imageinputs. There should be animageinput for each Hatch Tile node. -
Add a Remap COP.
-
Wire the Direct Diffuse node into the Remap COP’s
sourceinput. -
Wire the Remap COP into the Sequence Blend COP’s
blendinput. -
Add another Mono COP and rename it to
Direct Diffuse. -
Wire the File COP’s
directdiffuseAOV output into the Direct Diffuse node. -
Add a Tangent HDA node. Set the Pixel Scale parameter to
2to further reduce the noise. -
Wire the Direct Diffuse node into the Tangent node.
-
Add a Null COP and rename it to
LIGHTING_DIRECTION. -
Wire the Tangent node into the
LIGHTING_DIRECTIONNull COP. -
Add a Constant COP and two Ramp COPs.
-
Wire the Constant COP into each Ramp COP’s
size_refinput. -
Add two more Tangent HDA nodes.
-
Wire each Ramp COP into one Tangent node. The Ramp COPs should wire into different Tangent nodes.
-
Add a Blend COP.
-
Wire one Tangent node into the Blend COP’s
bginput, and the other Tangent node into thefginput. -
Add another Null COP and rename it to
STATIC_DIRECTION. -
Wire the Blend COP into the
STATIC_DIRECTIONNull COP. -
Wire the File COP’s
CryptoMaterialAOV output into a mask that removes the objects to which you’ll apply non-uniform direction hatching. -
Add another Blend COP.
-
Wire the
LIGHTING_DIRECTIONNull COP into the Blend COP’sbginput. -
Wire the
STATIC_DIRECTIONNull COP into the Blend COP’sfginput. -
Wire your mask into the Blend COP’s
maskinput. -
Wire the Blend COP into each Hatch Tile node’s
directioninput. Turn on the Sequence Blend COP’s display flag to see the output with uniform and non-uniform direction hatching applied.
Notes 
-
Since the Hatch Tile node uses a Hex Tile COP in the subnetwork, you must balance the scale of the hatches (Hatches Length) and the tiles (Tile Size). For example, an unbalanced scale may display seams between hex tiles. Use Weight Exp to balance the hatches and tiles.
-
The
directdiffuseAOV is channel data taken from rendering that represents direct lighting. You can use this data to compute tangent vectors that control the direction of hatching. You can also use it to create more complex lighting gradients, such as adding reflections. If you map your Hatch Tiles with adirectdiffuseAOV, make sure the direct diffuse isn’t a texture to avoid changing the hatches by texture. -
With animation, using direction hatching can produce a noisy swimming effect. It’s recommended that you use non-uniform direction hatching on objects that require a lighting gradient. For other areas in your scene you should use geometry or uniform direction hatching.