| On this page |
Houdini Engine for Unreal supports both inputting and outputting meshes to/from Unreal.
Input 
There are multiple ways to import meshes from Unreal to Houdini. You can use geometry:
-
from an asset in the content browser via Geometry Inputs.
-
from an Actor in the level by using a World Outliner Inputs.
-
from a Landscape through Landscape Inputs.
-
from another Houdini Asset, by connecting them together in Houdini using Asset Inputs.
You can import sockets, colliders, and LOD static meshes into Houdini as groups and attributes. Check the Export checkboxes on the input UI.
Output 
Mesh Generation 
Houdini assets contain Objects, Geos, and Parts. These control how the geometery in Unreal splits into multiple meshes.
-
Object (OBJ) nodes are Houdini’s transform nodes. They can contain other OBJ nodes or geometry (SOP) nodes.
-
Geo (SOP) nodes are Houdini’s geometry container nodes. They don’t contain geometry but contain parts.
-
Parts contain the actual mesh/geometry/attribute data.
You can use packed primitives to separate multiples meshes in your output. An example is to create multiple parts from merged geometry.
A pack primitive creates its own part and Static Mesh. If you don’t copy the packed primitive multiple times, a static mesh is created instead of an instancer. The only thing that may split meshes further is collision groups or LOD groups.
A Statich mesh is generated and regroups its LODS. Another static mesh is created for the non-collidable and non-LOD geometry. Additional meshes are created for each complex collision geometry group. Other groups in the asset will not split parts into separate meshes.
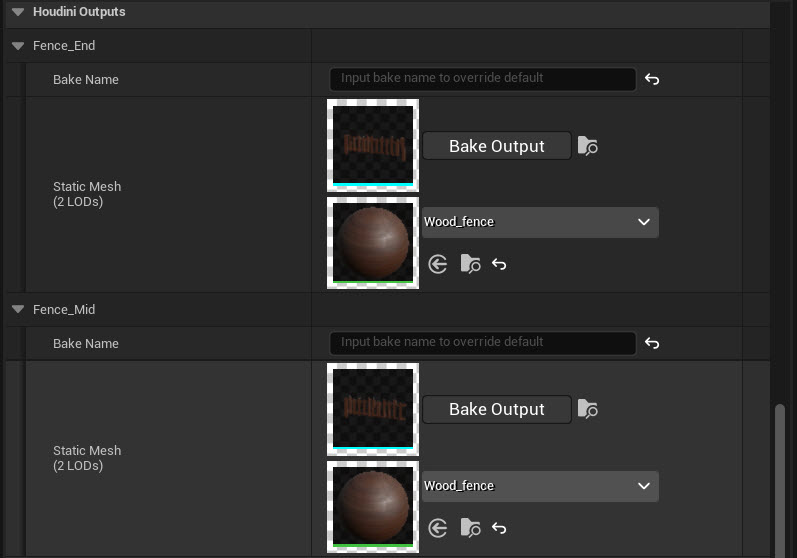
All the meshes generated by the asset are listed with their materials in the Houdini Outputs section.

This section details the type and number of colliders, LODs, sockets generated by the plugin for its corresponding Static Mesh.
Level of Details 
Levels of Details can be generated by the plug-in using the LOD groups.
-
Add the geometry for each LOD to a primitive group.
-
Name the starting LOD as
lod.
THe plugin creates sequence of LODs on the Static Mesh. The alphabetical order of the group names defines the order of the LODs in the mesh. The base level is lod0, then lod1, lod2 and so on. LOD levels on a mesh can also be imported to Houdini: LOD groups will be automatically created by the plug-in if the mesh in a geometry input or world outliner input has more than one LOD level
You can import LOD levels on a mesh to Houdini. LOD gruops are automatically created by the plugin if the mesh in a geometry input or world outliner input has more than one LOD level. Check the checkbox for Export LODs on the input.
You can change the LOD settings on the Generic UProperty Attributes.
LOD Attribute |
Attribute Type |
Description |
|---|---|---|
|
Detail |
Sets the LOD used for collision |
|
Detail |
Sets the minimum LOD |
|
String |
Sets the LOD Group |
|
Detail |
Sets the screensize values where lodx is the name of the LOD Note Manual change of the screensize values turns off |
|
Primitive |
Sets the screensize values of the LOD Note Manual change of the screensize values turns off |
Meshes generated by Houdini Engine that have LOD groups will automatically create Hierarchical Instanced Static Mesh Components when instanced, either on Packed Primitives or Object Instancers.
Note
Make sure the geometry inside of each LOD group is not packed. The plugin will create a separate instancer instead of a LOD level for packed geometry.
Materials and Attributes 
Houdini Engine for Unreal can recognize and convert various attributes to their Unreal equivalent.
Attribute Name |
Owner |
Type |
Description |
|---|---|---|---|
|
point, vertex |
float3 |
Set the normals of the mesh. The plug-in can recompute the normals automatically. You can control this by changing the value of the Recompute Normals settings, located in the Static Mesh Build Settings part of the plug-in settings. If normals are present, you can also have the tangents to be automatically recomputed by changing the Recompute Tangents plug-in settings. |
|
point, vertex |
float2 |
Set the UV sets of the mesh. You can use up to eight different UV sets naming them |
|
any |
float3, float4 |
Set the vertex colors of the mesh |
|
any |
int |
Set the lightmap resolution of the mesh |
|
point, vertex |
string |
Set the Unreal material on the faces of a mesh. The value of this attribute must be set to reference a material All the different materials used by a mesh are in the Houdini Outputs section of the details panel. See Materials for more information. |
|
prim |
int |
Set the mesh smoothing mask data |
|
any |
string |
Set the name used for the generated mesh |
You can also add sockets and colliders to the mesh using special groups.
Nanite Settings 
(UE5 only) The plugin can control the Nanite settings on the meshes found in the outputs of your HDA by using the following attributes:
Attribute Name |
Owner |
Type |
Description |
|---|---|---|---|
|
any |
int |
Enables Nanite on the generated meshes |
|
any |
int |
The position precision attribute to be used for Nanite Meshes |
|
any |
int |
The percent of triangles to keep for Nanite Meshes, zero by default (no triangles) |
Having any of those 3 attributes automatically enabless Nanite on the generated Static Meshes. This only applies to refined meshes, as Houdini Proxy Meshes do not support Nanite.