| On this page |
Animation layers allow the animator to create multiple “levels” or “layers” of animation without affecting the original animation. Animation layers can be used to test out different animation without losing any previous animation. Keys can also be set on each animation layer, resulting in a cleaner timeline that is less cluttered with keyframes.
Animation layers are created and manipulated in the animate state.
Animation layers example 
Setup 
In this example, we start with the ![]() Electra test geometry in the animate state.
Electra test geometry in the animate state.
-
Put down an Electra test geometry SOP in the network editor.
-
In the Electra SOP, set Output to APEX Scene.
-
Enter the animate state by clicking
 Animate on the left toolbar. This will automatically create an
  APEX Scene Animate SOP and connect it to the Electra SOP.
Add animation layers 
-
We start with a base animation on Electra:
Base animation -
Open the animation layers pane. At the top of a pane, click the
 New Tab icon and select New Pane Tab Type ▸ Animation ▸ APEX Animation Layers. The base animation layer, BaseAnimation, is displayed in the pane by default.
 -
Create a new empty layer:
-
At the top of the animation layers pane, select Layers ▸ Create Empty Layer.
-
Rename the new layer by double-clicking on the layer name.
At this point, there are no controls associated with the new layer, so if you try to move the character’s control in the animate state, it will snap back to its original position.
-
-
For the controls that you want to animate, add them to the new animation layer:
-
In the animate state, select the control(s).
-
In the animation layers pane,
 click the new layer and select Add Selected Controls to Layer.
By default, the new layer is added on top of the base animation as an additive layer, as opposed to overriding the base animation as an override layer. The layer type is indicated with the words
ADDorOVERin the animation layers pane. Layers that are higher up on the animation layer stack have their animation added on top of the lower layers.Once controls are added to a layer, you can keyframe those controls to add animation to the layer. The keyframes are added to the layer, and not to the base animation.
Note
There can only be one active layer. If you select multiple layers in the animation layers pane, only the layer with the name that is highlighted is active. Keyframes are only added to the active layer.
-
-
We add a few layers of animation to create the final animation:
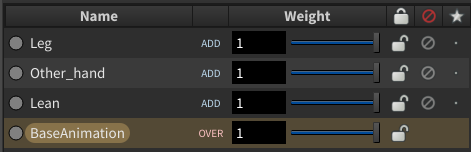
Added layers in the animation layers pane The videos below show the animation as it is built up with each layer.
Base animation Add lean animation Add other hand animation Add leg animation (final animation) -
To only see the animation of a particular layer on top of the base animation:
-
Solo the layer by clicking in the
 Solo column for the layer.
 or
-
Mute the other layers by clicking in the
 Mute/Unmute column for those layers.
Solo the leg animation layer -
Adjust the effect of a layer 
To change the effect of the new layer on the final animation, adjust the layer weight:
-
Adjust the Weight slider bar for the layer.
or
-
Enter a value in the textbox beside the slider. A weight of 1 means that the layer fully contributes to the final animation. A weight of 0 means that the layer does not affect the final animation.
Keyframes can be set on the layer weight by holding ALT and clicking the Weight textbox, or ![]() clicking the layer and selecting Set Weight Keyframe. At this point, the weight keyframes are not displayed in the playbar timeline or
clicking the layer and selecting Set Weight Keyframe. At this point, the weight keyframes are not displayed in the playbar timeline or ![]() animation editor.
animation editor.
To see and edit the weight keyframes in the timeline, animation editor, or channel list, ![]() click the layer and select Add Weight to Channel List, or ⇧ Shift +
click the layer and select Add Weight to Channel List, or ⇧ Shift + ![]() click the Weight textbox.
click the Weight textbox.
Note
If you click on another layer, the layer weight channel for the previous layer is removed from the channel list.
Keyboard shortcuts on the Weight textbox:
-
ALT click to set a keyframe.
-
⌃ Ctrl click to remove a keyframe.
-
⌃ Ctrl +
 click to reset to the default value.
 -
⇧ Shift +
click to add to the channel list. -
⌃ Ctrl + ⇧ Shift click to remove all the keys on a layer weight.
Apply a layer in a specific frame range 
A layer can be applied to a specific frame range by setting keyframes on the layer weight. In this example, we only want the layer to apply to the final animation between frames 7 and 16:
-
Select a range of frames in the playbar timeline by holding ⇧ Shift and dragging along the timeline.
-
click a layer and select Set Weight from Playbar Selection. Keyframes are added on the layer weight at the beginning and end of the frame range.
-
To see the added keys in the animation editor or playbar timeline, add the layer weight to the channel list by
clicking the layer and selecting Add Weight to Channel List.In the animation editor, we can see that the following keys are added around the selected frame range:
-
Frame 6 - weight of 0
-
Frame 7 - weight of 1
-
Frame 16 - weight of 1
-
Frame 17 - weight of 0
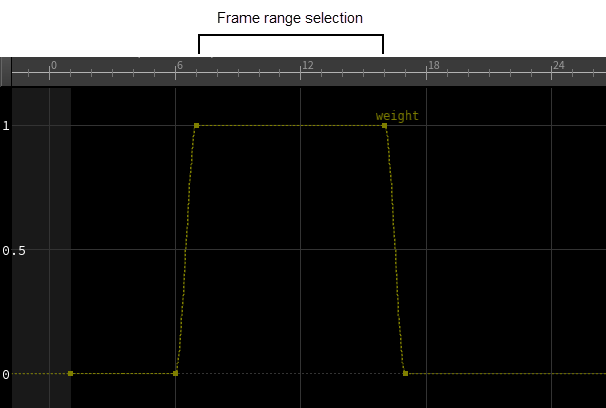
Set weight keyframes in frame range The weight for the layer is set to 1 in frames 7-16, so the layer fully contributes to the final animation in that range. Outside of the selected frame range, the layer weight is set to 0, so at those frames, the layer has no effect on the final animation.
-
Rig parameters 
Each control on the character is associated with one or more parameters on the character rig. For example, the character’s cog control could be associated with the cog translation (cog_t) and rotation (cog_r) parameters on the rig.
To see the parameters on the Electra rig:
-
Using the
 Electra test geometry SOP from the setup above, connect the first output of the Electra SOP to an
  Unpack Folder SOP.
 -
On the Unpack Folder SOP, set Extract Pattern to
/**rig, which extracts the Electra rig. -
In the APEX network view, the rig parameters are the ports on the
parmsnode.
To see the rig parameters that are added to each animation layer:
-
Select the
APEX Scene Animate SOP that the Electra SOP is connected to (see setup). -
In the animation layers pane, turn on Settings ▸ Show Layer Membership.
This opens up a Parms section at the bottom of the animation layers pane that lists the rig parameters that are added to the layer. These rig parameters can be copy and pasted to other layers, as well as removed from the layer. The Parms section gives you another way of adding and removing controls from a layer.
Working with rig parameters also gives you more fine-grained control over the contents of each layer. For example, you could add the cog control to a layer by selecting the control in the animate state, ![]() clicking the layer, and selecting Add Selected Controls to Layer. This adds both the translation (cog_t) and rotation (cog_t) parameters of the cog control to the layer. If you only want to keep the cog translation parameter, you could
clicking the layer, and selecting Add Selected Controls to Layer. This adds both the translation (cog_t) and rotation (cog_t) parameters of the cog control to the layer. If you only want to keep the cog translation parameter, you could ![]() click cog_r in the Parms section, and select Remove from Layer.
click cog_r in the Parms section, and select Remove from Layer.
Inherit animation layers 
An ![]() APEX Scene Animate SOP can inherit upstream animation layers with the Inherit Animation Layers from Input parameter, allowing for procedural chaining of animation using multiple APEX Scene Animate SOPs.
APEX Scene Animate SOP can inherit upstream animation layers with the Inherit Animation Layers from Input parameter, allowing for procedural chaining of animation using multiple APEX Scene Animate SOPs.

When connecting the second APEX Scene Animate SOP:
-
If Inherit Animation Layers from Inputs is turned off, the upstream layers are copied to and stored in the current node. These layers are not inherited, so they can be edited, and any upstream changes are not reflected in the current node.
-
If Inherit Animation Layers from Inputs is turned on, the upstream layers are inherited by, but not stored in, the current node, so upstream changes are reflected in the current node. In the animation layers pane, the inherited layers are greyed out and locked because they belong to the upstream node, so you cannot edit them in the current node (inherited layers can only be modified in the APEX Scene Animate SOP where they were created). You can, however, modify the weight of inherited layers.
You can also take ownership of an inherited layer, which allows you to edit the layer. Do this by
clicking the layer and selecting Set as Owned by Current Node. The layer can now be edited, and any changes in the upstream node are no longer propogated to the current node.
Animation layer icons 
Icon |
Functionality |
|---|---|
|
Create empty layer |
|
Create layer from selected controls |
|
Selected control is added to the layer |
|
Selected control is added to the layer, and this layer is currently the active layer. Keyframes are added to the active layer. |
|
Layer is locked, so you cannot update the animation on this layer. You cannot add new keyframes, and if you try to move the controls in the animate state, they will snap back to their original position. When a layer is locked, its animation cannot be changed in the |
|
Layer is unlocked |
|
Layer is muted, so the animation in this layer does not contribute to the final animation. When you mute a layer, it also locks the layer. |
|
Layer is unmuted |
|
Layer is soloed. When you solo a layer, all the other layers that are not soloed are muted and locked. You can solo multiple layers. Only the soloed layers contribute to the final animation. |
How-to 
| To... | Do this |
|---|---|
|
Create an empty layer |
At the top of the animation layers pane, select Layers ▸ Create Empty Layer, or click the This creates a new animation layer with no controls added to it. |
|
Create a new layer with the selected controls |
|
|
Change a layer from being an additive layer to an override layer, or vice versa |
|
|
Change the default type of new layers |
In Settings ▸ Default Layer Type, select Override or Additive. |
|
See the layers that a control is added to |
|
|
See the controls that are added to a layer |
or In the Settings menu, turn on Show Layer Membership. The Parms section at the bottom of the animation layers pane shows the rig parameters that are added to the layer. |
|
Remove the selected controls from a layer |
or
|
|
Allow/disallow changes to a layer |
Toggle the |
|
Allow/disallow a layer to contribute to the final animation |
Toggle the |
|
Only see the animation from a particular layer |
Click in the |
|
Set the active animation clip |
If there is more than one animation clip in the scene, a drop-down menu appears on the top toolbar with a list of the available clips. |
|
Change the effect of a layer on the animation |
Adjust the Weight slider for the layer, or specify a value in the weight textbox. If you select multiple channels (hold ⇧ Shift or ⌃ Ctrl while selecting) and update the weight slider or textbox value on one of the layers, the weight for all the selected layers will be updated. |
|
Set or remove a key on a layer weight |
or ALT click the Weight textbox to set a keyframe, or ⌃ Ctrl click to remove a keyframe. |
|
Modify a layer weight in the |
or ⇧ Shift + |
|
Remove multiple keys on a layer weight |
or
|
|
Remove all the keys on a layer weight |
or ⌃ Ctrl + ⇧ Shift click the Weight textbox. |
|
Set the layer weight back to its default value |
⌃ Ctrl + |
|
Apply a layer only in a specific frame range |
|
|
Merge a group of layers |
|
|
Merge all layers |
In the Layers menu, there are the following options:
|
|
Duplicate a layer |
or Select the layer and choose Layers ▸ Duplicate Active Layer. The new layer name is appended with |
|
Delete a layer |
or Select the layer, and choose Layers ▸ Delete Selected Layers. |
|
Rename a layer |
Double-click the layer name. |
|
Reorder the layers |
Drag a layer up or down the list of layers. You can also select several layers (hold ⇧ Shift or ⌃ Ctrl while selecting) and move them up or down the animation layers stack. |
|
Show the rig parameters that are in the active layer |
In the Settings menu, turn on Show Layer Membership. A list of rig parameters are displayed in the Parms section at the bottom of the animation layers pane. |
|
Copy and paste rig parameters between layers |
|
|
Remove the rig parameters in a layer |
|
|
Inherit upstream animation layers |
On the |
|
Take ownership of inherited layers |
|
|
Change the color chip associated with a layer |
Click the circle beside the layer name and choose a color. The color chip can be used to visually group layers together in the animation layers pane. This does not affect the animation. |
|
Show or hide the various columns in the animation layers pane |
In the Settings menu, turn on or off the Show |