| On this page |

A complete character rig can be built up by piecing together smaller components of the rig. You can use the pre-built rig components shipped with Houdini, or create your own components that can be reused in different rigs.
Houdini’s pre-built rig components are available from the APEX Autorig Component and
APEX Rigscript Component SOPs. These SOPs provide an interface to the rig components that add functionality such as FK, IK, and bone deform. In addition, the APEX Rigscript Component SOP allows you to procedurally build up a rig script (as an APEX graph), which acts like a “recipe” that can be applied to your character in one go. Rig scripts can be used to create higher-level rig components from lower-level components.
On this page, we introduce Houdini’s pre-built rig components by adding FK, bone deform, and IK logic to a 3-joint tube geometry. We then use the transformdriver rig component to create new controls that drive the existing controls on the tube skeleton.
FK 
In this example, we add FK rig logic to a 3-joint tube geometry using the fktransform rig component:
-
We start by drawing a skeleton for the tube geometry (see working with skeletons for more information on creating skeletons.):

Create a skeleton for a tube geometry -
On the
Tube SOP, set Rows to
3, and adjust the other parameters to change the size of the tube. -
Draw a skeleton with 3 joints,
point_0,point_1, andpoint_2, wherepoint_0is the parent ofpoint_1, which is the parent ofpoint_2.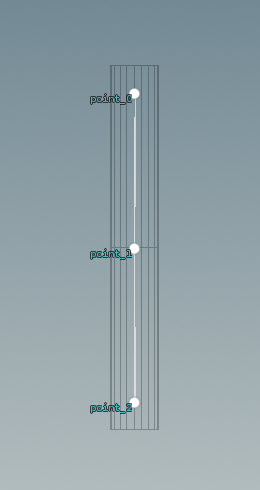
Tube skeleton
-
-
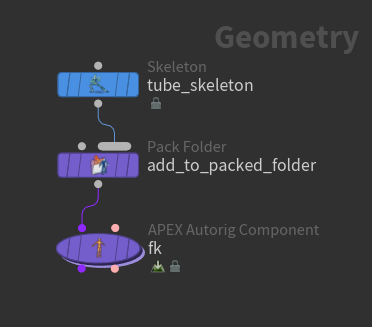
Connect the network below, which adds FK rig logic to the character (in this example, we don’t add bone deformation to the rig logic, so the tube geometry is no longer needed):
Add FK rig logic to the tube geometry -
The
Pack Folder SOP adds the tube skeleton to a packed folder structure. We name this skeleton
tube.skel- on the Pack Folder SOP, set Name totube, and Type toskel. -
See the contents of the packed folder structure in the rig tree view:
-
Select the Pack Folder SOP in the network editor.
-
At the top of a pane, click the
New Tab icon and select New Pane Tab Type ▸ Animation ▸ Rig Tree.
-
In the rig tree view, beside the node name (in our case,
add_to_packed_folder), set the drop-down box to the output. -
Set Type to Packed Folders. The following packed folder hierarchy is displayed:
/
-- tube.skel
-
-
On the APEX Autorig Component SOP, set the Component parameter to fktransform. This FK rig component creates a rig graph by translating the tube skeleton into a rig hierarchy; it takes each of the skeleton joints and creates a TransformObject node in the rig graph. The TransformObject nodes can then be turned into controls that the user can interact with in the animate state.
Tip
Because the FK component translates a skeleton into a rig hierarchy, it is useful to have this as the first pre-built component when building a rig for a character.
Note
By default, the rig that is created by the FK component is named
Base.rig(Rig section, Name parameter). You can change the name of the rig, but be aware that all the other pre-built rig components also have their default rig name set toBase.rig, so you would have to update all the rig names down the chain of APEX Autorig Component SOPs in your network. -
We don’t have a guide skeleton, so set guidesource to
tube.skel. -
In the Settings tab, outputskeleton parameter, specify the skeleton to output, in our example,
tube.skel. -
In the Source tab, skeleton parameter, specify the skeleton to use to create the rig hierarchy, in our example,
tube.skel. -
To create controls on the rig, populate the *promotegroup parameters in the Controls tab with the TransformObject nodes you want to turn into controls. You can use the APEX path pattern syntax to specify groups of TransformObject nodes. In our example, we want to promote the translation and rotation for all our controls, so we set tpromotegroup and rpromotegroup to
*. -
The FK component adds the rig graph to the packed folder structure, as seen in the rig tree view:
/
-- Base.rig
-- tube.skel
In the APEX network view, we can see the rig graph generated by the FK component, as shown below (nodes are rearranged and colors are added for clarity). The TransformObject nodes represent the skeleton joints, and are connected according to the skeleton joint hierarchy. The translate and rotate of each TransformObject node are promoted:
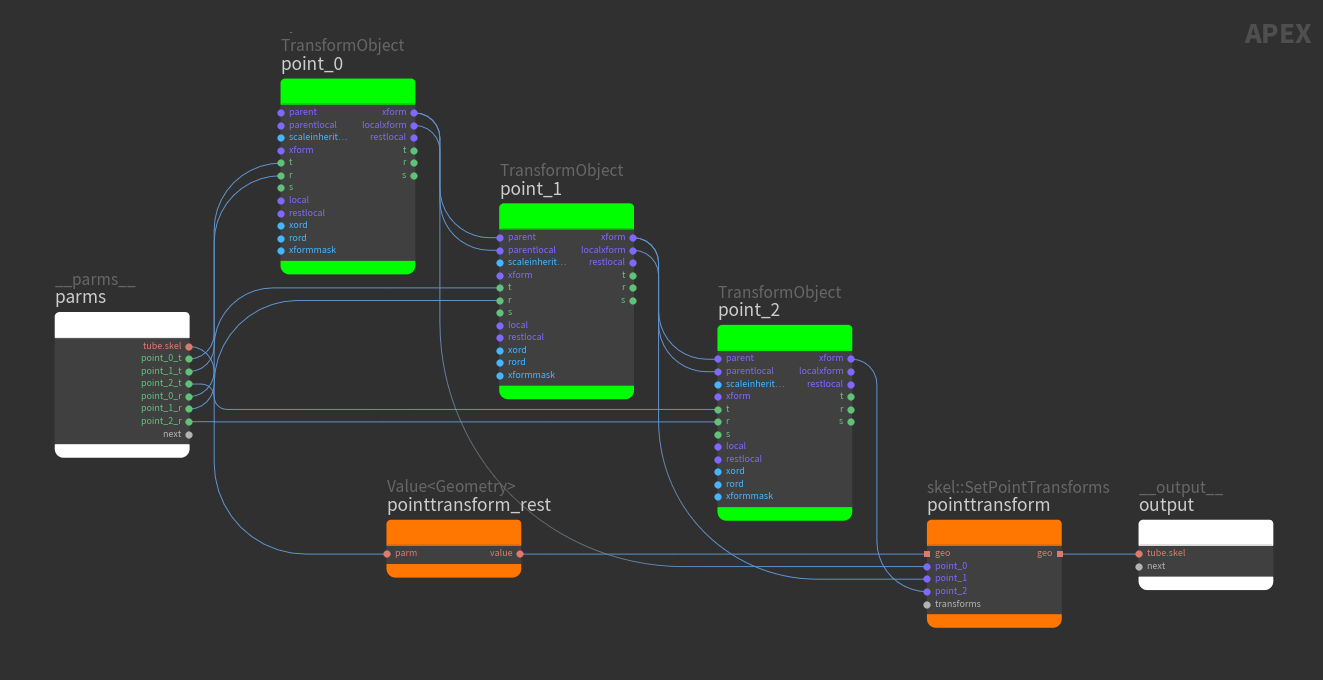
Rig graph generated by the FK rig component See geometry deformation for more information on the TransformObject and skel::SetPointTransforms nodes.
-
View the FK functionality in the animate state:
-
Select the APEX Autorig Component SOP and turn on its display flag.
-
Click
Animate on the left toolbar or press Enter in the viewport.
FK functionality in the animate state
-
Bone deform 
We now add bone deform logic to the FK rig graph using the bonedeform rig component. To perform bone deformation, we first need to create capture weights on the geometry using the Joint Capture Biharmonic SOP. We then add the updated geometry to the packed folder structure along with the skeleton:
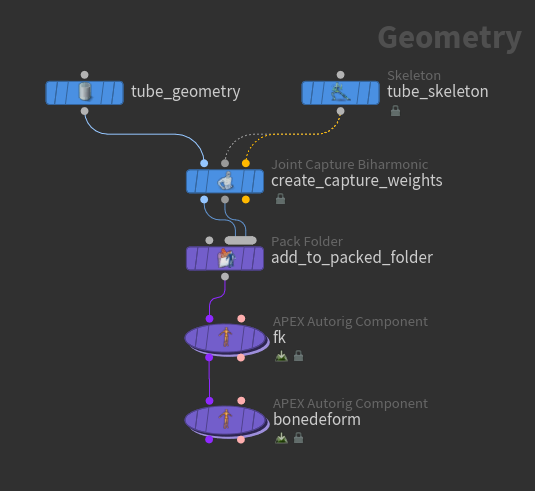
In other DCCs, weight creation often happens on the deformer. In Houdini, weight creation is separate from deformation, so we can prepare the input geometry with the correct weights before diving into APEX to create the rig logic.
-
The Pack Folder SOP adds the tube geometry and skeleton to a packed folder structure:
-
The first input to the Pack Folder SOP is the tube geometry used for the deformation. We name this geometry
tube.shp(set Name totube, and Type toshp). -
The second input is the tube skeleton. We name this skeleton
tube.skel(set Name totube, and Type toskel).
Note
The order of the inputs to the Pack Folder SOP must match the order of the Name and Type parameters in the Pack Folder SOP. See packed character format for more information on naming character elements in the packed folder structure.
We can see the following packed folder hierarchy in the rig tree view:
/
-- tube.shp
-- tube.skel
-
-
The APEX Autorig Component SOP,
bonedeform, adds bone deformation logic to the rig graph created by the FK component upstream. On thebonedeformnode, set Component to bonedeform. By default, the bonedeform component adds logic toBase.rig(set in the Rig section, Name parameter). -
In the Settings tab, change the following parameters to match the names of the geometry and skeleton in the packed folder structure:
-
restgeo =
tube.shp. This is the geometry with the capture weights we want to deform. -
restskeleton =
tube.skel. This is the name of the input skeleton that is the base for the capture weights. The joints of restskeleton need to match up with the capture weights on restgeo. -
outputgeo =
tube.shp. This is the name of the output geometry we want to display. It is usually the same as restgeo.
-
-
View the additional logic that the bonedeform component has added to the FK rig graph (added bone deform logic is in purple):
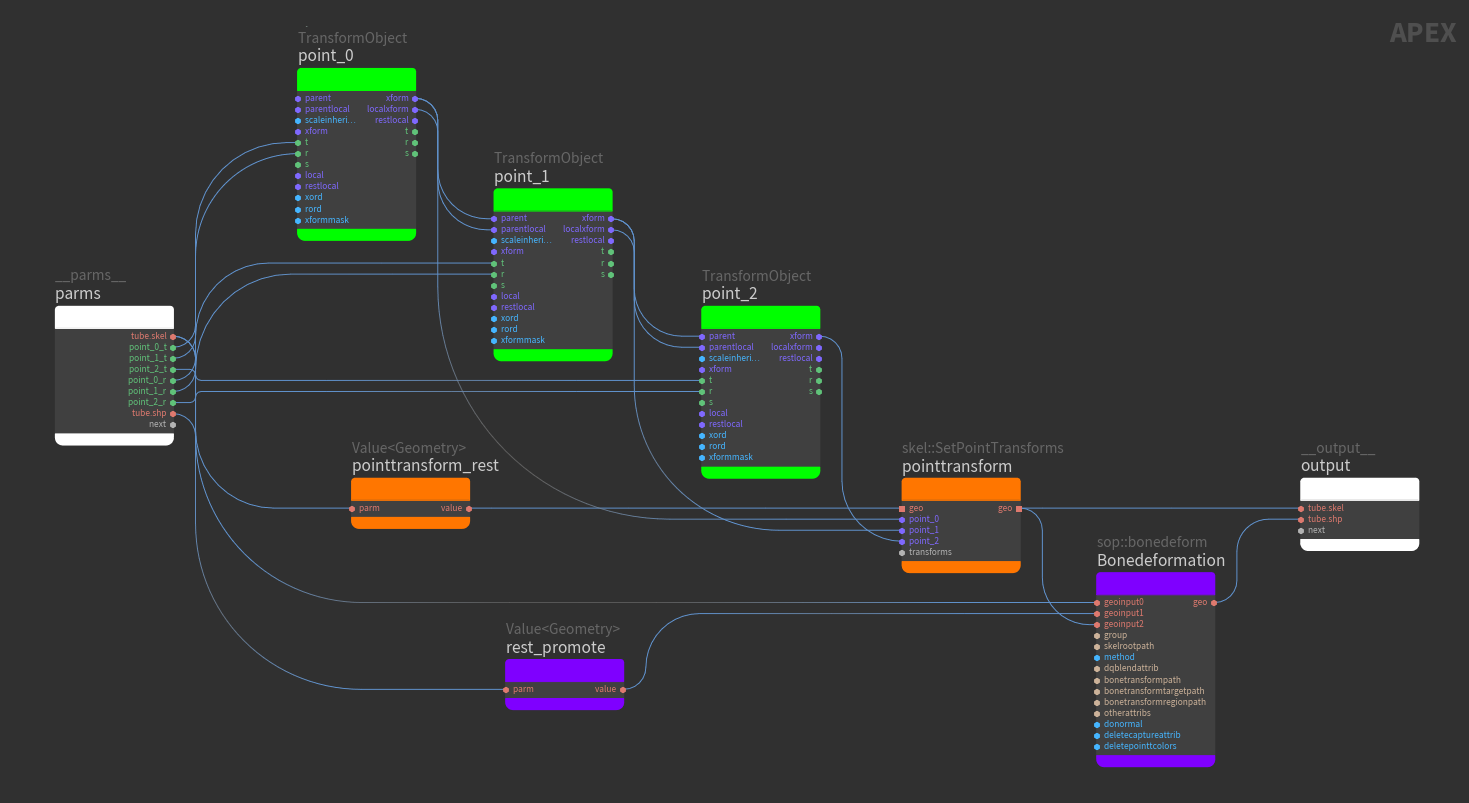
Bone deform logic -
View the bone deformation in the animate state:
IK 
In this example, we start with the FK rig from the previous example, and add IK functionality using the multiik rig component:
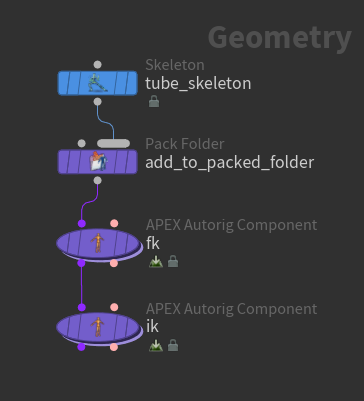
-
We only want to manipulate the IK controls, so we don’t need to promote the FK joints to be controls. On the
fknode, remove all the TransformObject nodes from the *promotegroup parameters in the Controls tab. -
On the APEX Autorig Component SOP,
ik, set the Component parameter to multiik. -
Set guidesource to the skeleton in the packed folder structure,
tube.skel. -
In the Driven tab, leave segments empty, since we don’t have tags set up on the skeleton.
-
View the IK functionality in the animate state:
Transform driver 
The transformdriver rig component is used to create new controls that drive the transforms (translate, rotate, and scale) of existing controls in the skeleton - the existing controls are essentially constrained to the new controls. The transformdriver component allows you to define different pivots and orientations for the existing joints without having to create new skeleton controls that would otherwise affect any bone deformation downstream.
In an APEX graph, the transformdriver component creates new TransformObject nodes, and adds a constraint between the new and existing nodes. The new nodes are not added to the skeleton; they are just extra controls used to drive the skeleton joints.
In this example, we add new controls to the FK rig from the previous example:
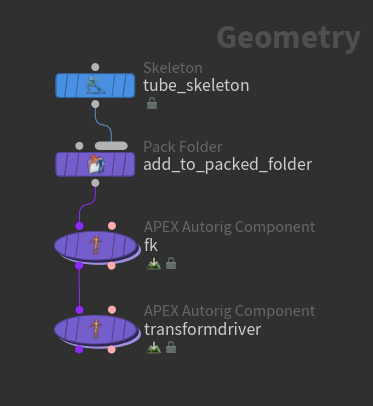
-
On the APEX Autorig Component SOP,
transformdriver, set the Component parameter to transformdriver. -
Set guidesource to the skeleton in the packed folder structure,
tube.skel. -
We add a transform driver control,
root, that sits at the position ofpoint_0, and drives the translation and rotation ofpoint_0:-
In the Settings tab, turn on use_t, use_r, and use_s.
-
In the Driven tab, set driventransforms to
point_0. This is the joint that is driven by the control. -
In the Control tab, driver parameter, specify a name for the new control. We set driver to
root. -
Set driverguide to
point_0. This is the position of the newrootcontrol. (The restlocal parameters for the newrootTransformObject node will be set to the position ofpoint_0.) If nothing is set in driverguide, the new control is created at the origin. -
Specify the transform components that are driven by the control - turn on makecontrol, promotet (translate), and promoter (rotate).
-
Configure the control shape in the Shape tab.
Transform driver control sits at the root of the joint chain
-
-
We now add a 2nd transform driver control,
tip, that sits at the position ofpoint_2, and drives the translation and rotation ofpoint_2. Now when theroottransform driver control is translated or rotated,point_2no longer moves because it is constrained to thetipcontrol:-
Click
beside the setups multiparm to add a new set of parameters for the
tipcontrol. -
In the Settings tab, turn on use_t, use_r, and use_s.
-
In the Driven tab, set driventransforms to
point_2. -
In the Control tab, set driver to
tip, and driverguide topoint_2. -
Turn on makecontrol, promotet, and promoter.
-
Configure the control shape in the Shape tab.
Transform driver controls at root and tip of joint chain -
-
When a transform driver control sits at a different position from the joint it is driving, the transform driver acts like a parent constraint - when the transform driver is rotated, the driven TransformObject and all its children rotate about the transform driver.
Transform driver sits at point_0 and drives point_1 Transform driver sits at point_0 and drives point_2 Transform driver sits at point_2 and drives point_1