| On this page |
|
Constraints allow you to constrain the transforms (translation, rotation, and scale) of one object (the driven) to another object (the driver).
In KineFX, you can create constraints using VOPs (VEX operators). To be able to set-up VOP constraints in your SOP network, you first need to create a
Rig Attribute VOP SOP node.
Notes
-
The majority of the constraints in KineFX operate on transform matrices.
-
You do not have to create a point in your scene for every transform you are going to use in your constraint network.
-
You can find example files at the bottom of the
Rig Attribute VOP SOP node doc that demonstrate the usages of these constraints in various SOP networks.
-
To keep things simple in this documentation page, the term object will be used in place of transform matrix.
Look At constraint 
The Look At constraint (also known as an aim constraint) lets you constrain the orientation of one object to the position of another object so that the driven object always points towards its driver object.
For example, you can use a Look At constraint to make the eyes of a character follow a ball flying through the air or a security camera follow a character through a scene.
To set up a Look At constraint, you need to use a combination of the following nodes:
-
A
Get Point Transform VOP node
-
A
Look At (KineFX) VOP node
-
A
Look At Constraint VOP node (for offsets and blending)
-
A
Set Point Transform VOP node
-
Any other
KineFX VOP nodes that are necessary to achieve the behavior you want to create.
You can use the Look At Axis parameter to specify which of the driven object’s axes is pointed towards the driver object, and the Up Axis parameter to set which of the driven object’s axes its up position is set to.
The Blend parameter on the Look At Constraint VOP node determines the strength of the driver objects' influence on their driven object, ranging from 0 (no effect) to 1.0 (fully apply the constraint). You can promote this parameter and use it to set or key the Look At Constraint’s strength. This is useful when you want the driven object to slightly deviate from the Look At follow behavior at certain times during an animation.
The Update Offset button on the Look At Constraint VOP node stashes the current transforms of the driver objects and the driven object and uses those to save a new starting position for the driven object. You can click this button anytime during the driven object’s animation to stash the current inputs as the rest or starting pose for the constraint. This is useful when you want to add just a little bit of difference to the Look At follow behavior. The Clear Offsets button resets any stored offset.
If you want to add offsets procedurally or manually to your constraint, then add an
Offset Transforms VOP node to your Look At Constraint network.
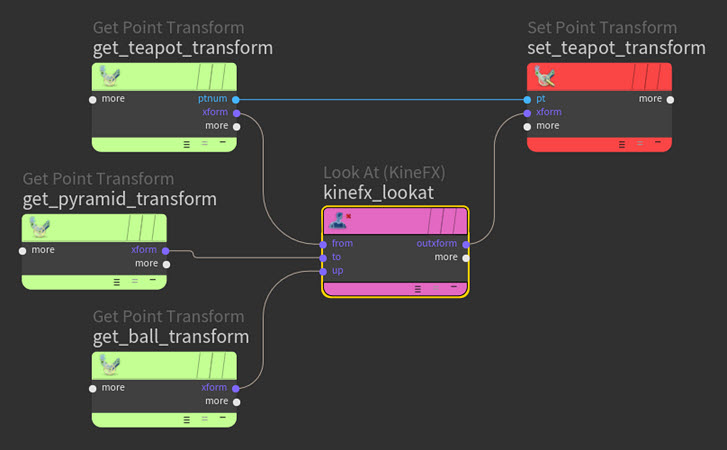
Example 1: Constraining the axis of a teapot primitive to look at a pyramid and ball primitive 
In this Look At (KineFX) VOP constraint example, the teapot primitive (driven object) looks at and follows the pyramid primitive (look at driver object) with its X-axis and its Y-axis points up towards the ball primitive (up driver object).
Example 2: Offsetting or blending a teapot primitive’s Look At constraint transforms 
In the Look At Constraint VOP example below, the teapot primitive (driven object) looks at and follows the pyramid primitive (look at driver object) with its X-axis and its Y-axis pointing up towards the ball primitive (up driver object), but the strength of the constraint varies.
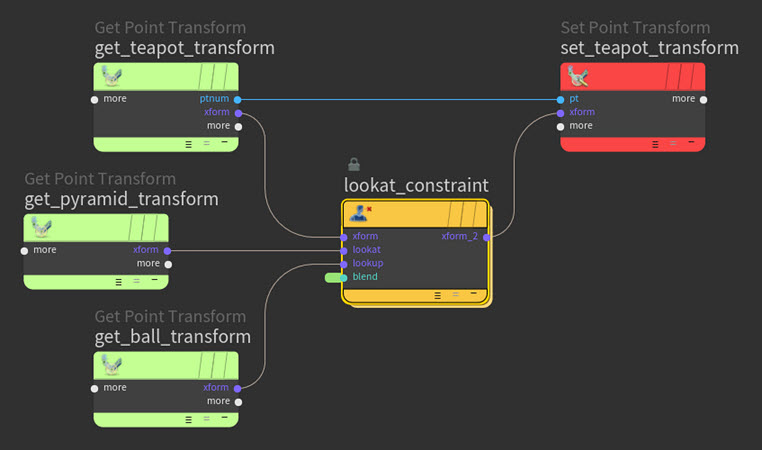
In the Look At Constraint VOP example below, the teapot primitive (driven object) looks at and follows the pyramid primitive (look at driver object) with its X-axis and its Y-axis points up towards the ball primitive (up driver object), but the driven object’s starting orientation and position are offset.
Parent constraint 
The Parent constraint lets you constrain one object to another so that the driven object behaves like the child of the driver object. This allows you to emulate a parent-child relationship between objects from different distinct hierarchies.
For example, you can use a Parent constraint to attach props to a character, like a top hat to a head or a parrot to a shoulder.
To create a Parent constraint, you need to use a combination of the following nodes:
-
A
Get Point Transform VOP node
-
A
Parent Constraint VOP node
-
A
Set Point Transform VOP node
-
Any other
KineFX VOP nodes that are necessary to achieve the behavior you want to create.
The Blend parameter on the Parent Constraint VOP node determines the strength of the driver object’s influence on its driven object, ranging from 0 (no effect) to 1.0 (fully apply the constraint). You can promote this parameter and use it to set or key the Parent Constraint’s strength.
The Update Offset button on the Parent Constraint VOP node stashes the current transforms of the driver object and parent object and then uses those to save a new starting position for the driven object. The Clear Offsets button resets the driven object’s start position to its original starting pose.
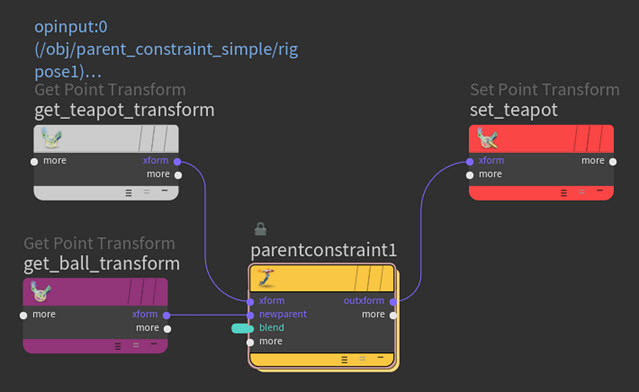
Example 1: Constraining an animated teapot primitive to an animated ball 
In this example, the teapot primitive (driven object) is parent constrained to the ball primitive (driver object).
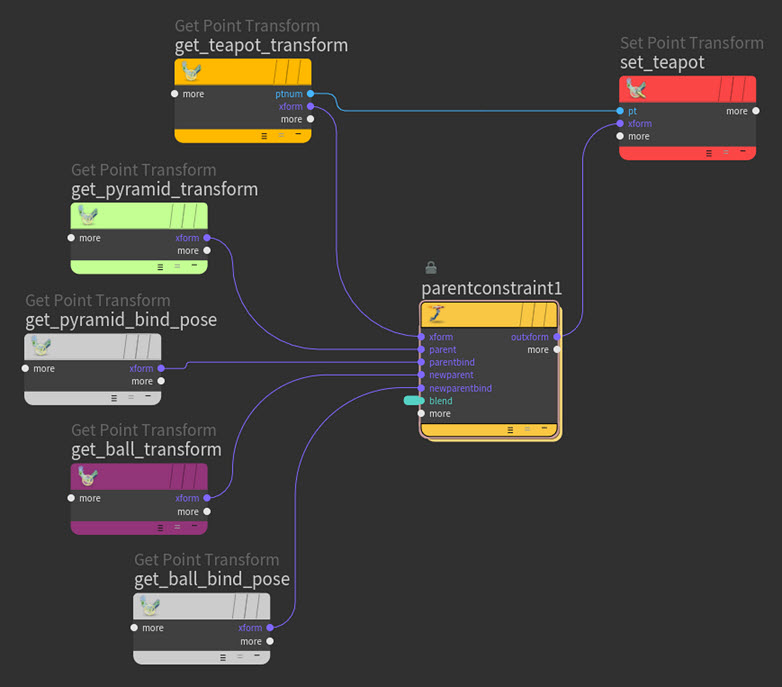
Example 2: Re-parenting an animated teapot primitive to a new parent 
In this example, the teapot (child) and pyramid (parent) primitives are part of a traditional joint hierarchy. The pyramid’s translation is animated in world space and the teapot’s rotation is animated in local space. The animated (translation and rotation) ball primitive (driver object) is the object we want to re-parent the teapot (driven object) to using the Parent constraint.
The bind poses for the pyramid and the ball define the start positions for the constraint and the offsets between the old parent (the pyramid) and the new parent (ball).
Path constraint 
The Path constraint (also known as a tangent constraint) lets you constrain an object to a position along a curve so that the driven object has to follow the driver position along the curve’s path. This allows you to drive the motion of an object through a scene with a position along a path.
For example, you can use a Path constraint to direct a roller coaster, train, car, or running character along a specific route through a scene.
To create a Path constraint, you need to use a combination of the following nodes:
-
A
Transform From Path VOP node
-
A
Set Point Transform VOP node
-
Any other
KineFX VOP nodes that are necessary to achieve the behavior you want to create.
The the Curve Position parameter on the Transform From Path VOP node determines the driven object’s position along the constraint’s curve. You can promote this parameter and use it to animate the driven object’s position along its path.
If you want to offset the driven object so that it points down the curve in a specific way, then you can add an
Offset Transforms VOP node to your Path constraint network.
Example 1: Constraining a teapot primitive so that it follows a curve’s path 

Example 2: Offsetting a path constrained teapot primitive so that its spout points down the curve’s path 

Surface constraint 
The Surface constraint (also known as a geometry constraint) lets you constrain one object to the surface of another object so that the driven object moves with the driver object’s surface as it deforms or the driven object respects the surface topology of the driver object when it is animated to traverse it.
For example, you can use a Surface constraint to affix a saddle to a horse, have a walking character respect the topology of the terrain it is walking over, or make an eyelid slide over an eyeball.
To set-up a Surface constraint, you need to use a combination of the following nodes:
-
A
Transform From Surface VOP node
-
A
Set Point Transform VOP node
-
A
Blend Transforms VOP node
-
Any other
KineFX VOP nodes that are necessary to achieve the behavior you want to create.
The Primitive Number and UV Position parameters on the Transform From Surface VOP node determine which primitive on the driver surface to attach the driven object to.
The Bias parameter on the Surface Constraint VOP node determines the strength of the driver object’s influence on its driven object, ranging from 0 (no effect) to 1.0 (fully apply the constraint). You can promote this parameter and use it to set or key the Surface Constraint’s strength.
Example 1: Attaching a teapot primitive to a specific primitive on Flip’s surface 
In this example, the teapot (driven) is attached to a specific Primitive Number (driver) on the surface of the Flip model.
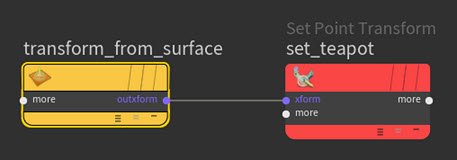
Example 2: Attaching a teapot primitive to the nearest primitive on Flip’s surface 
In the example below, the teapot (driven object) is attached to a primitive (driver object) on the animated Flip model by looking at the input teapot pose, finding the nearest primitive on the driver surface (rest flip), and then using that to set the Primitive Number and UV Position parameters on the animated Flip.

In the example below, the
Blend Transforms VOP node adds a bias to the Surface constraint. The Bias parameter is keyed so that the teapot appears to be drawn to Flip and then attach itself to the nearest primitive on Flip’s surface.

Blend transforms constraint 
The Blend Transforms constraint lets you blend the full transforms (translation, rotation, and/or scale) between objects (like one object to another object or one object between two objects) and mask out any unwanted translations, rotations, or scales. This is useful when you want to blend the translation of one object to another, but have the object keep its own rotations and scale.
For example, you can use a Blend Transforms constraint to blend the translations between a prop and the hands of the character that is carrying it so that the prop sits equidistant between the character’s two hands.
To set-up a Blend Transforms constraint, you need to use a combination of the following nodes:
-
A
Get Point Transform VOP node
-
A
Blend Transforms VOP node
-
A
Set Point Transform VOP node
-
Any other
KineFX VOP nodes that are necessary to achieve the behavior you want to create.
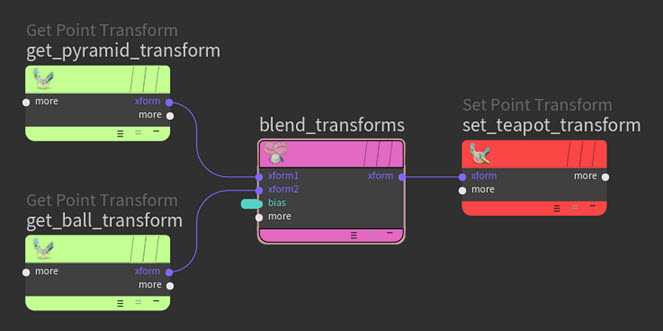
The Blend Transforms VOP node’s inputs are the driver objects and its output is the driven object.
The Bias parameter on the Blend Transforms VOP node determines the strength of the driver objects' influence on their driven object, ranging from 0 (no effect) to 1.0 (fully apply the constraint). You can promote this parameter and use it to set or key the Blend Transforms constraint’s strength.
If you want to add an offset to the constraint, then add an
Offset Transforms VOP node to your constraint’s network.
If you want to have certain transforms blend at specific times, then you need to create an individual Blend Transforms VOP node for each transform (translation, rotation, scale) and then set or key their values using the Bias parameter. If you want to blend the scale transform, then you may also need to add a
Compliment VOP node to your constraint network depending on the behavior you are looking for. The Compliment VOP node inverts the scale values that are written to the driven object’s transforms.
Example: Blending the transforms of an animated teapot primitive between a pyramid and a sphere 
In this example, the Blend Transforms constraint looks at the transforms from the pyramid (first input driver object) and the ball (second input driver object) and then writes out those values to the transforms of the teapot (driven object).
| See also |