| On this page |
|
Overview 
KineFX is Houdini’s rigging and animation character toolset that allows users to create and edit characters at the geometry (SOP) level. You can create your own KineFX characters from scratch, or use special KineFX SOPs and regular Houdini SOPs to edit imported characters and animation. The main areas of KineFX are rigging & animation, and animation retargeting.
Rigging and animation 
You can import characters into your network, or create the elements of a character (skeleton, geometry capture weights, rig) all at the SOP level. The character elements can be assembled into a character, and multiple characters can then be added to an animation scene that is input into Houdini’s viewport animation environment, the animate state.
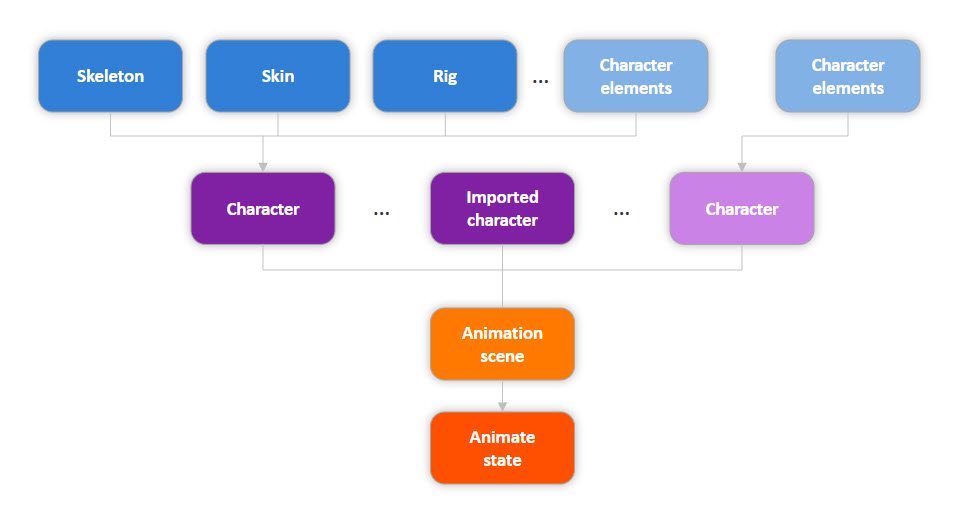
KineFX is built on the principles of procedural rigging, which allow you to quickly make iterations on your rigs, and experiment non-destructively. Rigging in KineFX is driven by APEX, a graph evaluation framework where character rigs are represented using APEX graphs.
KineFX is the umbrella term for Houdini’s SOP-based character toolset, and APEX is the rigging engine that runs underneath it. KineFX makes use of APEX, with some of KineFX’s infrastructure driven by APEX graph evaluation.
Animation retargeting 
Retargeting is the process of taking animation from one character and transferring it to another. KineFX’s flexibility and robustness allows it to handle different morphologies and hierarchical structures between source and target characters. The available tools within the retargeting workflow allow you to make changes to your character and animation using motion capture data, secondary motion effects, and MotionClips.

Character elements 
Creating and preparing a skeleton for rigging 
A character’s skeleton is represented at the geometry level by a collection of points connected by polygon lines. KineFX’s joint-based system allows a character’s joint hierarchy to be created and edited in various ways using SOP nodes. See working with skeletons for more information.
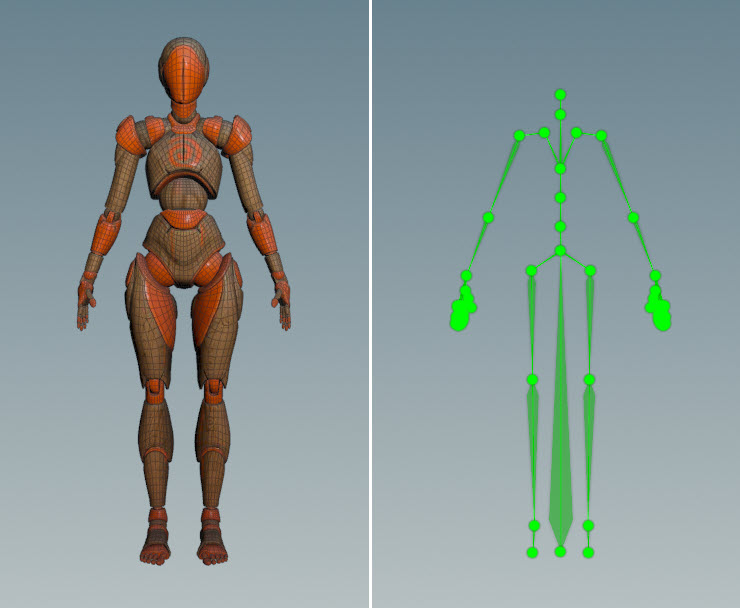
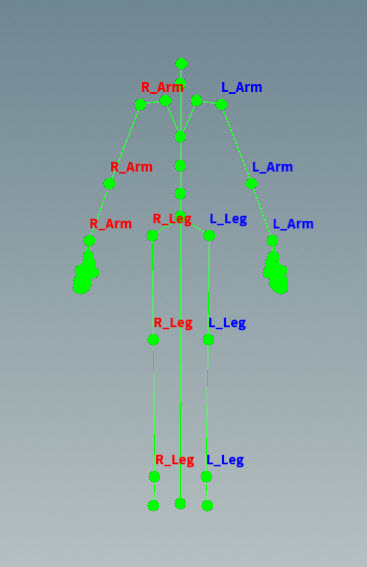
To prepare a skeleton for rigging, extra information can be added to a character’s base skeleton to create a reference skeleton, called a guide skeleton. The information on the guide skeleton is then picked up by rig components downstream to build up the rig functionality of the character. Some of the information that could be added are:
-
Extra joints that are used as a reference for creating controls on the rig.
-
Tags (labels) that identify groups of joints.
-
Properties that set information on the guide skeleton’s joints.
See preparing skeletons for rigging for more information on how to create a guide skeleton.
Creating capture weights on geometry 
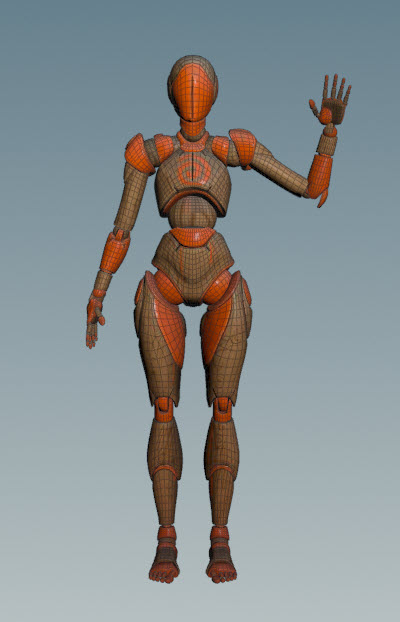
Once we have a character’s skeleton and skin, we can use skin capture to create weights on the geometry for skin deformation. When the joints move, the geometry is deformed according to the capture weights and position of the joints. See skin capture for the different SOPs that are available for creating and modifying capture weights.
Procedural rigging 
Rigging in KineFX is driven by APEX (All-Purpose EXecution), a graph evaluation framework that builds and runs character rigs. In APEX, character rigs are represented using APEX graphs.
A bit of background 
Pre-Houdini 20, a character’s rig logic lived in rig behavior nodes (like the Rig Pose SOP) and was also evaluated on those nodes. This meant that once we came to the point in the network that determined how a rig behaved, this functionality had to be evaluated at that exact place in the network, i.e. the rig logic and rig evaluation were tied together.
In the example below, we have a pre-Houdini 20 rigging setup where a tube geometry is being deformed. The character elements are set up by creating the tube geometry, skeleton, and capture weights on the geometry. On the Rig Pose SOP, the pose of the skeleton can be manipulated (the skeleton deformed), and animation can be added by setting keyframes. The Rig Pose SOP then evaluates the skeleton deformation and animation, and the result of this evaluation is piped into the Bone Deform SOP, where another evaluation is performed and the geometry is deformed.
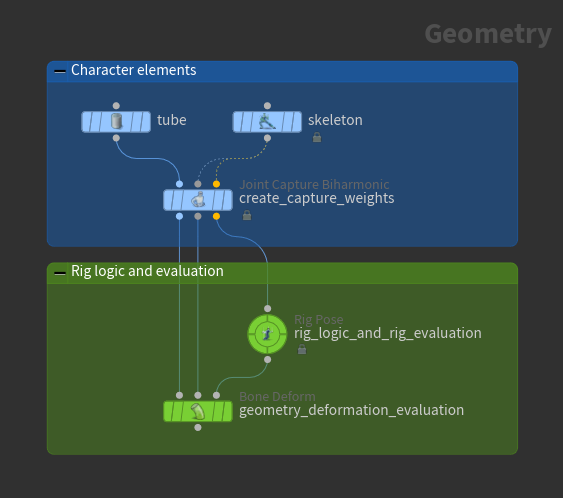
There are a few issues with this approach:
-
To deform the geometry on the skeleton, there are two evaluation steps - one on the Rig Pose SOP and another on the Bone Deform SOP, and there is an evaluation dependency between the two.
-
The rig logic and rig evaluation are tied together. Whenever you change the pose of the skeleton on the Rig Pose SOP, this change is evaluated.
-
The animation (on the Rig Pose SOP) and the deformed result (on the Bone Deform SOP) must be viewed on different nodes.
Rigging with APEX 
With the introduction of APEX in Houdini 20, we still have the same steps for assembling and preparing the character elements, but APEX graphs are now used as the rig logic representation:
Pre-Houdini 20 |
Houdini 20 |
|
|---|---|---|
Preparing and assembling character elements |
Same as pre-Houdini 20 |
|
Rig logic |
Rig behavior nodes (for example, |
APEX graphs |
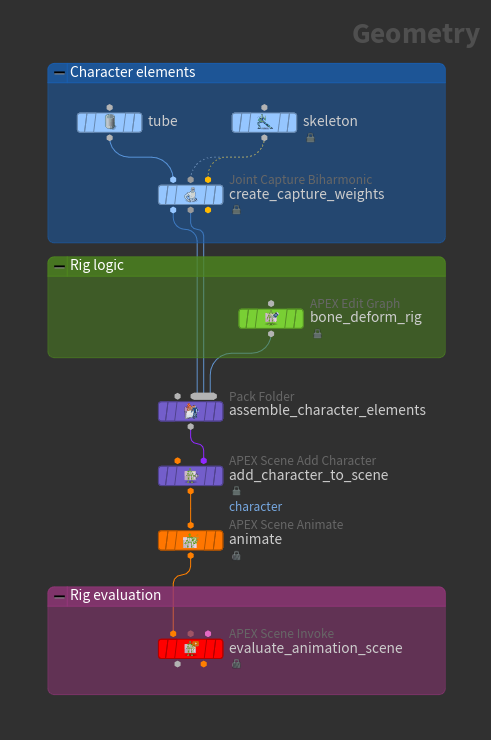
The example below shows one workflow of rigging with APEX, where the rig logic is in the APEX graph in the APEX Edit Graph SOP, and the rig is evaluated further down in the
APEX Scene Invoke SOP. In this way, users can procedurally build and assemble pieces of the rig, and choose to evaluate the final rig at a later point in the network. This idea of delayed evaluation allows the rig logic and rig evaluation to be decoupled, resulting in significant performance improvements.
Building rigs in APEX 
There are several ways to build your character rig in APEX, and these different methods can be combined to construct your final rig:
Drop down and connect graph nodes in the APEX UI |
The APEX network view is the UI where you can put down APEX graph nodes and manually connect them to build a graph. For more information on how to do this, start with the APEX graph basics page, then go through the graph examples for numerical operations, viewport animation, and geometry deformation. |
Use the APEX Script code interface |
APEX Script is a code interface that uses a Python-like syntax to generate APEX graphs. APEX Script snippets can be written in the APEX Script SOP, |
Use pre-built rig components |
Stay in the SOP network and use pre-built rig components to automatically build parts of the rig as APEX graphs under the hood. These rig components are available from the |
Rigging documentation 
Below is a snapshot of the rigging documentation:
Rigging with APEX graphs 
-
The APEX graph basics page describes the elements that make up an APEX graph, and how to manually create graphs in the APEX network view.
-
The APEX Script basics page gives an introduction to APEX Script with some simple examples.
-
Graphs for numerical operations gives step-by-step instructions on how to create and execute APEX graphs for numerical operations like adding two values, fetching multiple results, and retrieving information from geometry.
-
Graphs for viewport animation describes how APEX graphs are used to build some of the functionality in Houdini’s animation environment, including creating controls and constraints, and defining joint hierarchies.
-
Graphs for deforming geometry shows the APEX graph nodes that are used to deform a simple 3-joint tube geometry.
-
Various types of metadata are available on APEX graph elements, including tags, properties, and attributes.
-
The APEX path pattern syntax is a set of rules that allow you to filter and select specific elements within APEX graphs and the packed character format. APEX Script and the pre-built rig components make use of APEX path patterns.
-
See the full list of APEX graph nodes here.
Building graphs with APEX Script 
-
Working with graphs shows how to use APEX Script to access and manipulate graph elements, add graph logic directly into another graph, and invoke other graphs from within a graph.
-
Create your own functions in APEX Script or use the built-in APEX functions within your code snippet. APEX Script also provides convenient name mappings for some of the built-in APEX functions.
-
The APEX Script language reference describes the syntax and language elements of APEX Script, including the provided types, operations, and statements.
Rigging with rig components 
-
Learn how to use Houdini’s pre-built rig components to rig a 3-joint tube geometry.
-
Use pre-built rig components to build up a rig for a character.
-
See the list of available pre-built rig components here.
Assembling character data for animation 
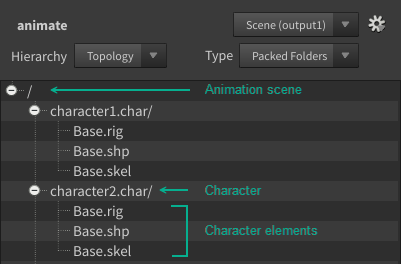
Once we have the elements of a character, we can assemble them into the packed character format, a way of bundling and organizing character data for Houdini’s animation environment. The packed character format is organized into a folder structure similar to a directory structure on disk.
The character folder structure consists of three levels of data containers - the animation scene, the characters, and the character elements. The character elements are added to a character container to build up a character, and characters are added to a scene container to assemble an animation scene. The animation scene is then passed to the animate state for viewport animation.
Only data in the packed character format can be displayed in the animate state. Some of the character elements in the packed character format have special extensions (for example, .skel, shp, .rig) that are picked up by the animate state to assemble the animation scene.
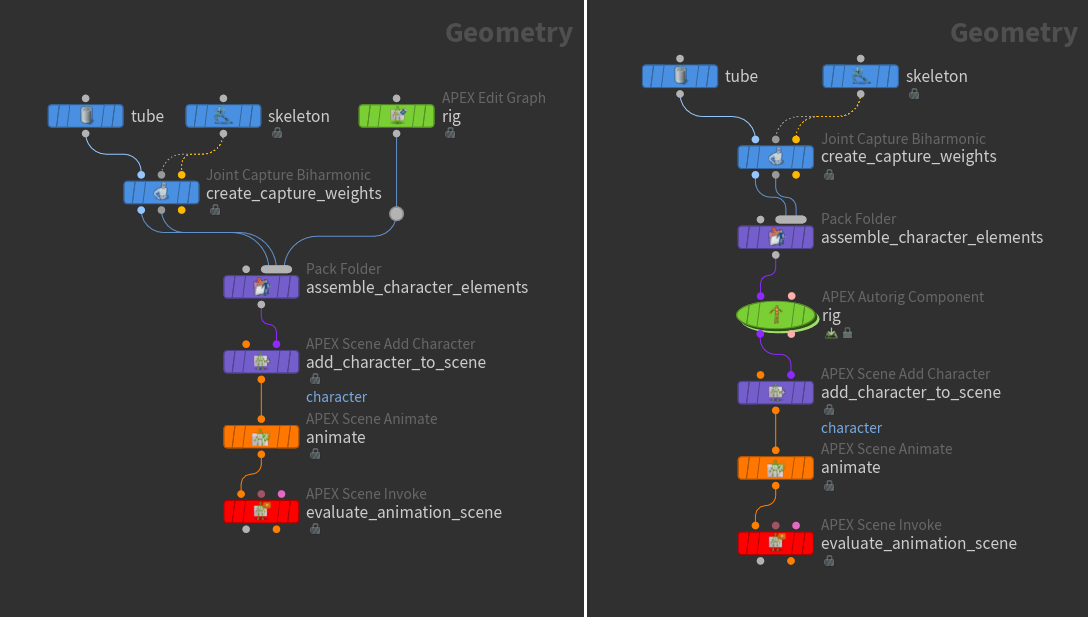
Depending on how you choose to build your character rig, the rig may be added to the packed character format using either the Pack Folder SOP or one of the rig component SOPs:
Animation 
Viewport animation 
Viewport animation is performed in the animate state, a viewer state in the APEX Scene Animate SOP that can display multiple characters, and allow users to perform posing such as FK or IK for characters, interact with character controls, and add constraints between characters. Functionality like physics-based motion and ragdoll can also be applied to animation within the animate state.
The input to the animate state is an animation scene in the packed character format. The animate state picks up the character elements in the packed character format (identified with special extensions) and uses them to build a scene for animation in the viewport.
Viewport animation documentation 
Below is a snapshot of the viewport animation pages:
-
The animation workflow page shows how to add characters and animation to a scene, transfer animation to characters through motion retargeting, and play back scene animation.
-
Learn how to work in the animate state, including using the transform handle to pose characters, and setting various configurations through the available menus and HUDs.
-
Several tools are available in the animate state to aid in posing characters, manipulating the motion paths of controls, and adding constraints, dynamic motion, and ragdoll simulations to your animation.
-
A quick reference for the hotkeys in the animate state is provided here.
-
In the animate state, character controls are organized into groups called selection sets. These sets can be used to select, hide, pin, and isolate groups of controls for easy management of control selection and visibility.
-
Animation layers allow users to create multiple “levels” or “layers” of animation without affecting the original animation.
-
The animation toolbar is a customizable toolbar consisting of simple slider tools that help improve the animation workflow by quickly creating breakdown poses or easily applying modifications to animation controls and curves.
SOP-based animation 
With SOP-based animation, you can put motion onto your character by building up a network using special SOP nodes. Characters do not need to be assembled into the packed character format for animation in the SOP network editor:
-
Apply realistic-looking projectile and pendulum motion using physics-based motion.
-
Apply ragdoll simulations to your character.
Animation retargeting 
The following pages provide information on different aspects of the retargeting process, including importing data into KineFX, editing and adding effects to your character and animation, and exporting the final result:
-
Import animation and character data from various sources, including motion capture, Crowds, Solaris, and FBX.
-
Transfer animation from one character to another and refine the retarget results.
-
Tweak the imported animation and add some of your own animation on top of the source animation.
-
Work with motion capture data in your retargeting network.
-
Add secondary motion effects to your characters.
-
Use MotionClips to view and edit animation.
-
Export the animation and character data after you have finished retargeting.